Sunbeam 6960-33, User Manual
The Sunbeam 6960-33 User Manual is a comprehensive guide designed to assist users in making the most out of their product. This free manual can be easily downloaded from manualshive.com, providing step-by-step instructions and essential information needed to maximize functionality and performance.
Share
Download


Reviews:
No comments
Related manuals for 6960-33

R220
Brand: Omcan Pages: 12

G92T
Brand: Bunn Pages: 2

NEW SZ
Brand: SEGAFREDO Pages: 86

Lady Anne
Brand: knIndustrie Pages: 2

CARRARA 2763CH
Brand: Rotel Pages: 105

UCNP115
Brand: U-Line Pages: 51

USK CM 32764
Brand: Kalorik Pages: 24

MCIM30TW
Brand: Magic Chef Pages: 20

E-Cool Wall B
Brand: EOS Pages: 58
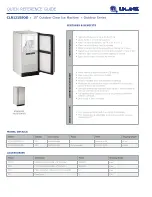
CLR1215SOD
Brand: U-Line Pages: 2

Zespresso Cafe ZES 200
Brand: Zepter Pages: 80

IMPRESSA XS90 ONE TOUCH
Brand: Jura Pages: 12

Baker's Select ABM6200
Brand: Welbilt Pages: 15

HR2357
Brand: Philips Pages: 7

HR235705
Brand: Philips Pages: 9

HR2375/00
Brand: Philips Pages: 23

HR2357/06
Brand: Philips Pages: 52

HR2358/06
Brand: Philips Pages: 60


