

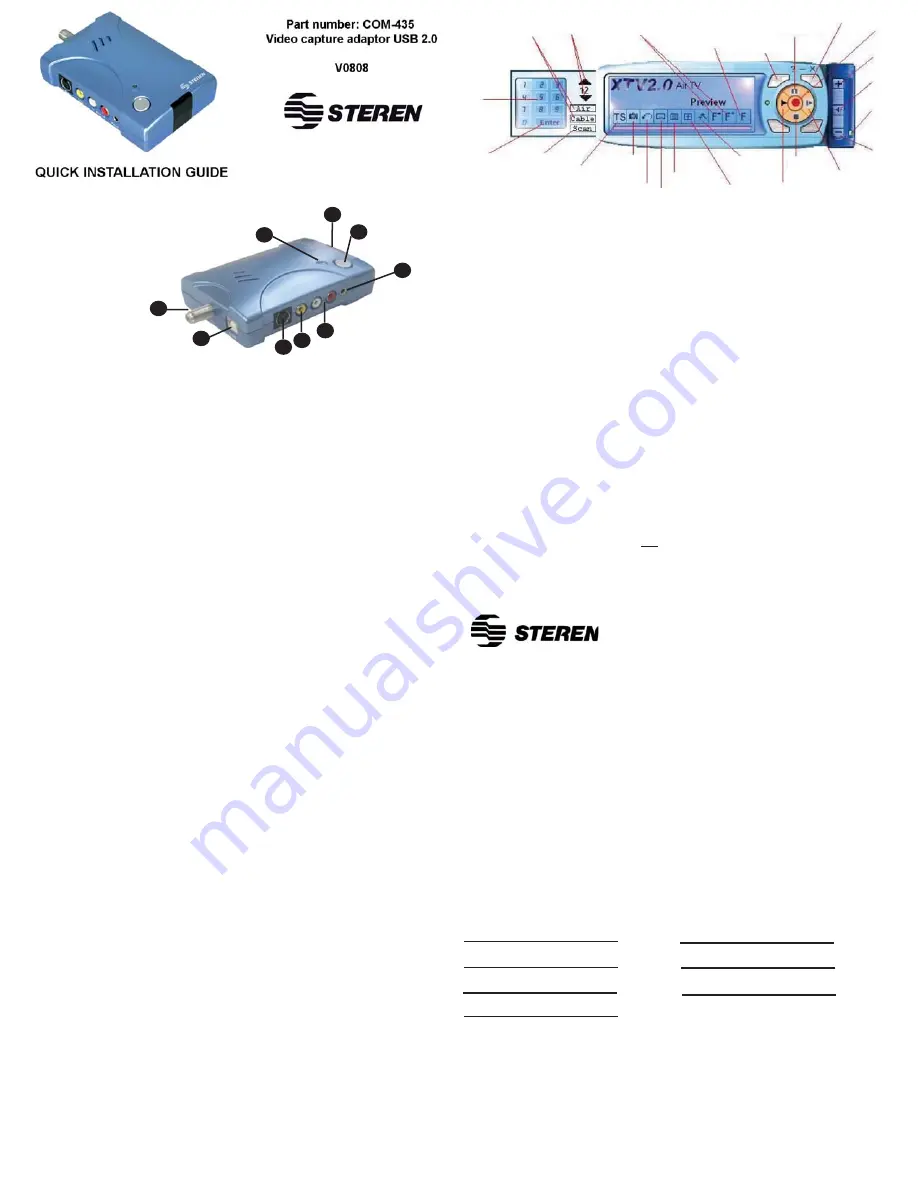
1.- S-Video Input
2.- RCA video input
3.- Audio Input
4.- Audio Output
5.- Infrared Sensor
6.- RF input
7.- USB connector
8.- Fixed Image
9.- Use indicator
DRIVER INSTALLATION (XP)
Make sure to install the drivers before to connect the TV adaptor to the
computer.
1.- Place the installation CD into the CD-ROM
2.- A window with options will automatically appear. Select the “open folder”
option in order to view the files.
3.- Locate the SETUP.EXE file which is in the Driver folder and run it.
4.- In the welcome screen, click NEXT in order to get the installation to begin.
5.- Once the necessary files have been copied, press Finish in order to close the
window.
6.- You must restart the computer to finalize the process. Select Yes I want to
restart my computer now.
7.- After the computer have been restarted, the driver are correctly installed.
SOFTWARE INSTALLATION
1.- Locate the SETUP file which is in the AP folder and run it.
2.- Select language installation.
3.- Select the country where you are, then click Set to continue.
5.- A new window appear. Click YES to install Windows Media Format 9
6.- Read the license agreement and press YES in order to begin the installation.
7.- On the following screens only press OK in order to close the installation
window.
8.- In the welcome screen, click Next.
9.- On the next screen select “Complete” for a full installation. NEXT subsequently
choose to continue.
10.- Select the destination location and click Finish to begin the installation
process.
11.- Press OK in order to close the installation window.
12.- Press FINISH in order to close the window.
In the following two windows, select the NOT NOW option and INSTALL
SOFTWARE AUTOMATICALLY option making sure to press NEXT after each
option in order to continue. This process will install the audio driver.
13.- In the next two windows, select Not at this moment and Install Software
Automatically (recommended) options, be sure to click Next in both windows to
continue. This process will install the audio driver.
14.- If a warning message displays in the screen, only click OK to continue.
15.- Click Finish to close the window.
16.- You must restart the computer to conclude the process.
In order to verify that the installation was processed correctly, open the
device manager, which is located in the control panel / system / hardware. A
new device will appear in the sound device section, video device, and
games device.
USING YOUR USB CAPTURE ADAPTOR FOR THE FIRST TIME
Before using your new USB synthesizer for the first time, it is necessary to create a
“bridge” between the COM-435 and audio card on your computer. To do this simply
connect a 3.5 mm cable from the audio output on your COM-435 (Aout) to the audio
input on your audio card (AUDIO IN). This way you will be able to listen to the TV
programs on your speakers (Only in Windows 2000).
In order to use your video capture adaptor on your computer, follow these steps:
1.- Connect a television antenna in the RF jack on your adaptor.
2.- Connect the USB cable to the computer.
3.- Connect speakers to the audio output.
4.- Run the XTV 2.0 Program.
5.- The use control and the main window will be displayed.
6.- You can now watch your favorite TV channel.
You can choose between 4 resolutions:
In NTSC mode: 352 x 240, 640 x 480, 720 x 480, Full Screen
In PAL mode: 352 x 288, 640 x 480, 720 x 576, Full Screen
Channel input
This option allows you to select a channel, directly. Remember, after select the number of the
required channel, you must press ENTER to confirm it.
Options
Use this menu to configure the next parameters:
General Settings
Encoder Property
Color
TV Tuner
ESPECIFICACIONES
Video Input:
RCA composite video, S-Video, coaxial
Audio Input:
Two RCA inputs
Audio Output:
In Windows XP, output through USB.
In Windows 2000, output through sound card
System:
NTSC, PAL, and SECAM
Movement Capture:
MPEG and AVI formats up to 720 x 480 for NTSC
720 x 576 for PAL
Still image format:
BMP / JPG
Still image resolution:
720 x 480 in NTSC format and 720 x 576 in PAL
Performance:
Up to 30 fps for NTSC and up to 25 fps for PAL
Input:
5V - - - through USB port
Product design and specifications are subject to change without previous notice
WARRANTY
This Steren product is warranted under normal usage against defects in workmanship and
materials to the original purchaser for one year from the date of purchase.
CONDITIONS
1.- This warranty card with all the required information, invoice or purchase ticket, product box
or package, and product, must be presented when warranty service is required.
2.- If the product stills on the warranty time, the company will repair it free of charge.
3.- The repairing time will not exceed 30 natural days, from the day the claim was received.
4.- Steren sell parts, components, consumables and accessories to customer, as well as
warranty service, at any of the addresses mentioned later.
THIS WARRANTY IS VOID IN THE NEXT CASES:
If the product has been damaged by an accident, acts of God, mishandling, leaky batteries,
failure to follow enclosed instructions, improper repair by unauthorized personnel, improper
safe keeping, among others.
a) The consumer can also claim the warranty service in the purchase establishment.
b) If you lose the warranty card, we can reissue it, if you show the invoice or purchase ticket.
RETAILER INFORMATION
Name of the retailer Part number
Brand
Address
Serial number
Product
Date of delivery
In case your product fails or have questions, please contact your nearest dealer. If you are in
Mexico, please give a call to our Call Center. 01 800 500 9000
1
2
3
4
5
8
9
6
7
1
2
3
4
5
6
7
8
9
Air / Cable
selection
Channel
up / down
Add / Delete
Channels
Favourite
Channel
Switch
Backward
Play / Pause
Forward
Record
Volume -
Volume
Adjustment
Mute
Continue
Playback
Stop
Playback
Options
Channel
Preview
Schedule
recording
Video
source
select
Last channel
Snapshot
Time
Shift
Auto Scan
Channel
Confirm
Channel
Product: Video capture adaptor USB 2.0
Part number.: COM-435
Brand: Steren


