background image

Manual Revision: 04/12/2019

User Manual

For the latest information and specifications visit 

www.startech.com/WALLSTSI2

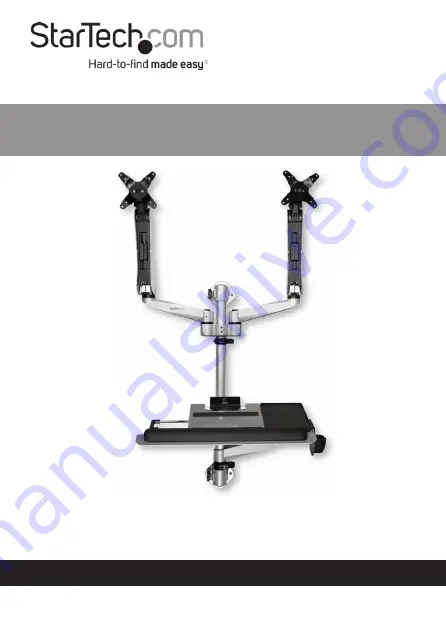
Wall-Mounted Sit-Stand Workstation | 

Dual Monitor Mount | Keyboard Tray

SKU#: 

WALLSTSI2

Actual product may vary from photos

Summary of Contents for WALLSTSI2

Page 1: ...4 12 2019 User Manual For the latest information and specifications visit www startech com WALLSTSI2 Wall Mounted Sit Stand Workstation Dual Monitor Mount Keyboard Tray SKU WALLSTSI2 Actual product may vary from photos ...

Page 2: ...StarTech com Where they occur these references are for illustrative purposes only and do not represent an endorsement of a product or service by StarTech com or an endorsement of the product s to which this manual applies by the third party company in question Regardless of any direct acknowledgement elsewhere in the body of this document StarTech com hereby acknowledges that all trademarks regist...

Page 3: ...structions Ne dépassez pas la capacité pondérale du produit Une surcharge du produit peut entraîner des blessures ou des dommages matériels Ce produit peut supporter 20 5 kg Ce produit est uniquement destiné à une utilisation en intérieur et ne doit pas être utilisé à l extérieur Warnhinweise Beachten Sie bei der Montage dieses Produkts die Montageanweisungen Überschreiten Sie nicht die Tragkraft ...

Page 4: ... las instrucciones Asegúrese de no exceder la capacidad de peso de este producto La sobrecarga de este producto puede causar lesiones personales o daños en la propiedad Este producto tiene capicidad para el siguiente peso 20 5 kg El uso de este producto es solo para interiores y no debe utilizarse en exteriores Waarschuwingen Zorg dat u dit product volgens de instructies in elkaar zet Overschrijd ...

Page 5: ...t doivent être placés et acheminés de façon à éviter tout risque électrique de chute ou de sécurité 安全対策 ケーブル 電源ケーブルと充電ケーブルを含む は 適切な配置と引き回し を行い 電気障害やつまづきの危険性など 安全上のリスクを回避するよう にしてください Misure di sicurezza I cavi inclusi i cavi di alimentazione e di ricarica devono essere posizionati e stesi in modo da evitare pericoli di inciampo rischi di scosse elettriche o pericoli per la sicurezza Säkerhetsåtgär...

Page 6: ...ion 8 Product Information 9 Specifications 9 Package Content 10 Requirements 11 Installation 12 Mounting the Sit Stand Workstation 12 Attaching the Mouse Pad 17 Attaching the Wrist Rest 18 Attaching the Rubber Strips 18 Attaching the Hook and Loop Strip 19 Attaching the Keyboard Tray 20 Attaching a Monitor 22 Attaching the Monitor Mount 23 Adjusting the Monitor Tilt 26 Adjusting the Spring Arm Ten...

Page 7: ...l drawings and more visit www startech com support Product Diagram 1 Monitor Mount 6 Cable Management Clip 2 Spring Arm 7 Wall Mount Bracket 3 Swivel Arm 8 Keyboard Tray 4 Monitor Shoulder 9 Mouse Pad 5 Aluminum Pole 10 Mouse Holder 1 2 3 5 6 8 7 4 9 10 ...

Page 8: ...7 To view manuals videos drivers downloads technical drawings and more visit www startech com support Product Dimensions ...

Page 9: ...8 To view manuals videos drivers downloads technical drawings and more visit www startech com support Product Rotation ...

Page 10: ...ownloads technical drawings and more visit www startech com support Product Information Specifications Type of measurement Measurement VESA mounting hole pattern 75x75 100x100 Tilt 900 to 150 Screen size Maximum 762 mm 30 in Rotate 3600 ...

Page 11: ... Wall Mount Bracket x 1 Wall Mount Bracket w Lock Plate x 1 Spring Arms x 2 Swivel Arms w Logo x 2 Swivel Arms x 2 Monitor Mounts x 2 Wall Screws x 4 Wall Screw Anchors x 4 Hand Screws x 8 Keyboard Tray x 1 Cable Management Clips x 3 Wrist Rest x 1 Mouse Holder x 1 Mouse Tray x 1 Mouse Tray Fixed Plate x 1 Hook and Loop Strip x 1 Anti Slip Rubber Strips x 2 ...

Page 12: ...al drawings and more visit www startech com support M3 Hex Key x 1 M6 Hex Key x 1 M4x8 mm Screws x 2 EVA Mouse Pad x 1 Monitor Shoulder x 1 User Manual x 1 Requirements Phillips Head Screwdriver x 1 Drill with Drill Bit x 1 Writing Utensil x 1 Level x 1 ...

Page 13: ...and mounting hardware that you re using will properly support the mounted equipment Failure to do so may result in personal injury and or equipment damage 1 Before installing the Sit Stand Workstation onto the mounting surface contact a professional contractor 2 After consulting a professional the Sit Stand Workstation can be mounted using the Mounting Hardware included 3 Using two of the Wall Scr...

Page 14: ...he Aluminum Pole in place by tightening the Adjustment Knob on the Wall Mount Bracket 8 Slide one of the Cable Management Clips onto the Aluminum Pole sliding the Cable Management Clip to the bottom of the Aluminum Pole 9 Use the Adjustment Clip to tighten or loosen the tension of the Cable Management Clip Note You do not need to hold the nut of the other side of the Cable Management Clip while ti...

Page 15: ...ip to the Aluminum Pole 11 Slide one of the Swivel Arms onto the bottom of the Aluminum Pole so that it is resting on the Cable Management Clip Installing the Swivel Arm 12 Tighten the Swivel Arm using the Adjustment Screw located on the side of the Swivel Arm Be careful not to over tighten the Swivel Arm The Swivel Arm should be secure but free enough to rotate 13 Repeat steps 8 10 to install the...

Page 16: ...n the Monitor Shoulder are facing forward 15 Using a Hex Key tighten the two Hex Screws on the Monitor Shoulder Be careful not to over tighten the Monitor Shoulder Installing the Monitor Shoulder Cable Management Clip 16 If required the third Cable Management Clip can be installed on the Aluminum Pole 17 Slide the top Wall Bracket over the Aluminum Pole 18 Using two of the Wall Screws mount the to...

Page 17: ...Secure the Aluminum Pole in place by tightening the Adjustment Knob on the Wall Mount Bracket Installing the Top Wall Mount Bracket 20 Insert the decorative plug into the bottom of the Aluminum Pole Make sure to align the notch on the decorative plug with the Bottom Lock Plate Inserting the Decorative Plug ...

Page 18: ...position the Mouse Tray 2 Align the Mouse Tray with the two metal prongs on either side of the Keyboard Tray Aligning the Mouse Tray with the Metal Prongs 3 While holding the Mouse Tray in place turn the Keyboard Tray over 4 Align the screw holes on the Mouse Tray Fixed Plate with the screw holes on the bottom of the Mouse Tray Aligning the Mouse Tray Fixed Plate with the Mouse Tray ...

Page 19: ...e Mouse Holder off of the side of the Mouse Tray Hanging the Mouse Holder off of the side of the Mouse Tray Attaching the Wrist Rest Remove the backing from the Wrist Rest and while applying pressure attach it to the bottom of the Keyboard Tray in the location your wrists wound normally rest while typing on a keyboard Attaching the Rubber Strips 1 Remove the backing from both of the Rubber Strips ...

Page 20: ...e Keyboard in place on the Keyboard Tray 1 If necessary cut the Hook and Loop Strip to fit the length of your keyboard 2 Separate the two sides of the Hook and Loop Strip 3 Remove the backing from both of the Hook and Loop Strips and while applying pressure fix one strip to the top of the Keyboard Tray and the other strip on the bottom of the Keyboard making sure to align the two strips ...

Page 21: ...oard Tray 1 Align the Mounting Hole on the third Swivel Arm with the Mounting Peg on the bottom Swivel Arm 2 Slide the Mounting Hole on the Swivel Arm over the Mounting Peg until it clicks in place Attaching the Swivel Arm to the Mounting Peg 3 Using the Hex Key included tighten the Hex Screw on the side of the Swivel Arm ...

Page 22: ...g on the Swivel Arm that was attached in step 2 Slide the Mounting Hole on the Keyboard Tray over the Mounting Peg until it clicks in place Attaching the Keyboard Tray 5 Using the Hex Key tighten the Hex Screw on the side of the Keyboard Tray next to the mounting hole Do not over tighten to allow for keyboard swivel Note The Keyboard Tray supports up to a maximum 2 5 kg ...

Page 23: ...nce while you re tightening the screws stop tightening Failure to do so could result in damage to the monitor 4 Repeat steps 1 3 to attached the second Monitor Attaching the Monitor Mount Note Attaching the Monitor Mount may require two people The Monitor Mounts can support up to a maximum of 9 kg per mount 1 Align the Mounting Hole on the Swivel Arm w Logo with the Mounting Peg on the top of the ...

Page 24: ...w manuals videos drivers downloads technical drawings and more visit www startech com support 4 Slide the Mounting Hole on the Spring Arm over the Mounting Peg until it clicks into place Attaching the Spring Arm ...

Page 25: ...itor Mount with the Mounting Peg on the top Spring Arm 6 Slide the Mounting Hole on the Monitor Mount over the Mounting Peg until it clicks into place Attaching the Monitor Mount 7 Using the Hex Keys adjust the swivel tension of the Monitor Mount by loosening or tightening the Hex Screws located on the Monitor Mount next to the mount hole 8 Repeat steps 1 7 to attach the second Monitor Mount ...

Page 26: ...ex Screw on the side of the Monitor Mount until the tension can hold the weight of the Monitor but it is still adjustable Note The screw cap located on the opposite side of the Hex Screw is not used for tilt adjustments Adjusting the Spring Arm Tension Using the large Hex Key adjust the tension of the Spring Arm by loosening or tightening the recessed Hex Screw located at the top of the Spring Arm...

Page 27: ...ownloads technical drawings and more visit www startech com support Adjust the tension of the Spring Arm until the Spring Arm is capable of holding the weight of the attached Monitor at the desired height Adjusting the Spring Arm Tension ...

Page 28: ...upporting the weight of the Monitor use the Hex Key included to loosen or tighten the Hex Screw on the side of the Monitor Mount until the tension can hold the weight of the Keyboard but it is still adjustable Adjusting the Keyboard Tray Tilt Note The screw cap located on the opposite side of the Hex Screw is not used for tilt adjustments ...

Page 29: ... damages whether direct or indirect special punitive incidental consequential or otherwise loss of profits loss of business or any pecuniary loss arising out of or related to the use of the product exceed the actual price paid for the product Some states do not allow the exclusion or limitation of incidental or consequential damages If such laws apply the limitations or exclusions contained in thi...

Page 30: ... tools StarTech com is an ISO 9001 Registered manufacturer of connectivity and technology parts StarTech com was founded in 1985 and has operations in the United States Canada the United Kingdom and Taiwan servicing a worldwide market Reviews Share your experiences using StarTech com products including product applications and setup what you love about the products and areas for improvement StarTe...

Reviews: