

Installation Guide
NXA-TTS500-BL
Table-Top Stand for NXD-500i
Overview
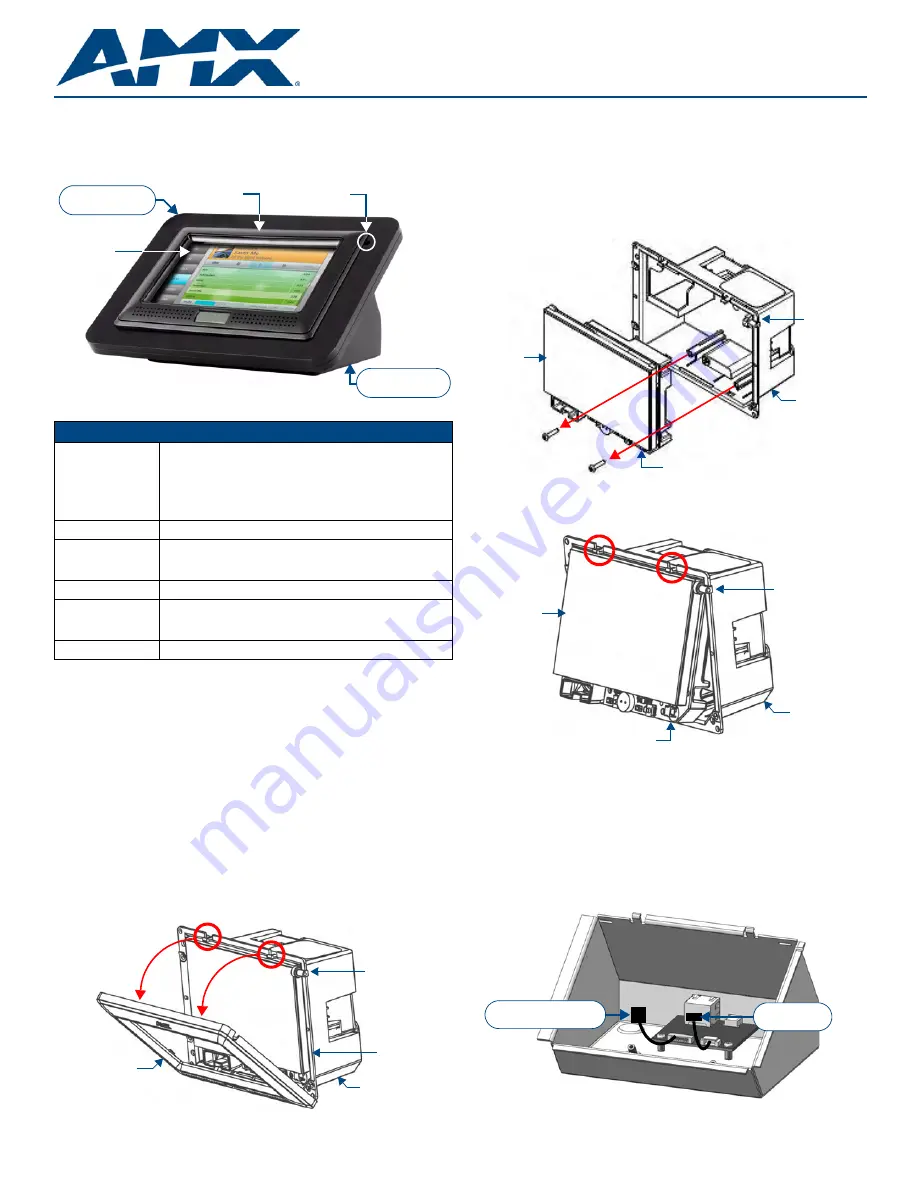
The NXA-TTS500-BL Table Top Stand (FG2261-50) for the NXD-500i 5" Modero®
Touch Panel with Intercom (panel sold separately) provides a table top installation
option for conference rooms and residential applications as well as a wired intercom
tabletop solution (FIG. 1).
Installation
The following sections describe installing an NXD-500i Touch Panel into the
NXA-TTS500-BL Table-Top Stand. This procedure involves first removing the
NXD-500i from it’s back-box, then installing the panel into the NXA-TTS500-BL
Table-Top Stand.
Note
: Before touching the device, discharge the static electricity from your body by
touching a grounded metal object.
Step 1: Disconnect Touch Panel Wiring
If the panel is connected, disconnect all wiring from the NXD-500i:
•
Ethernet Port
- The NXD-500i has no power input port. Instead, all power is
supplied via the Power over Ethernet (PoE) protocol. With PoE, the power is
supplied directly through the Ethernet port from either a PoE-enabled switcher,
or a PoE Injector.
•
Mini-USB Port
- The mini-USB port is used for software upload and audio
output.
Step 2: Remove the Bezel from the NXD-500i
The Bezel snaps on and off the NXD-500i, no screws are used or required. To remove
the Bezel from the NXD-500i (FIG. 2):
1.
Gently lift up on the Bezel from the top edge to disengage the plastic tabs on the
top edge of the panel from the notches on the Bezel.
2.
Remove the Bezel from the two bottom prongs.
Step 3: Remove the NXD-500i Back Box
To remove the plastic back-box from the NXD-500i:
1.
Disconnect the microphone cable from the bottom right corner of the Touch
Panel. FIG. 3 indicates the location of the microphone cable connector.
2.
Remove the two plastite mounting screws from the bottom front of the touch
panel (FIG. 3). These screws secure the panel to the back-box.
Note
: Discard these plastite screws; they should not be re-used.
3.
Remove the touch panel from the back-box (FIG. 4):
a. Gently pull the panel from the bottom edge. Note that the top edge is
secured to the back-box with two metal tabs.
b. Disengage the metal tabs on the top of the panel from the notches on the
back-box.
4.
Carefully remove the microphone from the notch on the back-box.
Step 4: Establish Internal Connections and Mount Microphone
The NXA-TTS500-BL Table-Top Stand is equipped with internal connectors that
connect to the touch panel via pre-installed adapter cables (FIG. 5).
This allows the Table-Top Stand to provide external connectors on the rear panel for
ease-of-access.
FIG. 1
NXA-TTS500-BL with NXD-500i touch panel installed (Touch Panel not included)
NXA-TTS500-BL Specifications
Compatible With:
NXD-500i 5" Modero® Wall/Flush Mount Touch Panel with
Intercom (FG2261-02).
The NXD-500i Touch Panel is sold separately.
Note
: The NXA-TTS500-BL Table-Top Stand is designed
specifically for use only with the NXD-500i. Do not mount any
other device in the NXA-TTS500-BL.
Enclosure:
Metal with matte black finish
Dimensions (HWD):
• Decimal inches: 3.671” x 7.0” x 4.912”
• Fraction Inches: 3 21/32” x 7” x 4 29/32”
• Metrics: 9.32cm x 17.78cm x 12.47cm
Weight:
1.2 lbs. (0.54 kg)
Included Accessories: • Strain Relief Bracket (62-1800-06)
• Strain Relief (45-0004-04)
• (2) Mounting Screws, #4-40 x .250 LG, PPH, Zinc (80-0110)
Optional Accessories:
• NXA-BEZ-5NB-BL Black bezel kit (FG2261-40)
FIG. 2
Removing the Bezel from the NXD-500i
NXD-500i
NXD-500i
Touch Panel
Bezel
NXD-500i
microphone
NXA-TTS500-BL
Enclosure
NXA-TTS500-BL
Bezel
Note
: The NXD-500i shown here is equipped with
the NXA-BEZ-5NB-BL Black Bezel Kit (not included)
Tab
Tab
notch
notch
NXD-500i
NXD-500i
NXD-500i
NXD-500i
Panel
Back Box
Bezel
microphone
FIG. 3
Removing mounting screws from the bottom front of the touch panel
FIG. 4
Removing the NXD-500i Back Box
FIG. 5
NXA-TTS500-BL - Internal Connectors
NXD-500i
microphone cable connector
Panel
NXD-500i
Back Box
NXD-500i
microphone
mounting screws
Tab
Tab
microphone cable connector
NXD-500i
Panel
NXD-500i
microphone
NXD-500i
Back Box
from ETHERNET/POE
port on NXD-500i
from USB port
on NXD-500i


