Quick-Start Guide
To view manuals, FAQs, videos, drivers, downloads, technical drawings, and more, visit www.startech.com/support.
Manual Revision: May 14, 2020 2:21 PM
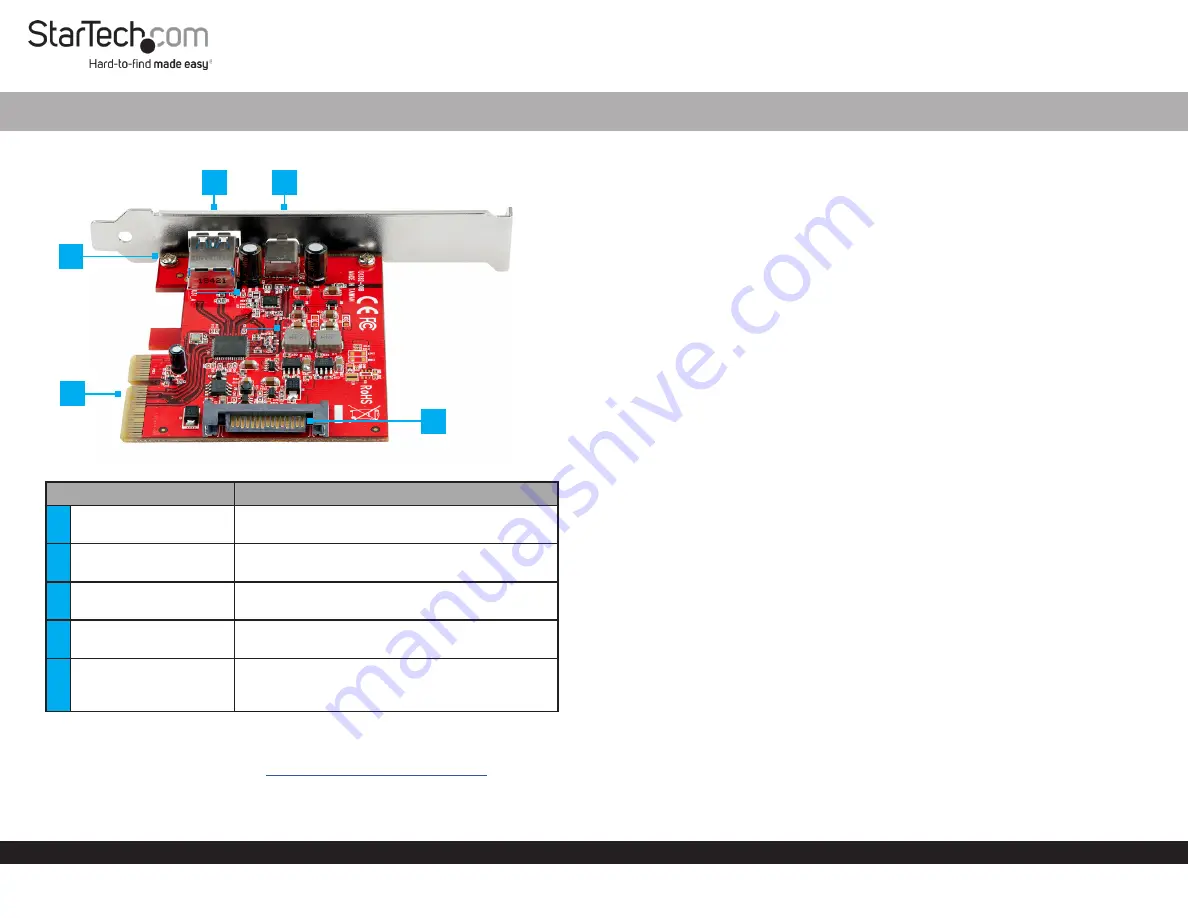
Product Diagram (PEXUSB311AC3)
Component
Function
1
USB-A Port
•
Used to connect a
USB Peripheral Device
to
the
USB Card
.
2
USB-C Port
•
Used to connect a
USB Peripheral Device
to
the
USB Card
.
3
Bracket Screws
•
Used to
Secure
the
Low Profile
or
Full Profile
Bracket
to the
USB Card.
4
PCI Express Connector
•
Used to connect the
USB Card
to the
PCI
Express Slot
on the
Host Computer
.
5
SATA Power Connector
•
(Optional) Connect a
15 Pin SATA Power
Connector
to provide extra power to the USB
Ports.
Requirements
For the latest requirements, please visit
www.startech.com/PEXUSB311AC3
•
Computer with an available PCI Express® slot (x4, x8, or x16)
•
(Optional) SATA Power Source
2-Port USB 3.1 Card - 10Gbps per port - USB-C, USB-A - PCIe
Tools
•
Small Phillips Head Screwdriver
Hardware Installation
Warning:
USB cards can be damaged by static electricity. Make sure that you are
properly grounded before you open your computer case or touch the
USB Card
. You
should wear an anti-static strap when you install any computer component. If an anti-
static strap is not available, discharge any built-up static electricity by touching a large
grounded metal surface for several seconds. Only handle the
USB Card
by its edges
and do not touch the gold connectors.
Installing the Low Profile Bracket
By default the
Full Profile Bracket
is attached to the
USB Card
. Depending on your
system configuration you may need to remove the
Full Profile Bracket
and replace it
with the
Low Profile Bracket
(included).
1.
Using a
Small Phillips Head Screwdriver
, remove the two
Bracket Screws
securing
the
Full Profile Bracket
to the
USB Card
.
2.
Align the
Screw Holes
on the
USB Card
with the
Screw Holes
on the
Low Profile
Bracket
. Making sure the
USB Card
is sitting on-top of the
Screw Holes
on the
Low
Profile Bracket
.
3.
Insert the
Bracket Screws
through the
USB Card
and into the
Screw Holes
on the
Low Profile Bracket
.
4.
Using the
Small Phillips Head Screwdriver
, tighten the
Bracket Screws,
being
careful not to over-tighten.
Installing the USB Card
1.
Turn off the
Computer
and any
Peripheral Devices
that are connected (e.g.,
printers, external hard drives, etc.).
2.
Unplug the
Power Cable
from the back of the
Computer
and disconnect any
Peripheral Devices
that are connected.
3.
Remove the
Cover
from the
Computer Case
.
Note:
Consult the documentation that came with the
Computer
for details about
how to do this safely.
4.
Locate an open
PCI Express Slot
(x4, x8, or x16) and remove the corresponding
Metal Cover Plate
from the back of the
Computer Case
.
5.
Gently insert the
USB Card
into the open
PCI Express Slot
and fasten the
Bracket
to the back of the
Computer Case
.
2
5
1
3
4