background image

!

WARNINGS!

- Misuse and abuse of this product can result in injury.
- Read instructions before assembly or using this product. Retain Instructions.
- Always inspect product before use, checking for worn, defective or missing parts.
- The single swing is suitable for age 3-8 years with maximum user weight of 45 kg(99 lbs).
- The nursery swing is suitable for ages 12-36 months with maximum user weight of 25 kg(55 lbs).
- Do not stand on the swing.
- Adult supervision at all times.
- Only for outdoor and domestic use.

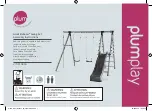
Tips :  It will take 2 people  around 45 mins to assemble this product.

2-IN-1 SWING

USER AND ASSEMBLY MANUAL

For Customer Service, please call 1-866-632-1718  or visit www.partsnservice.com

Monday – Friday 9:00 AM – 5:00 PM Eastern Time

Sportspower Ltd

Level 20, Parkview Centre 7 Lau Li Street, Causeway Bay, Hong Kong 

Save this instruction manual for future reference

Summary of Contents for SW-003

Page 1: ...is suitable for ages 12 36 months with maximum user weight of 25 kg 55 lbs Do not stand on the swing Adult supervision at all times Only for outdoor and domestic use Tips It will take 2 people around...

Page 2: ...r where the product is placed in relation to the sun to avoid overexposure to the heat which may cause hazard such as dizziness Your product is warranted against defects in material and workmanship Ex...

Page 3: ...gned for use with this product including but not limited to cables shipping ropes and chains as they may cause strangulation hazards Never allow children to walk too close to in front of behind or in...

Page 4: ...Leg Tube 5 x2 Rail 7 x4 Anchor 8 x1 Single Swing Seat 9 x1 Nursery Swing Seat E x8 8 5 x 19mm F x32 6 5 x 14mm I x16 6 5 x 10mm H x4 8 5 x 13 5mm J x4 M8 K x16 M6 L x1 10 13mm M x1 4mm 10 x4 Plastic...

Page 5: ...P 4 1 2 3 X 2 3 2 3 2 1 step 1 ASSEMBLY Insert Legs 2 and 3 into Beam 1 as shown in FIGURE1 Please note the order of Legs 2 and 3 need to be inverse on the two sides of the beam FIGURE 1...

Page 6: ...P 5 step 2 ASSEMBLY 3 2 3 4 4 4 4 2 1 4 K F B F I X 4 I B F K x 4 x 4 x 8 x 4 Insert Legs 4 into 2 and 3 Secure with B F I and K in the sequence shown in FIGURE 2 FIGURE 2...

Page 7: ...2 3 4 4 4 4 5 5 2 1 4 10 5 I K F D F X 4 I D F K x 4 x 4 x 8 x 4 Attach Plastic Cap 10 to each side of Rail 5 Secure Rail to Legs 4 on both sides of the swing using D F I and K in the sequence shown...

Page 8: ...p 4 ASSEMBLY Secure the swing to Beam 1 using A E H and J in the sequence shown in FIGURE 4 FIGURE 4 9 1 A E E H J 1 X 4 H A E J x 4 x 4 x 8 x 2 For Nursery Swing Seat See steps 6 and 7 for Single Swi...

Page 9: ...5 ASSEMBLY CONSTANT ADULT SUPERVISION REQUIRED AT ALL TIMES DURING USE Note Lock the seat belt tightly over the child shown in FIGURE 5 FIGURE 5 For Nursery Swing Seat See steps 6 and 7 for Single Sw...

Page 10: ...P 9 step 6 ASSEMBLY For Single Swing Seat I B F K x 4 x 4 x 8 x 4 Attach Legs 6 to 4 using B F I and K in the sequence shown in FIGURE 6 FIGURE 6 4 4 4 4 6 6 6 6 4 K F B F I X 4...

Page 11: ...P 10 step 7 ASSEMBLY For Single Swing Seat FIGURE 7 H A E J x 4 x 4 x 8 x 2 J E H A E 1 X 4 8 1 Secure the swing to Beam 1 using A E H and J in the sequence shown in FIGURE 7...

Page 12: ...x 8 x 4 FIGURE 7 Attach Anchor 7 to the base of all four Legs 6 using C F I and K in the sequence shown in FIGURE 7 IMPORTANT AFTER COMPLETING ALL THE STEPS GO OVER THE ENTIRE UNIT AND TIGHTEN ALL BO...

Page 13: ...step 9 ASSEMBLY 7 6 X 4 Position the anchors at 45 degree angle and secure them fully into the ground until the leg of the swing is standing flat and stable on the ground For Nursery and Single Swing...

Page 14: ...D THROUGH THE SEAT CONNECTOR TO ADJUST LOOSEN THE KNOT ON THE SEAT CONNECTOR PULL ROPE THROUGH THE HOLES AND TIGHTEN AGAIN MAKE SURE THAT THE KNOTS ARE TIGHT AND THAT BOTH ROPES ARE ADJUSTED SO THAT T...

Page 15: ...d at all times during use Do not leave children unattended For domestic use only Not for rental or commercial use Adult assembly required Make sure to proper ly dispose of all packaging material and d...

Page 16: ...ent proof of purchase during the warranty period This limited warranty does not cover our products which fail due to 1 normal wear 2 abuse and neglect 3 improper maintenance 4 unauthorized repairs or...

Reviews: