

fig. 2
fig. 1
fig. 3
fig. 4
fig. 5
fig. 6
fig. 7
fig. 8
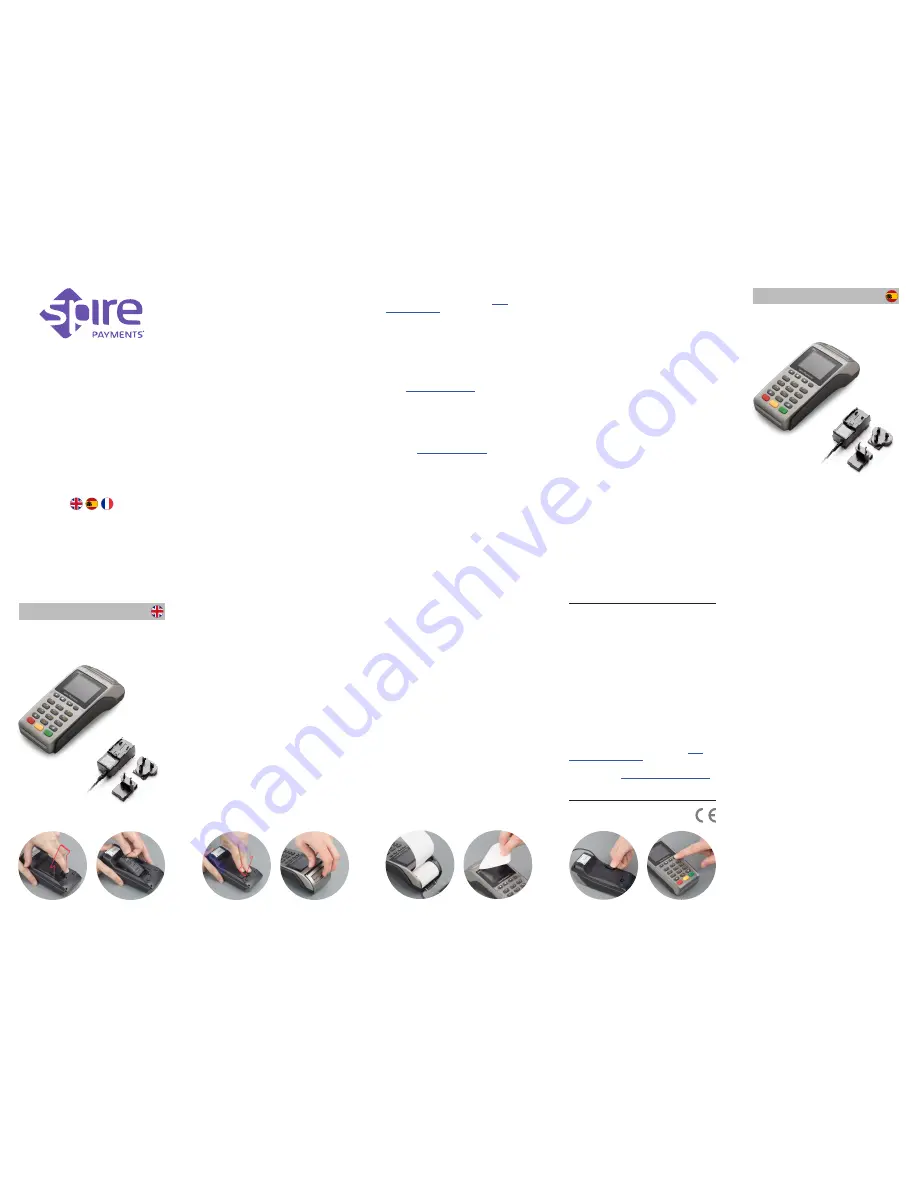
What you have received:
Terminal
with battery and
paper roll
Plug top
power supply
(region specific)
Contenido de la caja:
Terminal,
rollo de papel
y batería
Fuente de
alimentación
Step 1. Terminal battery installation
• Place the terminal face down on a flat surface and
remove the battery cover by applying pressure on
the tab and pulling upward.
(fig. 1)
• If a SIM is not pre-fitted insert the supplied SIM
into the socket marked SIM1. (For GPRS or 3G
version only)
• Remove the packaging and insert the battery into
the terminal.
(fig. 2)
• Replace the cover.
(fig. 3)
Step 2. Paper roll installation
• With the terminal facing up, gently pull upwards
on the lever located in the middle of the printer
door.
(fig. 4)
• Discard any packing material from the paper roll.
• Fit the roll as shown in the diagram.
The correct
orientation of the paper is critical.
(fig. 5)
• Pull 10 cm of paper until it protrudes from the top
of the terminal.
• Ensure the printer roller is installed.
• Close the printer door until a ‘click’ is heard.
• Remove the excess paper by pulling down and
tearing along the serrated edge.
(fig. 6)
Step 3. Charging the terminal
• Take the power supply and plug the small
connector in the rear of the terminal.
(fig. 7)
Only
then plug the power supply into the electrical
outlet.
• Charging of the battery will take between 2 and
4 hours.
• Battery status is indicated in the top right hand
corner of the display when the terminal is
switched on.
Step 6. Other transaction types
Please refer to the User Manual or visit
www.
spirepayments.com
for further information on
performing all transaction types and reading card
data by Swipe, Keyed and Contactless. Alternatively
contact your technical help desk for assistance.
Step 7. End of day/shift change
procedures
It is essential to perform specific processes at the
end of a working day, and possibly between shifts
for internal records.
Please refer to the User Manual
or visit
www.spirepayments.com
for further details.
Alternatively contact your technical help desk for
assistance.
Troubleshooting
In the unlikely event you experience issues with
this product, please follow the relevant procedure
detailed below. If this does not resolve the issue,
please visit
www.spirepayments.com
or contact your
technical help desk for further assistance.
No display
• Check the battery is fitted and no packing material
is interfering with the battery contacts.
• Insert power supply into rear of terminal and
confirm charging is in progress.
• Check power supply and all connections.
Poor battery life
• Ensure the power is being supplied.
• Check battery charge indicator is at maximum.
• Charge for 2 to 4 hours to ensure a full charge.
Poor printing performance
• Check the printer door is closed fully.
• Ensure an approved paper roll is installed correctly.
• Do not use in proximity of potentially flammable
gases or substances.
• Ensure cables used do not cause a trip hazard or
risk the device being dropped on to a hard surface.
• Do not expose to excessive heat or cold. Only
operate between 0 °C and 40 °C.
• Only use a rechargeable battery supplied or
specified by Spire and follow caution instructions
printed on it.
• Before cleaning, disconnect from the electrical
outlet. Use only a dry or dampened soft cloth.
• Do not immerse, use liquids, sprays or aerosol
cleaners. Clean all spillages quickly.
• This device is intended for handheld use only.
• Dispose any part in an environmentally sound
manner and in accordance with local laws.
• Spire Payments will not be held liable for any
damage resulting from user operation that does
not comply with the guidance stated.
Frequency bands and power
Maximum radio-frequency power transmitted in
the frequency bands in which this radio equipment
operates is below the limit values specified in the
corresponding Harmonized Standards.
The frequency bands and power limits applicable
to this radio equipment are: GSM900: 35 dBm,
GSM1800: 32 dBm, WCDMA 900/2100: 25.7 dBm,
Wi-Fi 2.4G: 20 dBm, NFC 13.56 MHz: 60 dBuA/m
at 10 m.
SPg7
Mobile Terminal
Quick Reference Guide
• When not in use you may leave the terminal
connected to the power supply to maintain
charge.
Step 4. Turning on the terminal
• Hold down the power button (located on the right
of the menu buttons) until the display illuminates
and the terminal beeps.
(fig. 8)
• Remove the protective film from the display if
present.
Step 5. Sale transaction
• Enter the transaction amount into the terminal.
• Present, insert, swipe the customers card or type in
the card details.
• Follow the on screen instructions depending on
the type of transaction.
• The terminal will approve/decline the transaction.
• A Merchant copy of the receipt will be printed. Tear
off and retain for your records.
• Confirm display prompts to print the customer
receipt. (If Contactless transaction, only a merchant
copy will print.)
• Tear off the customers receipt and give to the
customer.
• Ensure the printer roller is placed correctly. If it has
been accidentally removed, please put it back to
its original position.
Communication problems
• Reset the terminal by powering off and on
• Turn the terminal on and ensure the wireless signal
is strong.
Cannot read Cards
• Ensure the Chip Card has been inserted in the
correct orientation.
• Ensure the contactless card has been placed at a
distance of 0 to 4 cm from the terminal display.
• Ensure the magnetic stripe card has swiped in the
correct orientation.
• Test with another card of the same type.
Caution and safety instructions
• Do not attempt to disassemble, service or repair
any part.
• Do not use if damaged or the terminal shows signs
of tampering.
• Only use the supplied power adapter with an
electrical outlet of the correct rating.
• To avoid the potential hazard of electrical shock
do not use in wet environments or during an
electrical storm.
©2015–2017 Spire Payments Holdings S.à.r.l.
All rights reserved.
All information is subject to
change without notice and Spire Payments does not
warrant the information’s accuracy or correctness.
Spire Payments and the Spire Payments logo are
trademarks, service marks or registered trademarks
or service marks of Spire Payments Holdings S.à.r.l.
All other trademarks are the property of their
respective owners. Any Spire Payments software
described in this document is subject to a Software
License Agreement. Please refer to the Software
License Agreement for information regarding the
terms of use.
EU Compliance Statement •
Hereby, Spire Payments
Holdings S.à.r.l. declares that the radio equipment
type SPg7 is in compliance with Directive 2014/53/
EU and Directive 2011/65/EU.
The full text of the EU declaration of conformity is
available at the following internet address:
www.
spirepayments.com/library
.
PCI PTS •
The PCI Notice and Installation Guidance is
available online at
www.spirepayments.com/library
.
Spire Payments Holdings S.à.r.l. • 70 route d’Esch
L-1470 Luxembourg
E S PA Ñ O L
Paso 1. Instalación de la batería del
terminal
• Coloque el terminal boca abajo sobre una
superficie plana y retire la tapa aplicando presión
en la lengüeta y tirando hacia atrás.
(fig. 1)
• Si el terminal no viene preequipado con una
tarjeta SIM, inserte la tarjeta SIM a utilizar en el
conector marcado SIM1. (Sólo para versión GPRS
o 3G)
• Retire la lengüeta protectora de la batería e inserte
la batería en el terminal.
(fig. 2)
• Vuelva a colocar la tapa.
(fig. 3)
E N G L I S H
Paso 2. Instalación del rollo de papel
• Con el terminal boca arriba, tire suavemente de la
palanca situada en la parte central de la tapa de la
impresora.
(fig. 4)
• Retire el material de embalaje del rollo de papel.
• Coloque el rollo como se muestra en el dibujo.
Es
muy importante que el papel esté correctamente
orientado.
(fig. 5)
• Tire del papel hasta que sobresalga unos 10 cm
por la parte superior del terminal.
• Antes de cerrar la tapa de la impresora,
asegúrese de que el rodillo de la impresora está
correctamente instalado.
• Cierre la tapa de la impresora hasta que oiga un
“clic.”
• Retire el papel sobrante tirando de él hacia abajo y
ayudándose del borde dentado.
(fig. 6)
Paso 3. Carga del terminal
• Inserte el conector de la fuente de alimentación
en la parte trasera del terminal
(fig. 7),
y después
conecte la fuente de alimentación al enchufe.
• El proceso de carga de la batería durará entre 2
y 4 horas.
• El estado de carga de la batería se indica mediante
un led en la esquina superior derecha del terminal
cuando éste está encendido (verde batería
cargada, naranja descargada).
Encendido del terminal
• Pulse la tecla de encendido (situada a la derecha
de las teclas de menú) hasta que encienda el
display.
(fig. 8)
• Retire la película protectora del display, si todavía
está adherida.


