Spectra Precision LL300S, Hands-On Training
The Spectra Precision LL300S is a reliable laser level for precise construction and landscaping tasks. This robust product ensures accurate leveling and alignment with its self-leveling capability and long-range operation. Take your projects to the next level with our free, comprehensive user manual available for download at manualshive.com.
Share
Download


Reviews:
No comments
Related manuals for LL300S

LLK
Brand: Draper Pages: 4

ALC 2/1-Basic
Brand: Flex Pages: 174

81434
Brand: Levenhuk Pages: 18

L100M MX
Brand: Laser Tools Pages: 4
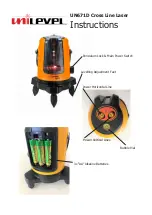
UN671D
Brand: Unilevel Pages: 2

Quadrum DigiPlus
Brand: LaserLiner Pages: 13

AGMA 22
Brand: MAC3 Pages: 4

STHT77498-1
Brand: Stanley Pages: 20

STHT77502-1
Brand: Stanley Pages: 24

FATMAX FMHT1-77416
Brand: Stanley Pages: 212

CROSS 90
Brand: Stanley Pages: 210

FatMax FMHT77598
Brand: Stanley Pages: 220

Fatmax FMHT1-77415
Brand: Stanley Pages: 222

Fatmax FMHT77446
Brand: Stanley Pages: 318


