Sony LBT-XGV11AV, Operating Instructions Manual
The Sony LBT-XGV11AV is a powerful audio system that delivers exceptional sound quality. Enhance your listening experience with this versatile device, designed to entertain and captivate. To take full advantage of its features, download the free Operating Instructions Manual from manualshive.com, ensuring seamless navigation and precise control.
Share
Download


Reviews:
No comments
Related manuals for LBT-XGV11AV

ES100
Brand: JBL Pages: 2

4400
Brand: FAAC Pages: 36

RF
Brand: Abode Pages: 5

AS-1100
Brand: Galaxy Audio Pages: 2

Ranger 9000E
Brand: Caddx-Caddi Controls Pages: 6

TP-100
Brand: LAIA Pages: 71

Passport 500 Pro
Brand: Fender Pages: 4

XL-31 Series
Brand: FBII Pages: 48
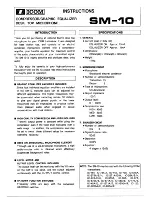
SM-10
Brand: Icom Pages: 2

JBS-350
Brand: Jensen Pages: 2

KX-TD816JT
Brand: Panasonic Pages: 36

QUORUS
Brand: Qtx Pages: 5

Model 12
Brand: Cambridge SoundWorks Pages: 11

thombox Security pack
Brand: THOMSON Pages: 8

25-741
Brand: SAFE-T-ALERT Pages: 5

00 173137
Brand: Hama Pages: 26

SB4020E0-B0
Brand: Vizio Pages: 20

VDH-NK380
Brand: Vacron Pages: 17


