Electret Condenser Microphone
Электретный конденсаторный микрофон
Электреттік конденсаторлық микрофон
ECM-PCV40
©2012 Sony Corporation
Printed in China
English
Before operating the unit, please read this manual thoroughly and retain it for future reference.
The manufacture year and month is noted on the package.
Made in China
Sony Corporation
1-7-1 Konan, Minato-ku, Tokyo, 108-0075 Japan
WARNING
This microphone (ECM-PCV40) is for plug-in power devices only.
Be sure to connect the microphone to a plug-in power compatible jack of a computer or other device.
Connecting to jacks that are not plug-in power compatible may cause a malfunction.
Features
Vocal Microphone for PC
Recommended for uses such as singing karaoke with your computer or recording audio for videos to be uploaded to the
Internet (This electret condenser microphone has greater sensitivity than general dynamic vocal microphones. This allows
greater freedom of use with your computer and gives high-quality audio.)
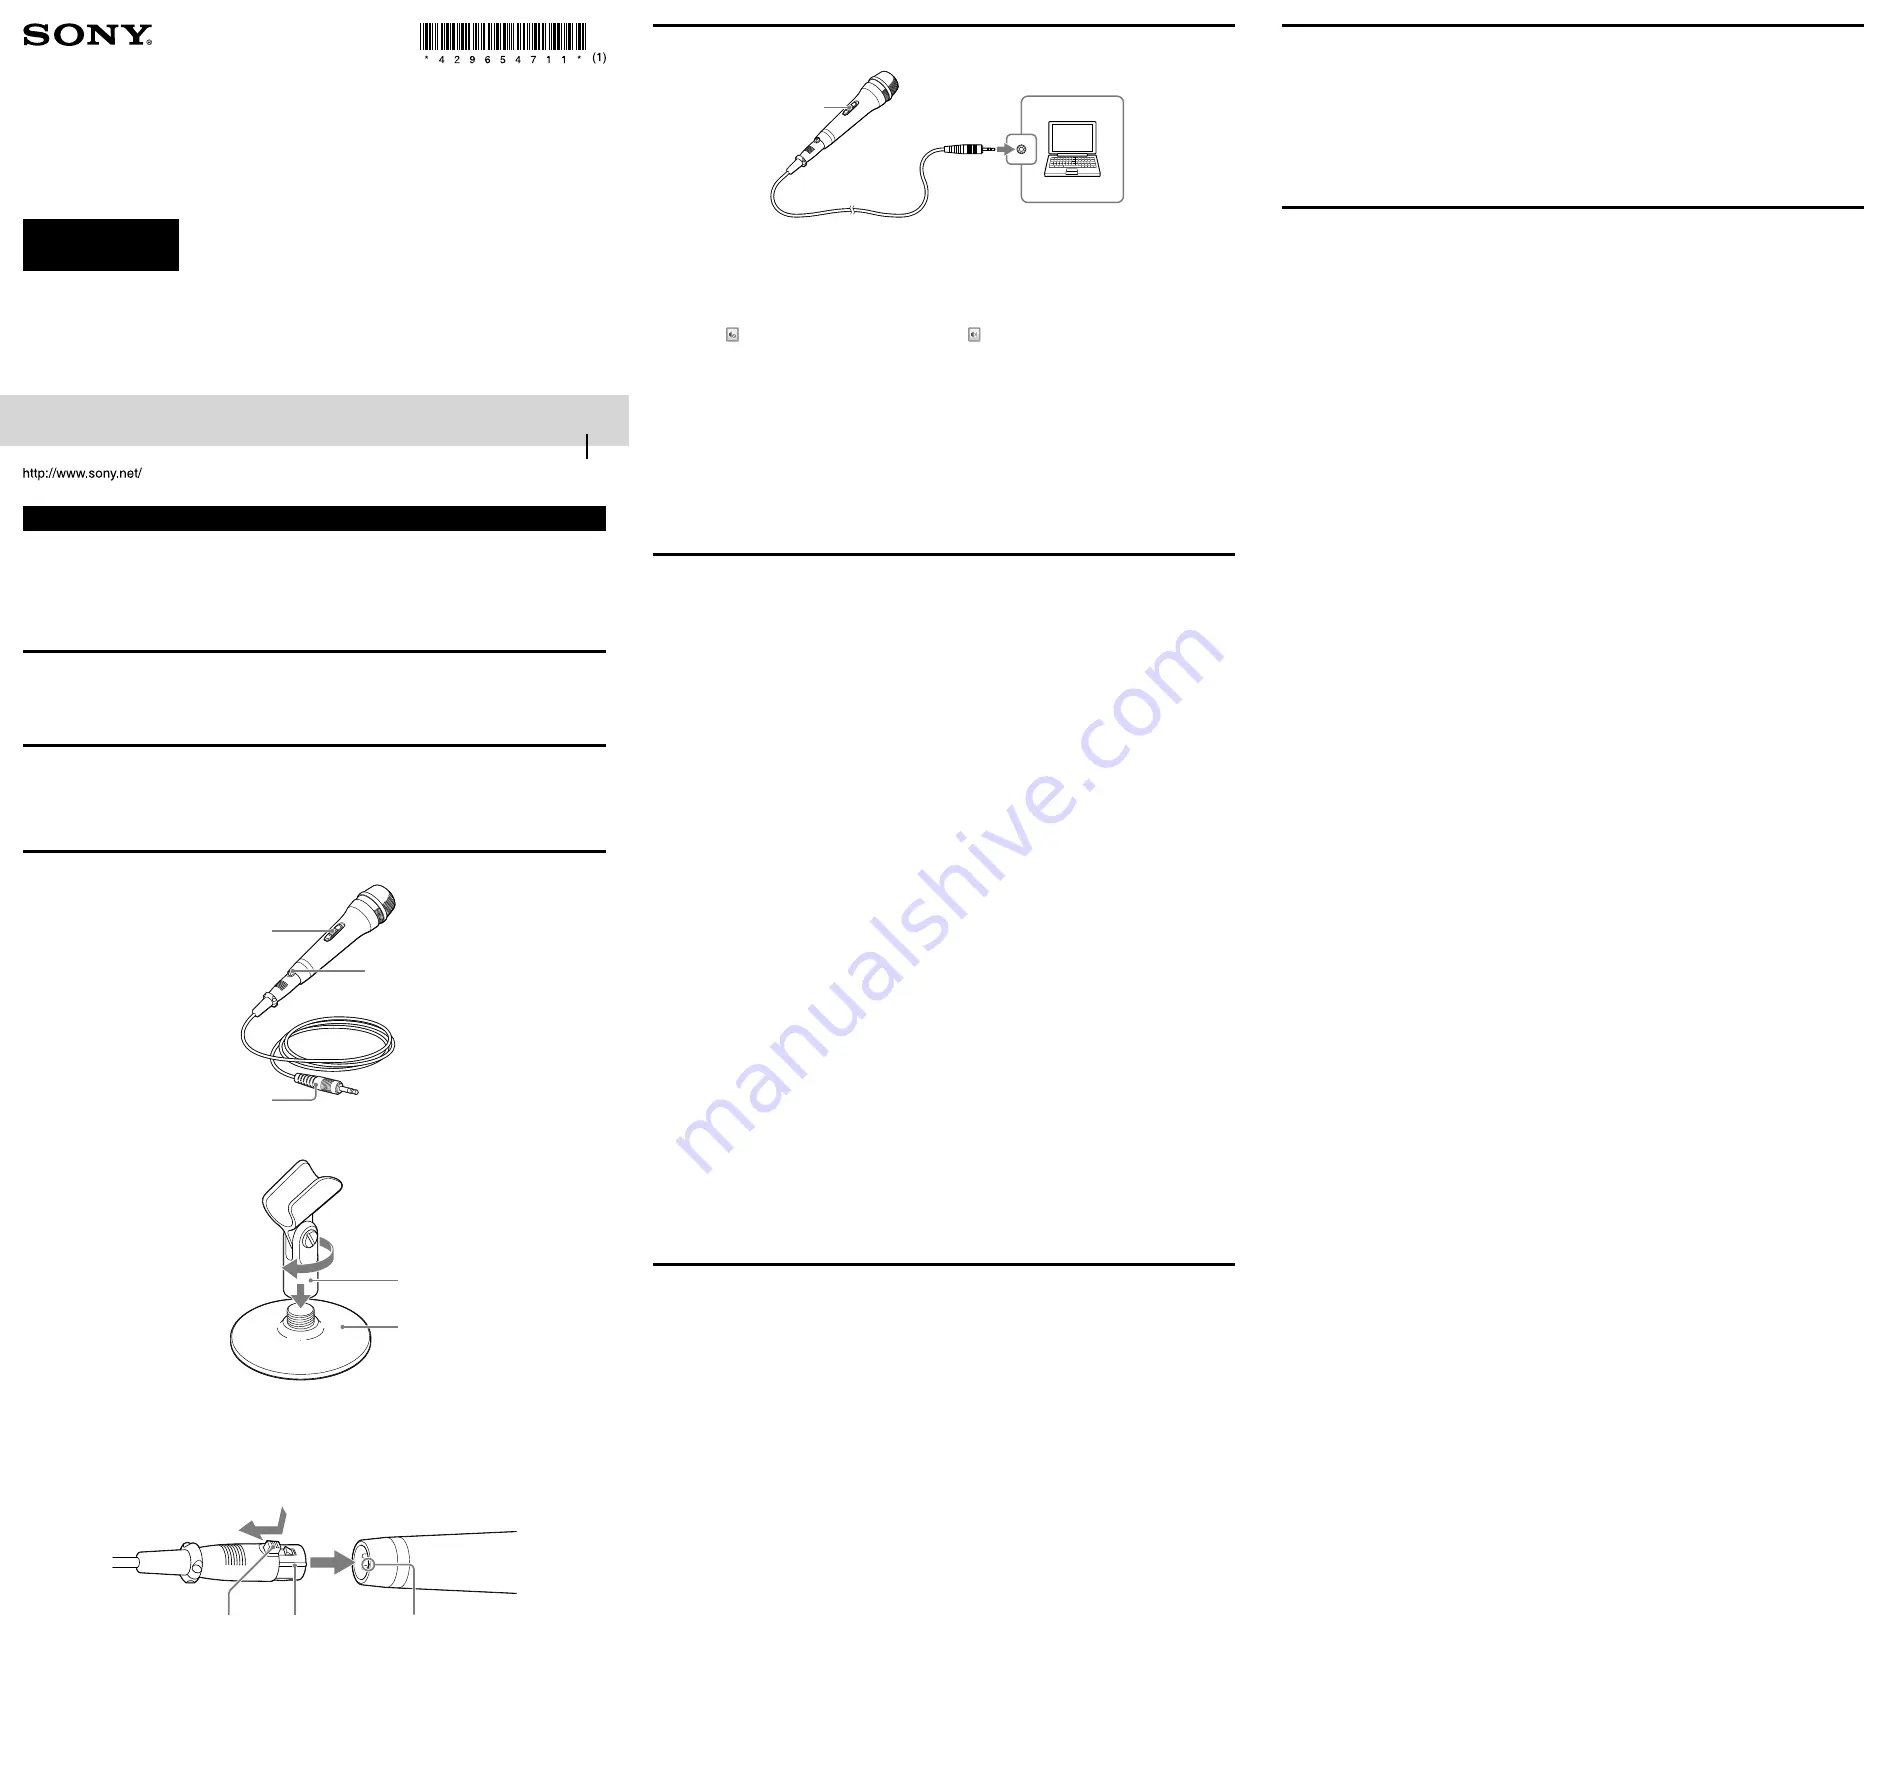
Identifying the parts
* Sounds are output in monaural.
Assembling microphone stand
1
Attach the microphone holder to the screw part at the center of the tabletop stand.
Screw in tight so there is no gap between the microphone holder and tabletop stand.
2
Attach the microphone to the microphone holder, and adjust the angle.
Detaching/attaching microphone cord
To detach the microphone cord, pull out while holding down the lock release button on the connector.
To attach the microphone cord, align the ridge on the microphone output terminal with the groove on the connector, and press
together until you hear a click.
Talk switch
Slide the switch to “ON”
when using the microphone
or “OFF” when not using it.
Talk switch
Slide the switch to “ON”
when using the microphone
or “OFF” when not using it.
Lock release button
Lock release button
Three-conductor
gold-plated mini plug
*
Three-conductor
gold-plated mini plug
*
Microphone holder
Microphone holder
Tabletop stand
Tabletop stand
Dethatch while pressing
Dethatch while pressing
Ridge
Ridge
Groove
Groove
How to use
Audio settings must be made to output through the computer’s speakers/headphones audio input from the microphone.
1
Connect microphone to computer’s plug-in power microphone jack.
2
Slide microphone talk switch to “ON.”
3
Make audio settings on computer, and adjust volume.
Windows Vista / Windows 7
1 Select “Control Panel” from the “Start” menu, and open “Hardware and Sound.”
2 Click “Sound,” select the “Playback” tab on the displayed “Sound” screen, select “Speakers/headphone” from the playback
device list, click the “Properties” button, and then select the “Levels” tab.
3 Click the (muting button) under “Microphone” to switch to (muting off).
4 Adjust the “Microphone” volume as you like.
5 Adjust the volume of the active speakers/headphones.
Windows XP
1 Select “Control Panel” from the “Start” menu, and open “Sounds, Speech, and Audio Devices” or “Sounds and Audio
Devices.”
2 Select the “Audio” tab, and click “Volume…” under “Sound playback.”
3 Remove the check mark from the “Mute” checkbox under “Mic Volume” * on the displayed “Master volume” window.
4 Adjust the “Microphone” volume as you like.
5 Adjust the volume of the active speakers/headphones.
* If “Mic volume” is not displayed on the “Master Volume” window, click “Properties” from “Options,” then make sure “Playback” is selected
under “Adjust volume for.”
Then put a check in “Microphone” under “Show the following volume controls:,” and return to the “Master Volume” window.
Compatible software is required to record voice through the microphone while playing back music on your computer or to
create video files with audio. For details, refer to the manual or help file of the software you are using.
Troubleshooting
No sound, unable to record
The connected recorder is not a plug-in-power supply system device.
Connect the microphone to a plug-in-power supply system device.
Check with the operating instructions of the connected device.
The plug does not fit properly.
Insert the plug all the way into the microphone jack, and make sure it is secure.
Wipe the plug with a soft cloth.
The microphone’s talk switch is not turned on.
Slide the talk switch to “ON.”
Computer audio output is muted.
Check the computer’s audio output settings, and deselect “Mute.”
External active speakers are not turned on (if using external active speakers).
Turn on the power for external active speakers.
Audio devices for the computer are not set correctly.
Check the computer’s settings. For details, refer “How to use.”
Incorrect operations were made with the recording software.
Refer to the manual or help file of the software you are using
Volume of external active speakers/headphones is low.
Adjust the volume of the external active speakers/headphones.
Microphone sound is distorted
Microphone input level on the computer is too high.
Adjust as follows.
Windows Vista / Windows 7
1 Select “Control Panel” from the “Start” menu, and open “Hardware and Sound.”
2 Select the “Playback” tab on the displayed “Sound” screen, select “Speakers” from the playback device list, click the
“Properties” button, and then select the “Levels” tab.
3 Adjust the “Microphone” volume as you like.
Windows XP
1 Select “Control Panel” from the “Start” menu, and open “Sounds, Speech, and Audio Devices” or “Sounds and Audio
Devices.”
2 Select the “Audio” tab, and click “Volume” under “Sound playback.”
3 Adjust “Mic Volume” as you like on the displayed “Master Volume” window.
Microphone boost is turned on for the computer.
Following the procedures below to turn microphone boost off.
Windows Vista / Windows 7
1 Select “Control Panel” from the “Start” menu, and open “Hardware and Sound.”
2 Click “Sound,” select the “Recording” tab on the displayed “Sound” screen, and then select “Microphone” from the recording
devices displayed.
3 Click “Properties,” select the “Levels” tab on the displayed “Microphone Properties” screen, set “Microphone Boost” to
“0.0 dB” (off), and then click “OK” to close the screen.
Windows XP
1 Select “Control Panel” from the “Start” menu, and open “Sounds, Speech, and Audio Devices” or “Sounds and Audio
Devices.”
2 Select the “Audio” tab, and click “Volume” under “Sound playback.”
3 Click the “Advanced” button for “Mic volume” on the displayed “Master Volume” window.
4 On the “Advanced Controls for Microphone” screen, deselect “Microphone Boost.”
For details on computer operations, refer to the manual for your computer.
Specifications
Type:
Electret Condenser Microphone
Power supply:
Plug-in-power supply system (phantom power is not supported)
Dimensions:
Microphone
Approx. ø43 mm × 160 mm (diameter/length)
With Microphone holder and Tabletop stand
Approx. ø100 mm × 120 mm (diameter of the base/height)
Mass:
Microphone
Approx. 300 g (including cord)
With Microphone holder and Tabletop stand
Approx. 360 g (including microphone, microphone cord, microphone holder, and table stand)
Microphone output connector:
Cannon XLR-3-12C type
Microphone cord:
4.5 mm diameter single-core shielded / Three-conductor gold-plated mini plug / approx. 2 m length
Directivity:
Uni-directional
Frequency response:
80 Hz – 15,000 Hz
Front sensitivity (Open circuit output voltage level):
–40 ± 3.5 dB
Operating temperature:
0 °C – 35 °C
Included items:
Microphone (1), Microphone cord (1), Microphone holder (1), Tabletop stand (1), Operating Instructions (this
document) (1)
Design and specifications are subject to change without notice.
Talk switch
Talk switch
Computer
Computer
Plug-in power
microphone jack
Plug-in power
microphone jack
4-296-547-
11
(1)
Precautions
This microphone is a precision instrument. Never disassemble it.
Do not expose the microphone to a mechanical shock such as by dropping or striking it.
If the microphone is placed near speakers/headphones, a high pitched noise may be heard (howling effect). This is caused by
the microphone catching sound from the speakers/headphones repeatedly. In this case, place the microphone as far as possible
from the speakers/headphones.
Do not leave the microphone in a humid, dusty or hot place, or under direct sunlight. This may cause a malfunction.
When using outdoors, never let the microphone become wet with rain or saltwater.
When the microphone and the plug become dirty, wipe them with a dry cloth. Do not blow on the microphone when dusting
it. A dirty plug will cause deterioration of sound quality and intermitted sound.
Always hold the plug when disconnecting. Pulling the cord may cause it to snap.
Trademarks
Microsoft, Windows and Windows Vista are registered trademarks or trademarks of Microsoft Corporation in the United
States and/or other countries.
All other trademarks and registered trademarks are trademarks or registered trademarks of their respective holders. Furthermore,
“
” and “
” are not mentioned in each case in this manual.
Operating Instructions
Инструкция по эксплуатации
қолдану нұсқаулықтары