Sony DCR-SX83 Handycam®, Handbook
The Sony DCR-SX83 Handycam® is a compact and versatile camcorder that captures stunning HD videos effortlessly. Explore its impressive specifications such as a 60x optical zoom, 16GB internal memory, and a Carl Zeiss Vario-Tessar lens for outstanding image quality. Enhance your shooting experience by downloading the comprehensive user manual, absolutely free, from manualshive.com.
Share
Download


Reviews:
No comments
Related manuals for DCR-SX83 Handycam®

SC-DC163
Brand: Samsung Pages: 128

SC-D70
Brand: Samsung Pages: 77

SC-DC163
Brand: Samsung Pages: 5

SC HMX20C - Camcorder - 1080p
Brand: Samsung Pages: 131

SC-DC171
Brand: Samsung Pages: 128

SGH-X300
Brand: Samsung Pages: 119

HMX-W200RN
Brand: Samsung Pages: 90

SC DX205 - Camcorder - 680 KP
Brand: Samsung Pages: 143

HMX-U20BN
Brand: Samsung Pages: 90

HMX-M20BN
Brand: Samsung Pages: 77

HMX-S10BN
Brand: Samsung Pages: 166

HMX-E10BN
Brand: Samsung Pages: 98

HMX-H100N
Brand: Samsung Pages: 147

HMX-U10RN
Brand: Samsung Pages: 104

HMX-Q20BN
Brand: Samsung Pages: 129

SCD303
Brand: Samsung Pages: 2
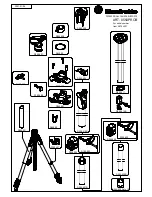
ART. 055XPROB
Brand: Manfrotto Pages: 1

AK-HC3800
Brand: Panasonic Pages: 8


