

2001 Sony Corporation
4-658-411-11(1)
User’s Guide
CRX85A
List of Accessories
When you unpack the carton, make sure that it contains the CRX85A and all of the accessories
listed below.
If anything is missing or damaged, contact your retailer.
• CRX85A
• AC Adapter (AC-CRX85)
• PC Card
• Interface Cable
• Power cord
• Setup Guide
• Software CD-ROM
• Warranty
• User’s Guide
• Ferrite Clamps (2)
• Software Quick Start Guide
Note
To guard against possible loss or damage, be sure to make a backup copy of the provided software CD-ROM on a CD-
R disc or other media. The software CD-ROM is not sold separately.
Before Connecting the Interface Cable
Attach the ferrite clamps to the both ends of the Interface cable. Position the center of the
ferrite clamp as shown in the illustration below, and then secure the ferrite clamp by closing it
until you hear a click.
Note
To satisfy radio-frequency interference suppression standards, be sure to install the ferrite clamp correctly. It reduces
the possibility interference with other devices.
Introduction
The CRX85A has the following features:
❑
Features
technology to prevent buffer under-run errors.
❑
Can write CD-R discs at a speed of up to 20
×
.
❑
Can write CD-RW discs at a speed of up to 8
×
.
❑
Can read CD-ROM discs at a speed of up to 24
×
.
❑
Can read DVD-ROM discs at a speed of up to 8
×
.
❑
Has a compact, lightweight design for portability.
❑
Includes a compact, lightweight AC adapter that is compatible with power supply voltages
from 100 to 240 V.
❑
Includes a PC card (PCMCIA type II) that supports CardBus mode and 16-bit mode.
❑
The CRX85A should be used in CardBus mode in order to fully attain its maximum 24
×
read speed (3600 KB/sec.).
Required System Configuration
The CRX85A can be used with a personal computer with the following specifications:
❑
CPU: Pentium II 400 MHz or faster
❑
RAM: At least 64 MB
❑
Hard disk space: 1 GB or more
❑
PC card slot: PCMCIA type II
×
1 slot
❑
OS: Windows 98 Second Edition (Windows 98 SE), Windows 2000 Professional
(Windows 2000), or Windows Millennium (Windows Me)
❑
Computer must have a CD-ROM drive or be capable of connection to the Internet.
(Required for PC card setup).
CAUTION
The required system configuration is designed to provide the basic capability to write CD-R and CD-RW discs. In
order to actually use the CRX85A, it is necessary to satisfy not only the system requirements described here, but also
the system requirements that are specified for the writer software. (The system requirements for writer software
usually exceed the system requirements described here.)
Main Specifications
Speed
Write speed
20
×
maximum (CD-R)
8
×
maximum (CD-RW)
Read speed
24
×
maximum (CD-ROM)
8
×
maximum (DVD-ROM)
Discs
Compatible discs
CD-ROM
DVD-ROM
CD-ROM XA
DVD-Video
Photo CD
(Multisession compatible)
CD-DA
CD-R
CD-RW
CD-I
Video CD
CD Extra (CD+)
CD TEXT
Audio combined CD-ROM
Disc diameter: 12 cm
8 cm (CD-DA reading only)
Writing methods
Track at once
Disc at once
Session at once
Fixed packet writing
Drive
Data transfer rate
Maximum: 3600 kb/s (24
×
1)
)
Access time
Average (random stroke): 160 ms
1)
The maximum data transfer rate varies
according to the performance capabilities
of the computer.
Operating Environment/Storage
Environment
Operating temperature
5°C to 35°C
Power Supply/Miscellaneous
Power supply
External power jack: rated 5 V
AC adapter: AC-CRX85
(rated input AC100 V - 240 V)
Power consumption
2.0 A
Size
Approximately 129
×
18
×
134 mm
(W
×
H
×
D)
Weight
Approximately 230 g (main unit only)
Interfaces
Drive interface
ATAPI-compliant
Buffer capacity
8 MB
PC Card
Interface: PCMCIA 2.1/JEIDA 4.2-
compliant
Card type: PCMCIA type II
Interface card dimensions:
54
×
5
×
85.6 mm (W
×
H
×
D)
Weight:
Approximately 30 g
These specifications and the appearance of
the product are subject to change without
notice.
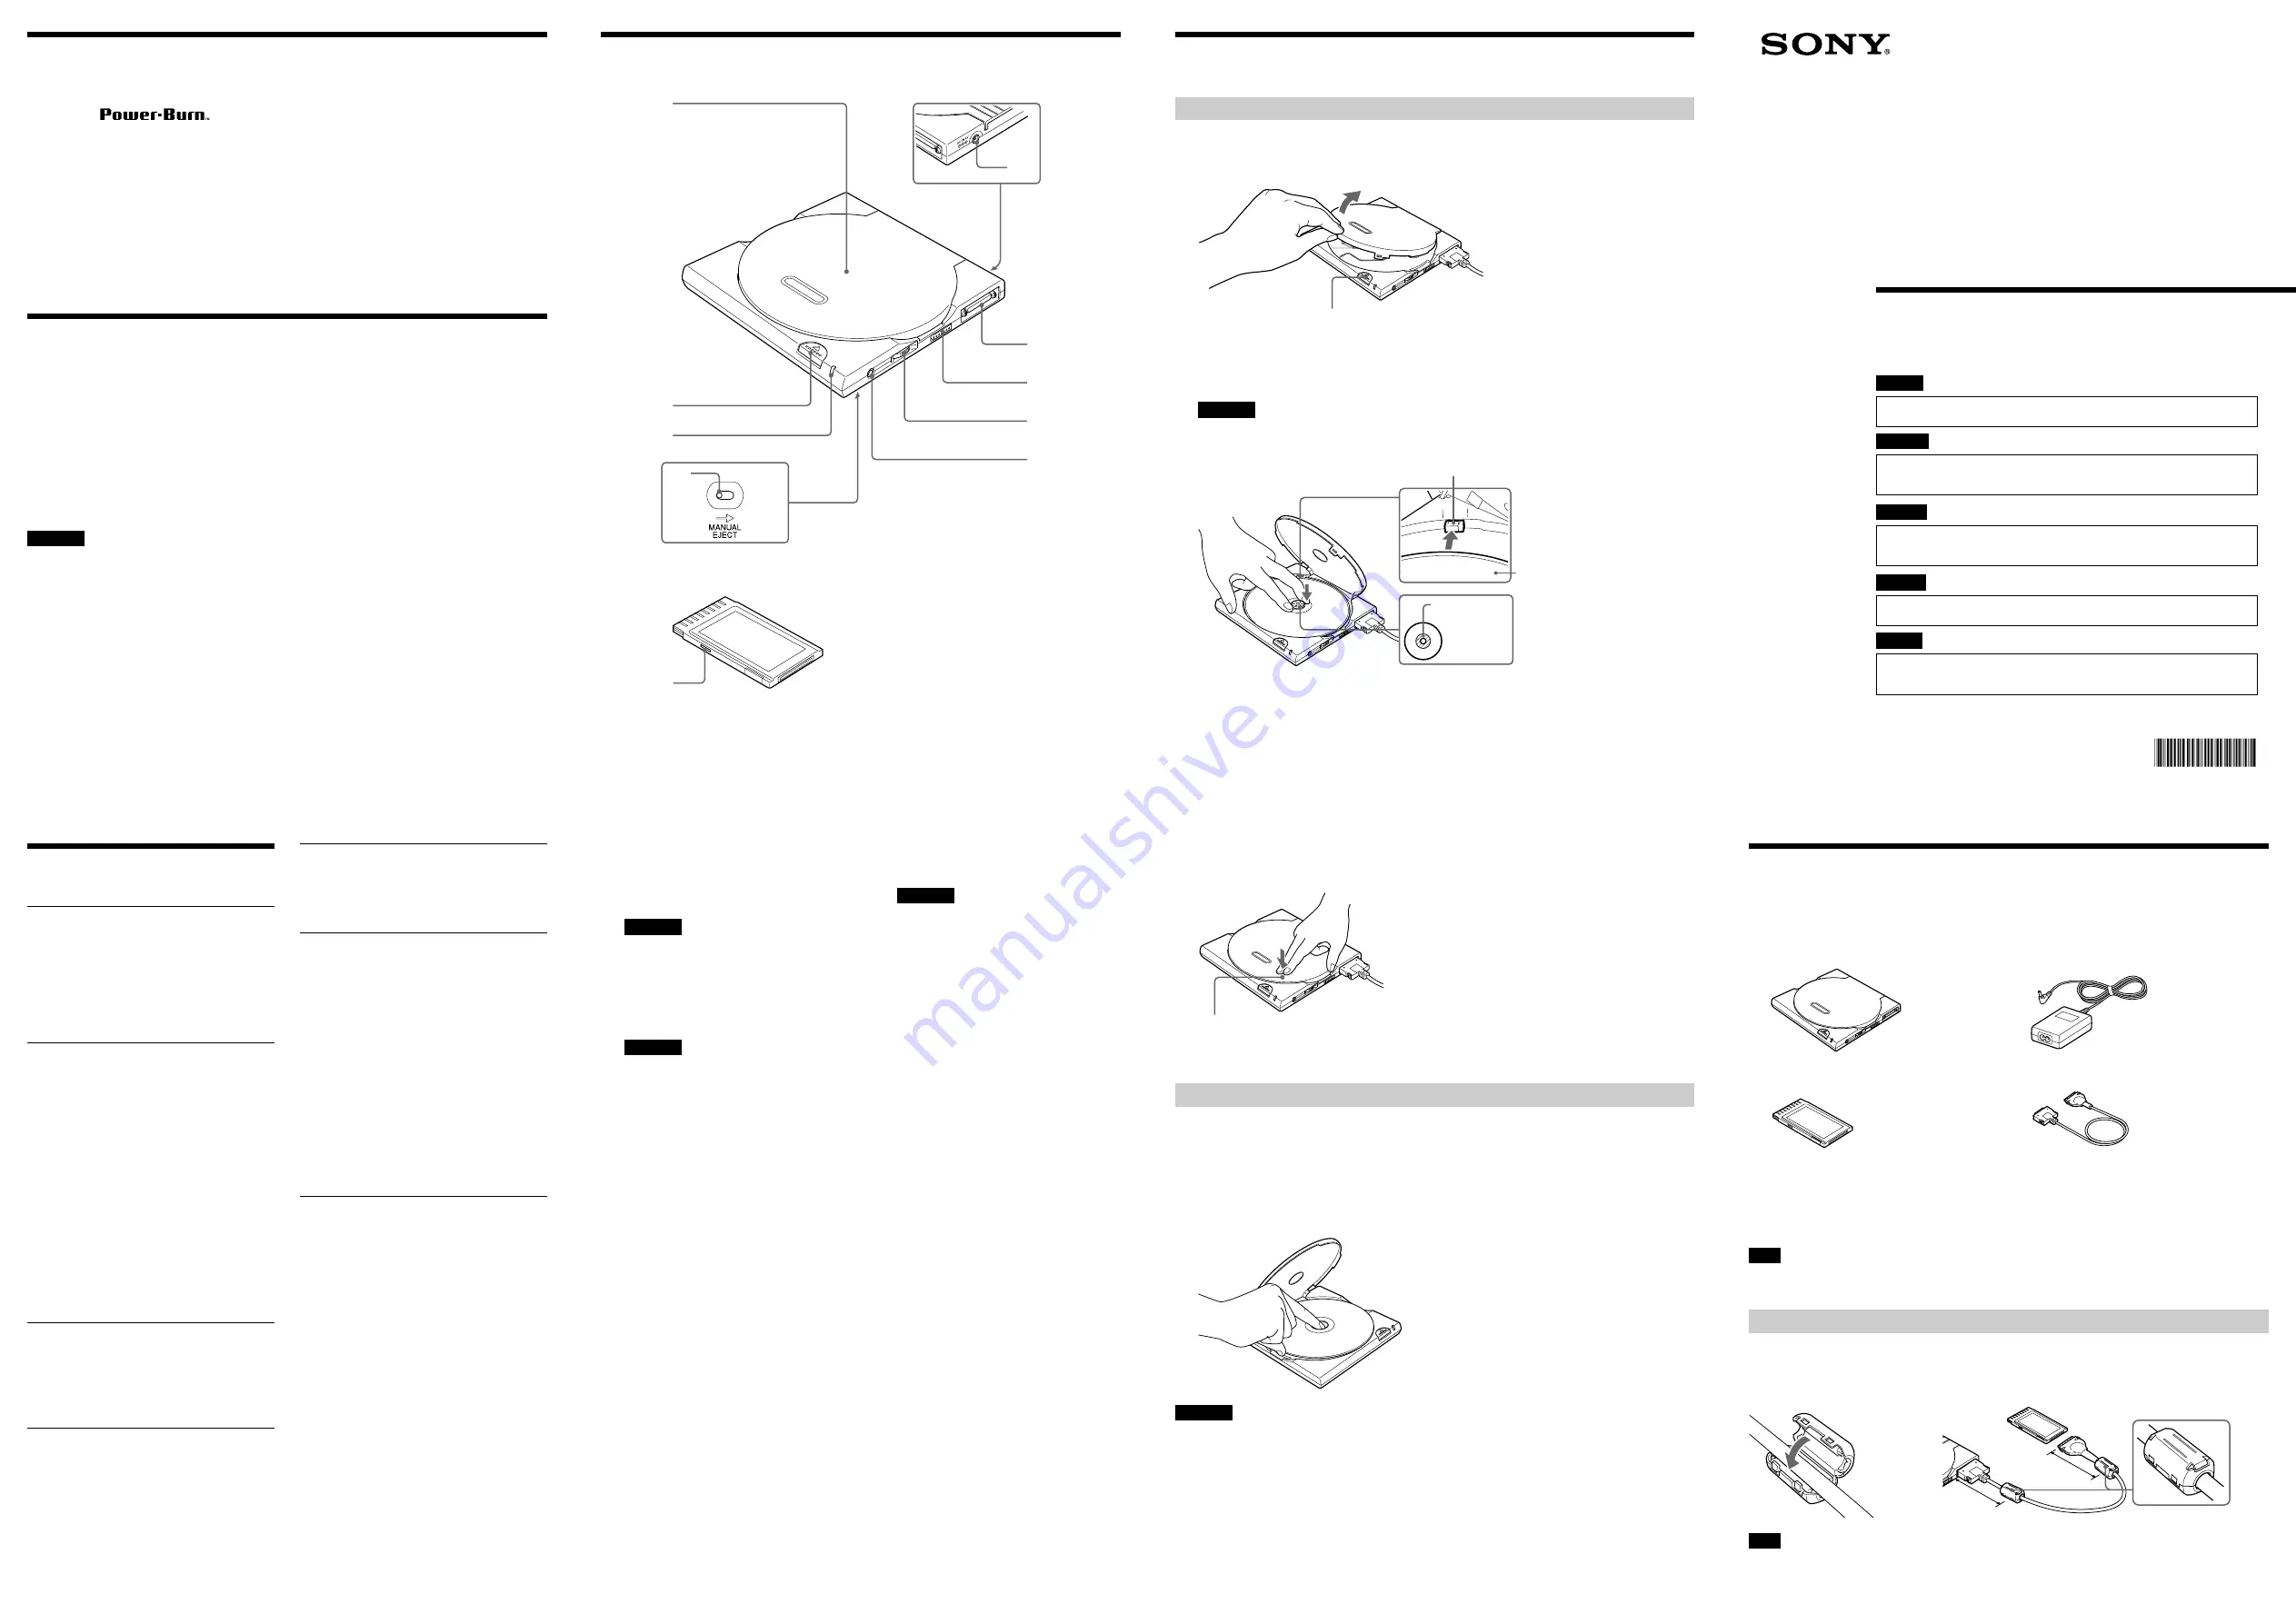
Names and Functions of Parts
Main unit
3
4
5
6
8
9
1
7
2
PC card
0
1
Top Cover
2
Power Jack (rear of unit)
Connect the AC adapter (provided) here.
CAUTION
Never connect any AC adapter other than the one
that was provided with the CRX85A.
3
Interface Connector
Connect the interface cable (provided)
here.
CAUTION
Never connect any interface cable other than the
one that was provided with the CRX85A.
4
Power Switch
Use this switch to turn the CRX85A on
and off.
5
Volume Dial
Use this dial to adjust the volume of the
analog audio signal that is output from
the headphone jack.
6
Headphone Jack
Headphones or active speakers can be
connected here.
7
Manual Eject Lever (bottom of unit)
When the CRX85A is off, push this
lever in the direction indicated by the
arrow to open the top cover.
8
Indicator
This indicates the operating status of the
drive. When the drive is on but idle, this
indicator is green; when the drive is in
operation, this indicator is orange.
9
Eject Button
Press this button to open the top cover.
Important
The CRX85A is equipped with an electronically
powered eject mechanism in order to prevent the
top cover from being opened accidentally while
the drive is in operation. As a result, if the drive is
off, pressing the eject button will not open the top
cover. Furthermore, even when the power is on,
depending on the status of the application that is
currently running, the top cover might not open for
one second or longer after the eject button is
pressed.
If the top cover does not open when the eject
button is pressed (unless the drive is currently
writing a disc), press the manual eject lever
(located on the bottom of the drive) in the direction
indicated by the arrow to open the top cover.
q;
Mode Switch
This switch is used to select the PC card
operating mode (CardBus mode/16-bit
mode).
For details on CardBus mode and 16-bit
mode, refer to the Setup Guide.
Loading and Ejecting Discs
Loading a Disc
1
Press the eject button to open the top cover.
The top cover will open slightly by itself. Lift it all of the way open manually.
2
Load a disc.
Push down on the center of the disc until the disc clicks into place. Do not press too hard.
Also, be careful not to touch the lens or any other optical parts in the drive.
CAUTION
When loading a disc, press the disc’s edge against the side of the spring-loaded bumper inside the disc
compartment. Make sure that the disc’s recording surface does not sit on top of the bumper before closing the
drive cover.
3
Close the top cover.
You can now access the data on the disc.
Ejecting a Disc
1
Press the eject button to open the top cover.
The top cover will open slightly by itself. You can then manually lift it until it opens fully.
2
Remove the disc.
Hold one finger against the edge of the disc from the side of the CRX85A, and press
another finger against the protrusion in the center of the drive to remove the disc.
CAUTION
• Make sure that the disc has stopped spinning before removing the disc.
• Do not open the top cover while the indicator is orange. Doing so may cause the computer to freeze up.
Eject button
Press here firmly to close.
Portable
CD-RW/DVD-ROM
Drive
Printed in Malaysia
English
Please refer to this manual together with the “PC Card Interface Drive User’s Guide”
in the attached Software CD-ROM, which carries more detailed information.
Français
Reportez-vous au présent manuel ainsi qu’aux documents intitulés “PC Card Interface Drive
Guide de l’utilisateur” contenu sur le CD-ROM accompagnant ce produit pour plus de
détails.
Deutsch
Einzelheiten entnehmen Sie bitte diesem Handbuch zusammen mit der “Betriebsanleitung
für das PC-Karten-Schnittstellenlaufwerk” auf der mitgelieferten CD-ROM, die zusätzliche
Details enthält.
Español
Consulte este manual junto con la “Guía del usuario de la unidad de interfaz de tarjeta de
PC” del CD-ROM del software suministrado, que ofrece información más detallada.
Italiano
Fare riferimento a questo manuale insieme a “Guida dell’utilizzatore dell’unità disco a
interfaccia scheda PC” nel CD-ROM del software allegato, che contiene informazioni
più dettagliate.
Press here.
Label facing up
Disc
Disc
Bumper
Approximately
8 cm
Approximately
8 cm


