

1
EN
GSM Remote Controlled Power Socket Solight DY10GSM
Thank you for purchasing our remote controlled socket DY10GSM. Its power output can be switched on or off via SMS command or using
buttons directly on the socket. The DY10GSM socket is capable of communicating with an additional DY10S socket at a distance of up to 30m.
With one SIM card you can control one DY10GSM socket and up to four DY10S sockets.
Both DY10GSM and DY10S sockets support temperature monitoring, temperature control, calendar setup and delayed SMS control from your
mobile phone. All services and features must be supported by the GSM network and the SIM card. Detailed information on the function and
advanced operation of the socket is provided in this manual.
1 Purchase a GSM SIM card and insert into the socket. This SIM card phone number is referred to as the master user number in this booklet.
2 On this SIM card, you need to deactivate the PIN entry function and activate the calling and SMS sending function.
3 To ensure a secure socket operation, do not divulge this phone number to persons who might abuse it.
For your safety
This socket has been designed for home or office use. It is not intended, for example, for switching industrial plants.
Before using this socket, make sure that mobile networks with sufficient signal coverage are available at the area of use, otherwise
the socket may not be operable.
The power consumption of appliances connected to the socket must not exceed 3,600W and the current 16A.
Electrical appliances whose consumption exceeds 1,500 W must be earthed.
Do not expose the socket to short circuit.
Do not touch the socket slots with any metal objects by hand.
This socket is intended for indoor use. Do not use it in a damp, chemically aggressive or dusty environment.
Do not open the device unless maintenance is required.
Do not shake the socket and avoid dropping it to the ground – this might cause its damage.
The socket operates on the principle of receiving and transmitting signal. Keep it out of the reach of radio networks that could
interfere with this signal.
Do not use the socket in areas where the use of transmitting devices is prohibited with regard to a possible risk of explosion (mines,
specific chemical plants, etc.).
The device may explode if thrown into fire.
The socket may work with voltage and current specified by the manufacturer. When used under other parameters, the correct
functioning of the socket may be compromised.
Keep the socket and its accessories away from children.
Product package
GSM socket (1 pc) Temperature sensor (1 pc) Operating manual (1 pc)
2
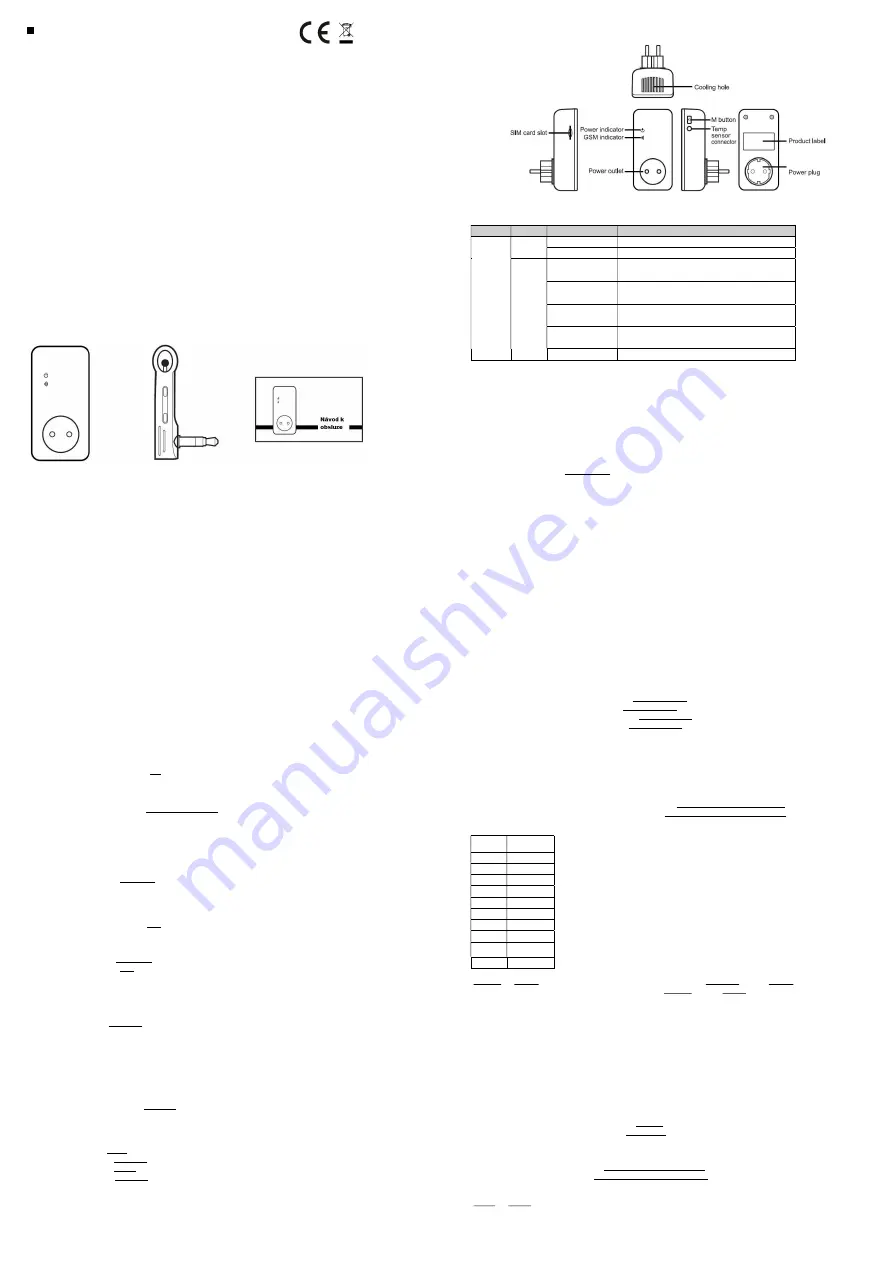
Description of DY10GSM socket
The DY10S socket is identical, apart from the missing SIM card slot.
LED indicators
Type
Indicator
Action
Status
DY10GSM
and DY10S
Power
indicator
OFF
Controlled power outlet is OFF
Steady light
Controlled power outlet is ON
GSM
indicator
Flashing slowly
Network Search (DY10GSM)
Lost connection with DY10GSM (DY10S)
Slow lighting up and
going out
Sleep mode
Two fast and one slow
flashing
Socket in pairing mode
Shining for 3 sec
Revert to default setting
Fast flashing
Receiving/sending SMS command
User authorization level
Socket setting and detailed setting may only take place via SMS commands. When setting up, select one of the two user level options:
Master user
Only one master user is authorized to use all of the DY10GSM functions. To use all the features of this socket, save the master user number
into the socket memory.
Other users
Up to four phone numbers may be allowed to use commands to switch the socket on and off, to detect the temperature in the socket’s
surroundings and to receive information about changes in power status.
Other phone numbers are not authorized to control the socket!
SMS commands
SMS command format:
#code#content#
The maximum number of characters in a command is 16
The DY10GSM socket will respond to the user upon receipt of an SMS command
Note
When writing a command, do not forget the # sign
Do not include spaces in the command text
Commissioning
Insert SIM card into the DY10GSM socket; the SIM card slot is on the side of the device; insert the SIM card as shown on the device casing.
Ensure that the SIM card is securely fixed. Connect temperature sensor to the inlet on the device side. The default password is 1234.
1 Switching on:
1.
Insert the DY10GSM socket into a power outlet. The GSM indicator will slowly flash for 15 seconds, then it will change to slowly
lighting up and going out – this status means that the socket is logged into the GSM network and ready for further operation. In its
default mode, the socket is set to outlet turned off.
3
2.
Turn on the electrical device to be operated, then connect it to the socket.
3.
Press the "M" button for about one second to turn the socket on. After setting other users, these users will be able to control the
socket.
Note:
1.
If the GSM network LED flashes slowly, it means a warning that the SIM card is not working properly.
2.
Check GSM signal strength. The quality of GSM signal may affect the properties of the socket. The user should make sure that
the socket is used in a location with sufficient GSM signal.
3.
For first use, we recommend a test run for the user to assure the correct operation of the socket and to detect GSM signal
quality.
2 Master user registration:
Send SMS command to the phone number of the SIM card inserted in the socket for:
Master user’s number registration:
#00#
3 Change of master user:
Current master user will send SMS command for:
Change of master user’s number:
#14#NewMasterNumber#
NewMasterNumber –
phone number of a new master user in format e.g.: 737xxxyyy.
4 Other users:
Up to four other phone numbers can be registered for this socket. These phone numbers can send SMS commands to control the DY10GSM
and DY10S sockets.
The master user will send SMS command for:
Registering other users:
#06#Family#
Family
– phone number of another user in format e.g.: 737xxxyyy.
Finding out other users’ registered numbers:
The master user will send SMS command for:
Finding out other users’ numbers:
#06#
Deleting other users:
The master user will send SMS command for:
Deleting another user:
#15#Family#
Deleting all other users:
#15#
5 Pairing DY10GSM and DY10S:
Master user will send an SMS for pairing DY10GSM and DY10S. Before pairing, make sure that the DY10S is set to default settings. If the DY10S
has not been paired yet, you can skip this process. If it has already been paired, you need to press the "M" button for 10 seconds. If this has
been done, the master user will send an SMS command for:
Pairing with DY10S
:
#60#name#
After receiving the SMS, the master user will receive the following answer: “
Power „name“ socket now!
“. After receiving this message,
connect the DY10S to power network. The LED power indicator will flash slowly for a few seconds and after pairing with the DY10GSM, and
then change to slow lighting up and going out.
“Name” is the DY10S socket identification when communicating with DY10GSM. Use this name when sending commands for this socket. Using
the DY10GSM setting, you can set any DY10S socket name. The title can contain numbers or letters without diacritic signs.
The master user will send SMS command for:
Disconnecting the DY10S socket:
#70#name#
6 Power control:
Method 1: Hold "M" button for one second.
Method 2: The master user will send SMS command for:
Turn DY10GSM
on
:
#01#0#
Turning DY10S on:
#61#name#
Turning DY10GSM off:
#02#0#
Turning DY10S off:
#62#name#
7 Delayed socket outlet control:
The power outlet can be set to delayed switching on/off in periodically repeating time interval. Delayed control will be automatically
deactivated by SMS command or by the "M" button; activating the calendar feature will also automatically deactivate the delay control
function. If a delay control command is received and the power outlet is turned on, this output will be immediately turned off and will only be
4
resumed when the desired time has elapsed. In contrast, when the socket is switched off, it will remain off until the desired delayed activation
time interval has elapsed.
The master user will send SMS command for:
Delayed DY10GSM power-on after defined time:
#12#0#Minutes#1#
Delayed DY10S power-on after defined time:
#63#0#Minutes#1#
Delayed DY10GSM power-off after a defined time:
#12#0#Minutes#0#
Delayed DY10S power-off after a defined time
:
#63#0#Minutes#0#
Minutes are a time parameter; the available range is 1 – 720.
8 Operation by calendar:
Activation of operation by calendar. The power outlet can be set to switch on at a certain time and then to switch off at a another set time.
Operation by calendar will be deactivated automatically if the user changes the socket status by SMS or "M" button; delayed operation or
control by achieved temperature may also deactivate this function.
The master user will send SMS command for:
Setting time interval for switching the DY10GSM power outlet on:
#20#0#WorkDay#StartTime#EndTime#
Setting time interval for switching the DY10S power outlet on:
#65#name#WorkDay#StartTime#EndTime#
Work day: One character, values ranging from "0" to "9". The following table shows the description of the various values
:
Value
Corresponding
day
0
every day
1
Monday
2
Tuesday
3
Wednesday
4
Thursday
5
Friday
6
Saturday
7
Sunday
8
Monday to
Friday
9
Weekend
StartTime
and
EndTime
: Contains 4 characters (HH:MM) and works in 24h format. If
StartTime is
later than
EndTime
, the device will remain
turned on until the next day. The power outlet will be switched on at
StartTime
and off at
Endtime
.
Example:
#20#0#1#0000#2130#
; 0 - means DY10GSM socket, 1 - Monday, 0000 means start time 00:00, 2130 means end time 21:30.
9 Control by ambient temperature:
The temperature sensor must be connected to the socket for this function. The power outlet can then be controlled depending on ambient
temperature. Operation by ambient temperature will be deactivated automatically if the user changes the socket status by SMS command or
"M" button; delayed operation or control by calender will also deactivate this function. Two modes are available: cooling and heating mode. In
the heating mode, the socket will automatically turn the output on when the temperature drops below the pre-set limit and turn off when the
temperature exceeds the requested temperature. In the cooling mode, the socket will automatically turn on when the temperature exceeds
the pre-set value and turn off when the temperature drops below the pre-set value.
Master user will send SMS command for:
Activating DY10GSM socket temperature control:
#23#0#1#
Activating DY10S socket temperature control:
#66#name#1#
Setting temperature control parameters
The master user will send SMS command for:
Setting DY10GSM socket parameters:
#24#0#mode#MinTemp#MaxTemp#
Setting DY10S socket parameters:
#67#name#mode#MinTemp#MaxTemp#
The mode parameters can be 1 or 2. Heating mode – 1, cooling mode – 2. The temperature range may reach from -10 to 50°C.
MinTep
and
MaxTep
: Values can be set in the range from -10 to 50°C.
For example,
#24#0#1#15#25#
means that you are setting control parameters based on ambient temperature for socket 0 - DY10GSM, 1 -
heating mode: if the temperature drops below 15 °C – socket will switch on, when temperature exceeds 25 °C, the socket will switch off. After
successfully setting the temperature range, this setting will be saved until the socket is reset to default settings.


