background image


ASSEMBLY INSTRUCTIONS


SM2007


BASE SIZE: 2.020m x 0.685m


Summary of Contents for SM2007

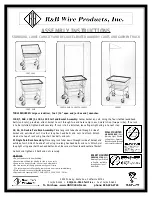
Page 1: ...ASSEMBLY INSTRUCTIONS SM2007 BASE SIZE 2 020m x 0 685m ...

Page 2: ...ocess needs to be adhered to to qualify for the steel warranty of your Duratuf Smart Store shed Wash all surfaces annually using a hose and soft nylon brush Within 2 km of coast wash every 3 months as above After a storm wash the cladding and the gutters as soon as possible to remove any highly corrosive salt deposits Volcanic Ash Fallout wash as soon as possible removing fall out from roof and gu...

Page 3: ...70m 4 Side Wall 1 pan Angle 1 895m 2 Door Sheet 1 850m 2 Door Sheet 1 pan 1 850m 2 Door Sides 1 850m 4 Door Jamb 1 890m 2 Door Brace 1 025m 4 Barge 0 770m 2 Door Top Bottom 0 715m 4 Weatherstrip 1 850m 1 Hardware Pack 1 Touchup Paint Brush 1 DESCRIPTION QTY DIAGRAM CHECKED Checked Date 3 CLADDING FLASHINGS HARDWARE PACK 1 ...

Page 4: ...IPTION QTY DIAGRAM Front Back Bottom Plates H4 Green 2 020 m 2 Front Back Top Plate H1 Red 2 020 m 2 Side Wall Bottom Plates H4 Green 0 685 m 2 Side Wall Top Plates H1 Red 0 687m 2 Spouting 2 055m 1 Ridge 2 055m 1 PACK 2 TIMBER ...

Page 5: ...S 1 LAY FOUNDATION 2 ASSEMBLE DOOR QUICK OVERVIEW 4 Top Plate Back Side Wall Sheets Barge Flashing Spouting Roof Sheets Top Plate Side Top Plate Front Bottom Plate Front Bottom Plate Side Back Wall Sheets Front Wall Sheet Door Jambs Door Sheets Door Side Flashing Padbolt Support Door Brace Door Top Bottom Flashing Ridge Flashing ...

Page 6: ...ing through from underneath During construction you may raise the bottom timber plate to allow the wall cladding to protrude 20mm below the bottom plate This will stop water flowing between the bottom plate and the concrete floor See note on page 8 80mm 100mm 7 5mm 20mm Concrete Floor Base Plate Wall Cladding 6 RAISED BASE PLATE OPTION For sheds placed on a raised concrete floor No doubt by now yo...

Page 7: ...r diagram STEP 4 On the back of the door place door braces in posi tion as shown in fig 3 Ensure that the top and bottom ends of the braces are under the door flashings as shown in fig 4 and opposite ends of the braces overlap in the middle Rivet door brace flashings onto back of door as shown Where possible rivet from front of door STEP 3 Attach hinges to door side flashing using rivets provided ...

Page 8: ...other Rivet sheets together on overlaps as shown STEP 3 Nail wall sheets to the Top Plate at each end making sure that the top of the sheets are flush with the top of the Top Plate and the sides of the wall sheet overhang the Top Plate by approx 15mm as shown Check that the Top Plate is straight then nail the wall sheet to the Top Plate two clouts per pan see fig 1 STEP 4 Nail the wall sheets to t...

Page 9: ...ottom of sheets flush with each other Rivet the sheets together on overlaps as shown STEP 3 Nail the wall sheets to the Top Plate at each end making sure that the top of the sheets are flush with the top of the Top Plate and that the sides of the wall sheets overhang the Top Plate by 15mm as shown Check that the Top Plate is straight then nail wall sheets to the Top Plate using two clouts per pan ...

Page 10: ...gs to wall sheets using four rivets equally spaced on each side IMPORTANT IF YOU CHOOSE TO RAISE YOUR TIMBER BASE PLATE READ THE FOLLOWING For sheds with Raised Base Plate option only see page 6 deduct 30mm from measurement shown between Top and Bottom Plates on all wall panels so cladding protrudes 20mm below bottom plate 15mm 15mm 15mm 15mm TOP PLATE DOOR JAMB NAIL STEP 2 Using 2 x 30mm clouts n...

Page 11: ...th the second Side Panel ensuring that the Side Panel overlaps the Back Wall Panel STEP 3 Stand up the Front Wall Panel Ensure that the Front Wall Sheets overlap the Side Wall Sheets Using 8 x 40mm screws screw the Top and Bottom Plates together STEP 4 Rivet the wall sheets together at the corners using 4 equally spaced rivets as shown 11 FRONT OVERLAPS SIDES X 4 SIDE WALL BACK WALL SIDE WALL FRON...

Page 12: ... the outside edge of the back wall cladding as in fig 4 Using 4 x 50mm Clouts predrill and nail the Roof Sheets to the Top Plates through the ribs at each corner ensuring ribs on the Roof Sheets line up with ribs on the Wall Sheets fig 2 STEP 3 Ensure the Front and Back Top Plates are straight Using 11 x 50mm clouts nail the roof sheets to the back Top Plate through each rib Using 11 x 50mm roofin...

Page 13: ... galvanised brackets screws and dynabolts Space the brackets evenly around the shed and fix to the Bottom Plate and the concrete slab A 10mm masonry drill bit is required FITTING A SMART STORE FLOOR KIT OPTIONAL Position the Floor Joists centrally between the side Base Plates and skew nail each end with two 75mm nails Check that the shed is sitting level and square Check that the diagonal Bottom P...

Page 14: ...l bit drill hole into top and bottom timber plates STEP 1 Place the doors in the panel In open position approx 25mm below top of top plate Using two rivets rivet the top and bottom hinges to the Door Jamb Flashing ensuring door closes properly Fit remaining rivets Repeat with second door x3 x3 x3 x3 x3 x3 IMPORTANT CLEAN UP REMOVE ALL DRILL FILINGS FROM ROOF WALLS AND CHANNELS THOROUGHLY FAILURE T...

Page 15: ......

Page 16: ...is less than 200g m2 as published by Branz Warranty certificate being returned to manufacturer within 21 days of purchase together with proof of purchase This warranty does not cover the following Fastenings and fixings Normal wear and tear damage by impact or acts of God Situations where the shed has been used for storage of chemicals manure or corrosion causing products Unauthorized modification...

Reviews: