background image


User 

Manual 


Siqura FD2x Series


1.3 Megapixel Vandal Proof IP Fixed Dome Camera


Summary of Contents for FD2x Series

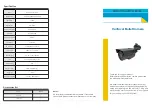
Page 1: ...User Manual Siqura FD2x Series 1 3 Megapixel Vandal Proof IP Fixed Dome Camera ...

Page 2: ......

Page 3: ... 5 1 SYSTEM TIME SETTINGS 14 5 1 1 Sync with computer time 14 5 1 2 Manual 14 5 2 USER MANAGEMENT 15 5 2 1 Root password 15 5 2 2 Add user 16 5 2 3 User permissions 16 5 2 4 Manage users 17 5 2 5 User information 17 5 3 NETWORK 18 5 3 1 Acquire IP address automatically DHCP 19 5 3 2 Use a fixed IP address 20 5 4 DDNS 21 5 5 MAIL 22 5 6 FTP 23 5 7 ALARM CONFIGURATION 24 5 8 MOTION DETECTION 25 5 9 ...

Page 4: ...RESSION 37 6 3 VIDEO STREAM PROTOCOL 39 6 4 VIDEO FRAME SKIP 40 6 5 AUDIO MODE AND BIT RATE SETTINGS 41 7 CAMERA SETTINGS 43 7 1 EXPOSURE 43 7 2 WHITE BALANCE 44 7 3 BACKLIGHT SETTING 45 7 4 BRIGHTNESS SETTING 45 7 5 SHARPNESS SETTING 45 7 6 CONTRAST SETTING 46 7 7 DIGITAL ZOOM SETTING 46 7 8 IR FILTER SETTING 46 APPENDIX A TECHNICAL SPECIFICATION 47 ...

Page 5: ...ight Under copyright laws the contents of this installation manual may not be copied photocopied translated reproduced or reduced to any electronic medium or machine readable format in whole or in part without prior written permission of the company Important information Before proceeding please read and observe all instructions and warnings in this manual Retain this manual with the original bill...

Page 6: ...health which could otherwise be caused if this product is thrown into the garbage bin The recycling of materials will help to conserve natural resources For more details information about recycling of this product please contact your local city office your household waste disposal service or the seller of the product Compliance is evidenced by written declaration from our suppliers assuring that a...

Page 7: ...sk a qualified technician for servicing Do not operate the camera beyond the specified temperature humidity and power source ratings Verify the power source is appropriate before you plug in and operate the unit If the camera is installed outdoors make sure it is sheltered from direct sunlight Do not use strong or abrasive detergents when cleaning the camera Use a dry cloth to clean the camera whe...

Page 8: ......

Page 9: ...width With ultra high resolution users can monitor critical areas with greater detail like never before 3 1 Features Image Quality Sony progressive scan CCD CMOS sensor 1 3 Megapixel high definition Low light sensitivity 0 2 lux F1 2 Application Dual streaming MJPEG MPEG 4 o MJPEG up to 1280x960 15 fps o MPEG 4 up to 640x480 30 fps Digital zoom 1x 12x Two way audio Image rotation Flip Mirror and 1...

Page 10: ......

Page 11: ...a in their network using the application DeviceSearch exe found in the supplied CD s DeviceSearch folder This application will detect and list all the Siqura FD2x cameras found in the network The Device Search application is also available on the Software Downloads page of www optelecom nkf com Login required 4 1 1 Device Search software setup To explore your network for installed devices 1 Double...

Page 12: ... Device Search again The IP Camera s default IP address not shown in figure 4 3 is in the 10 x x x series The precise address is printed on a label on the bottom of the camera Note that if the camera is hard reset the IP address reverts to 192 168 0 250 Figure 4 2 Device search security alert Figure 4 3 Device search all found devices ...

Page 13: ... reasons of security it is strongly advised to change the administrator s password See section 5 2 User Management for further details Additionally users can change the camera s network property either DHCP or Static IP directly in the list of found devices Refer to the section 4 1 2 to learn how to change the IP Camera s network property 4 1 2 Changing the IP camera s Network property Users can d...

Page 14: ... Camera s MAC address for future identification 3 In the Network Setup page select DHCP and click Apply 4 Click OK on the Note indicating you have changed a setting Wait for one minute to re search for the IP Camera 5 Click the Device Search button to search all the devices again and select the IP Camera with the correct MAC address 6 Double click on the IP Camera and log in when prompted Figure 4...

Page 15: ...r The installation file is named install cab When Internet Explorer displays the security warning shown in figure 4 7 click Install 2 When prompted by the Siqura Viewer installation wizard to install click Next 3 When installation is complete click Finish The Siqura home page will display as shown in figure 4 8 4 3 Siqura FD2x User Interface Across the top of the main page shown in figure 4 8 are ...

Page 16: ...etting In this section the Administrator sets host name system time root password network related settings etc This area is further described in section 5 System Settings Streaming setting In this section the administrator can set video and audio formats and compression parameters These settings are described in section 6 Video and Audio Streaming Camera setting In this section users can adjust va...

Page 17: ...GS Figure 5 1 shows all categories under the System tab Each category in the left column is explained in the following sections please note The System configuration page is only accessible by an Administrator Figure 5 1 System settings ...

Page 18: ...mn as shown in figure 5 2 5 1 1 Sync with computer time If selected the displayed date and time will be synchronized with those of the user s PC 5 1 2 Manual The Administrator can also set video date time and day manually Note that the entry format for date and time should reflect that shown next to the entry field Figure 5 2 System settings ...

Page 19: ...r management in the left hand column This screen is shown in figure 5 3 5 2 1 Root password please note The root username is Admin and the default password is 1234 Both username and password are case sensitive It is recommended that the administrator change this password Figure 5 3 User management settings ...

Page 20: ...These permissions are described in section 5 2 3 4 Click Add to add the new user The new user will be displayed in the user name list please note User names and passwords are limited to 16 characters in length This camera supports a maximum of twenty user accounts 5 2 3 User permissions The Siqura FD2x series of cameras supports four permissions that control access to the corresponding web page se...

Page 21: ...2 From the list labelled Existing User select the name of the user and click Edit 3 In the pop up dialog select the user s permissions change the user s password and click Save please note It is required to enter the user password as well as select the functions open to the user When finished click Save to modify the account s password and privileges 5 2 5 User information To view a list of accoun...

Page 22: ... Home System Streaming and Camera Figure 5 5 above shows NewUser 1 1 0 0 NewUser is the user name The number 1 indicates a privilege is granted the number 0 indicates a privilege is denied Therefore J is granted privileges of Home and System and is denied the privileges of Streaming and Camera 5 3 Network You can configure the camera to use a fixed IP address or to acquire the address dynamically ...

Page 23: ...e its IP address To acquire the IP address via DHCP 1 In the left hand menu select Network as shown in figure 5 6 2 Select the option Get IP address automatically 3 Restart the IP dome camera Upon restart users can find the camera through the installer program DeviceSearch exe found in the DeviceSearch folder on the camera s CD please note Record the IP dome camera s MAC address which can be found...

Page 24: ...Search folder on the camera s CD or enter the IP address in the browser s address bar and press Enter IP address The IP address identifies the camera on the network Subnet mask The subnet mask is used to determine if the destination is on the same subnet The default value is 255 255 255 0 Default gateway The default gateway is used to forward frames to destinations on different subnets An invalid ...

Page 25: ...100 8080 instead of http 192 168 0 100 Host name The name identifies the camera For example if the alarm function is enabled and set to send alarm messages by Mail FTP the host name entered here will display in the alarm message Alarms are described in section 5 7 Alarm Configuration 5 4 DDNS Dynamic Domain Name System DDNS allows a DNS name to be constantly synchronized with a dynamic IP address ...

Page 26: ... name in the Host name field 6 In the Username E mail field type the username or e mail required by the DDNS provider for authentication 7 In the Password Key field type the password or key required by the DDNS provider for authentication and click Save 5 5 Mail The Administrator can send an e mail via Simple Mail Transfer Protocol SMTP when an alarm is triggered SMTP is a protocol for sending e m...

Page 27: ...erver Account Name Password E mail Address For SMTP server details contact your network service provider 5 6 FTP The Administrator can configure the camera to send alarm messages to a specific File Transfer Protocol FTP site when an alarm is triggered The FTP configuration page is shown in figure 5 10 Figure 5 10 FTP settings ...

Page 28: ...password and remote folder in the appropriate fields 3 Press Save when finished For FTP server details contact your network service provider 5 7 Alarm Configuration The IP dome camera provides one relay input and one relay output for cooperating with alarm systems to capture event images The alarm configuration page is shown in figure 5 11 Figure 5 11 Alarm configuration ...

Page 29: ...normal output signal status as high or low according to the current alarm application 5 Check the boxes Send Alarm Message by FTP or Send Alarm Message by E Mail as appropriate to your system please note Make sure the SMTP or FTP configuration has been completed as described in sections 4 5 Mail and 4 6 FTP 5 8 Motion Detection The Motion detection function enables the camera to trigger an alarm w...

Page 30: ...Trigger alarm Output level is adjustable Users may choose from low or high in order to meet the requirements of the alarm Send E mail when the motion detected Once motion is detected the system could automatically send a notice to a specified user s E mail address Send message to FTP when motion detected When the alarm is triggered a message will be sent to the FTP site the administrator has speci...

Page 31: ...haracters Alternately click Select to browse for an existing directory important If the specified file folder is indicated as invalid verify that the directory name does not contain invalid characters including spaces 5 10 Iris Adjustment With this feature the camera automatically adjusts the iris to achieve consistent exposure output To configure the auto iris lens 1 From the left hand menu selec...

Page 32: ...File The log file provides useful information about configuration and connections after system launch To view the system log In the left hand menu click View log file as shown in figure 5 15 The system log displays Figure 5 15 Log file ...

Page 33: ...ers The FD2x camera s parameters are stored in its configuration file To view all of the system s parameters Click View parameters in the left hand menu The parameters display in the browser as shown in figure 5 16 Figure 5 16 System parameters ...

Page 34: ... the camera s settings to those present when shipped from the factory To restore the camera s default settings Click the Set Default button The system will restart in 30 seconds important The IP address will be restored to default To reboot the system without changing its settings Click Reboot Figure 5 17 Factory defaults ...

Page 35: ...oftware Version To display the camera s software and firmware versions In the left hand menu select Software version The camera s software and firmware versions are displayed as shown in figure 5 18 Figure 5 18 Software version ...

Page 36: ...re 5 19 please note Make sure the upgrade software file is available before initiating a software upgrade To upgrade your camera s software 1 In the left hand menu select Software upgrade 2 Click Browse as shown in figure 5 20 and select the binary file to be uploaded for example Userland jffs2 Figure 5 19 Software upgrade ...

Page 37: ... OK Software uploading will begin please note Do not change the upgrade file name or the system will fail to find the file 4 When notified that the file has uploaded successfully click OK to continue Figure 5 20 Software upgrade ...

Page 38: ...k Upgrade The system will check whether the upgrade file exists or not After the upgrade process is finished the viewer will return to the Home page and operation can continue important Upgrading the software also resets factory defaults including IP address Make sure to note all settings before proceeding Figure 5 21 Select file to upgrade ...

Page 39: ...e Streaming tab at the top of the page The items display in the left hand column In this section the administrator can configure specific video resolution video compression mode video protocol and audio transmission mode 6 1 Video Resolution and Rotate Type The video setting page is show in figure 6 1 Figure 6 1 Video format settings ...

Page 40: ...fps MPEG 4 VGA 15 fps 3 Click Save to confirm the setting 6 1 2 Video rotate type Users can change video display type if necessary Rotate types for the Siqura FD2x cameras include Normal Flip Mirror and 180 degree illustrated in this section Suppose the displayed image of IP dome camera is shown as in figure 6 2a This is the default orientation if the dome camera is flat on a tabletop for example ...

Page 41: ...ation applied Flip video Rotates the image vertically Mirror video Rotates the image horizontally 180 degree rotate Inverts the image 180 3 Click Save to confirm the new setting 6 2 Video Compression Administrators can select the appropriate MJPEG MPEG 4 compression mode in the video compression page shown in figure 6 3 depending on the application Figure 6 3 Video compression ...

Page 42: ...he MPEG 4 compression setting 1 From the Main menu select Streaming and from the left hand menu select Video Compression 2 Choose one of the following compression settings 128 kbps highest compression lowest quality 256kbps default 512kbps 1024kbps lowest compression highest quality 3 Click Save to confirm the setting To display compression information on the home page 1 From the Main menu select ...

Page 43: ...ocol using TCP transport To configure the Video Stream protocol 1 From the Main menu select Streaming and from the left hand menu select Video Stream Protocol 2 Select one of the following protocol settings MPEG 4 over RTSP MJPEG over RTSP MPEG 4 over RTSP MJPEG over HTTP JPEG over HTTP for internet use Multicast mode To use Multicast mode you must also supply the Multicast IP address and appropri...

Page 44: ...ideo Frame Skip Video frame skipping is useful for saving bandwidth The setting page is shown in figure 6 5 To enable MJPEG frame skip 1 From the Main menu select Streaming and from the left hand menu select Video Frame Skip 2 In the section labelled MJPEG Frame Skip select one of the following options No skipping default Frame skipping at 5 frame internal Frame skipping at 10 frame internal Frame...

Page 45: ...wing options No skipping default Frame skipping at 5 frame internal Frame skipping at 10 frame internal Frame skipping at 15 frame internal 3 Click Save please note Higher frame skipping rates decrease video smoothness 6 5 Audio Mode and Bit Rate Settings The Audio configuration page is show in figure 6 6 On this page the administrator can select the transmission mode and audio bit rate Figure 6 6...

Page 46: ...en to the other one site at a time Simplex Talk only One site can only speak to the other site Simplex Listen only One site can only listen to the other site Disable Select this item to turn off the audio transmission function 3 From the drop down list labelled Bit Rate select the audio transmission bit rate Audio transmission bit rates include 16 kbps G 726 24 kbps G 726 32 kbps G 726 40 kbps G 7...

Page 47: ...arameter setting are described in the following sections 7 1 Exposure The exposure is the amount of light received by the image sensor and is determined by the width of lens diaphragm opening iris adjustment the amount of exposure by the sensor shutter speed and other exposure parameters With this item users can define how the Auto Exposure function works Figure 7 1 Camera settings ...

Page 48: ...e size of the Iris opening The higher the number the more light is let into the lens Fixed Shutter Mode In this mode users can select the shutter speed Shutter speed values range from 1 5 to 1 10000 second Once you choose a new setting press SET to confirm it 7 2 White Balance A camera needs to find reference color temperature which is a way of measuring the quality of a light source for calculati...

Page 49: ...manually 1 Select a number between 1 and 11 2 Press SET to confirm the new setting 7 3 Backlight Setting Backlight compensation enhances the visibility of objects in the foreground of an image by using such objects as reference points To enable backlight compensation 1 Select On 2 Press SET to confirm the new setting 7 4 Brightness Setting Users can adjust the image s brightness by adjusting this ...

Page 50: ...ortion to the full size of the image The camera s digital zoom is adjustable from x1 to x12 at VGA resolution To adjust the camera s digital zoom 1 Select a value from x1 no zoom to 12x full zoom 2 Press SET to confirm the new setting please note Digital zoom by its nature reduces image quality 7 8 IR Filter Setting When the IR function is On the camera removes the IR cut filter for clearer images...

Page 51: ...73 Operation Video Compression MPEG 4 MJPEG Video Streaming Simultaneous MPEG 4 and MJPEG video stream dual encoding Resolution MPEG 4 VGA QVGA CIF QCIF MJPEG 1280x960 4 VGA VGA Frame Rate MPEG 4 30fps VGA MJPEG 15fps 1280x960 30 fps 640x480 Brightness Manual Exposure Auto Manual Sharpness Manual Contrast Manual White Balance Auto Manual Indoor Outdoor Digital Zoom 1x 12x Image Setting Rotation Fl...

Page 52: ...ndicator Power Link TX General Operating Temperature 40 F 122 F 40 C 50 C 32 F 122 F 0 C 50 C when using PoE Weather Proof Standard IP66 standard Power Source DC12V AC 24V PoE Power Consumption 4 2W max 350mA DC12V 3W max 250mA DC12V 4 2W max 350mA DC12V Certificate CE FCC RoHS compliant Dimension 142 x 119mm 5 6 x 4 7 Inches Weight 1 kg 2 lbs please note Weight and dimensions are approximate All ...

Page 53: ......

Page 54: ... Optelecom NKF B V 2008 Version 1 2 082306 1b Siq FD2x UM MW03SP3 199925410780 00 www siqura com www optelecom nkf com ...

Reviews: