background image


English - 1


Overview 

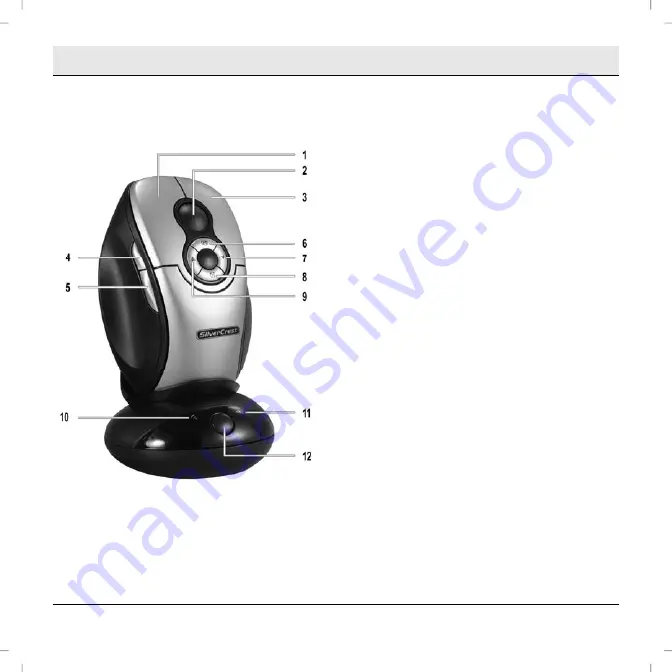
Thank you for purchasing the SilverCrest OM 809. Apart from the 3 standard buttons, this optical wireless 
mouse is equipped with six special buttons, which enable you to access frequently recurring functions. 
Refer to the list below for details of assignment of the special buttons (4 to 9) when delivered. 


Left-hand mouse button 

Middle mouse button and scroll wheel 

Right-hand mouse button 

4 Back 

5 Forwards/next 

Switch over active application 

7 Page 

back 

8 Close 

application 

9 Page 

forwards 

10  Indicator light for wireless reception 

11 Charge indicator light 

12 Synchronizer button 


Carefully read through this manual to familiarise yourself with the wireless mouse and charger unit before 
starting up. Please also follow all the safety instructions. 

Summary of Contents for OM 809

Page 1: ...cial buttons 4 to 9 when delivered 1 Left hand mouse button 2 Middle mouse button and scroll wheel 3 Right hand mouse button 4 Back 5 Forwards next 6 Switch over active application 7 Page back 8 Close application 9 Page forwards 10 Indicator light for wireless reception 11 Charge indicator light 12 Synchronizer button Carefully read through this manual to familiarise yourself with the wireless mou...

Page 2: ...nterface 5 Conformity 5 Disposal of old devices 5 PACKAGE CONTENTS 6 SYSTEM REQUIREMENTS 6 INSTALLING THE HARDWARE 7 Insert the rechargeable batteries 7 Connect the wireless mouse to the computer 8 Switching the wireless mouse on and off 10 Energy saver mode 10 Charging the rechargeable batteries 10 INSTALLING THE SOFTWARE 11 THE CONFIGURATION 15 TROUBLESHOOTING 17 WARRANTY NOTES 18 ...

Page 3: ...o naked flames or fire sources e g burning candles on or next to the device no foreign bodies penetrate the device is not exposed to large temperature fluctuations the device is not exposed to excessive impacts and vibrations Cables Always hold all cables at the plug and do not pull on the cable itself Never touch a cable with wet hands as this can cause a short circuit or electric shock Do not pl...

Page 4: ...evice with respect to electromagnetic compatibility and screening quality This device fulfils all relevant standards related to its CE conformity If the device is modified without the manufacturer s prior approval compliance with these standards is no longer guaranteed Use the accessories specified by the manufacturer only If you are not using the device within the Federal Republic of Germany you ...

Page 5: ...rthermore TARGA does not accept any responsibility for the replacement or exchange of connection cables and devices not specified by TARGA GmbH The user is solely responsible for the correction of faults caused by such unpermitted changes and for replacement or exchange of the devices Conformity The wireless mouse has been tested and approved with respect to compliance with the basic requirements ...

Page 6: ...packaging contents are complete OM 809 wireless mouse Charger unit with integrated receiver 2 rechargeable batteries type AAA 1 2 V User instructions Driver CD System requirements Operating system Microsoft Windows 2000 XP At least one free USB port CD ROM drive ...

Page 7: ... correct polarisation note and match and symbols in the wireless mouse see figure below 1 Synchronizer button 2 Optical sensor 3 Rechargeable battery compartment 4 Contacts for charging the rechargeable batteries in the charger unit The rechargeable batteries must be fully charged first in order to use their full capacity i ...

Page 8: ...on your switched on computer The operating system automatically recognises the new hardware and installs the required drivers 2 During this short one off procedure a message appears first New hardware found Human Interface Device followed by the message The new hardware has been installed and can now be used After you have connected the USB the receiver indicator light 10 on the charger unit light...

Page 9: ...he receiver indicator light on the charger unit flashes 4 Then press the synchronizer button on the wireless mouse within 25 seconds see figure below The receiver indicator light on the charger unit soon continues to flash with a fast rhythm Synchronization is finished Synchronizer buttons Receiver indicator light Detailed view of the charger unit Detailed view of the underside of the wireless mou...

Page 10: ...ou do not use the mouse for several minutes it automatically switches itself off Then press any button on the wireless mouse to switch it back on Charging the rechargeable batteries To recharge the rechargeable batteries insert the wireless mouse with the inserted rechargeable batteries in the charger unit see figure on the first page The charge indicating light see figure on page 1 item 11 lights...

Page 11: ...oftware Please insert the enclosed CD ROM in the CD ROM drive of your computers The installation process see figure below should start automatically If not double click the autorun exe file on the CD ROM to start it manually You will be asked to choose the language for the installation Select your language and click Next to start the installation ...

Page 12: ...12 English Ensure you have selected the correct device and click Next to continue The installation is prepared Please wait ...

Page 13: ...English 13 Click Next to start the installation Here you can select the target folder for the installation using the Browse button or use the suggested folder Please click Next to continue ...

Page 14: ...lled software and then click Finish As soon as the installation is completed you can use the software to configure the optical mouse Do this by clicking on the new symbol in the task bar bottom right hand side of your screen next to the system clock For more details plead read from page 15 The configuration ...

Page 15: ...t button to reinstate the delivered factory condition You can activate changes by clicking the Apply button the window remains open or the OK button the window closes Use the slide button Speed of double click to adjust the double click speed If you move the slider to the left and activate the function with the Apply button the mouse responds with a low double click speed If you move the slider to...

Page 16: ...You can choose between the settings 1 line 3 lines or 6 lines Use the For Pages option to scroll page wise Adjust the volume If this function is activated you can use the mouse s scrollwheel to adjust the system volume The function described above Wheel Scroll Speed is automatically deactivated at the same time Use the slide controller to determine the volume change per movement Use the menu s oth...

Page 17: ...onwards Connecting the wireless mouse to the computer Try another USB port Check the charge of the rechargeable batteries Change the position of the receiver to improve the reception conditions The distance between the receiver and mouse should not be more than one metre when aligned Check whether you have resynchronized after changing the rechargeable batteries Please ensure that the radio receiv...

Page 18: ...18 English Warranty notes ...

Page 19: ...English 19 Warranty notes ...

Page 20: ...20 English ...

Reviews: