Siemens Water Technologies Acutec 35, Manual
The Siemens Water Technologies Acutec 35 is a cutting-edge water treatment system designed for efficiency and reliability. Need assistance with installation and maintenance? Look no further! Download the user manual for free from manualshive.com and discover comprehensive instructions to maximize the benefits of this exceptional product.
Share
Download


Reviews:
No comments
Related manuals for Water Technologies Acutec 35
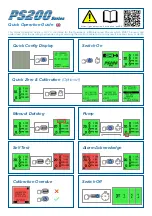
GMI PS200 Series
Brand: 3M Pages: 2
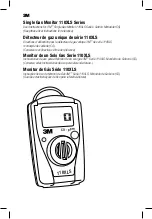
110XLS Series
Brand: 3M Pages: 33

Land Star
Brand: Bounty Hunter Pages: 10
Fast Tracker
Brand: Bounty Hunter Pages: 12

DISCOVERY 3300
Brand: Bounty Hunter Pages: 24

x2
Brand: Shadow Pages: 36

EX-TEC SNOOPER H
Brand: sewerin Pages: 35

GE-100
Brand: Raider Pages: 12

LBW-WATCHMAN-EC
Brand: Cool Air Pages: 24

Cyclone MC1
Brand: WGI Innovations Pages: 4

CP-WG01W
Brand: CPVan Pages: 12

MD9200
Brand: Famous Trails Pages: 10
Beacon 200
Brand: RKI Instruments Pages: 56

GX-2003
Brand: RKI Instruments Pages: 153

VS-24
Brand: Eagle Eye Pages: 10

MD9100
Brand: Famous Trails Pages: 15

FLSJ1263A
Brand: Samon Pages: 40

201T
Brand: Honeywell Pages: 66


