background image

SHAR� 

OPERATION MANUAL 

Please read this operation manual carefully before using the camcorder. 

Important 

For assistance in rep orting  the  theft  or loss  of this product, record 
on the line provided the serial number which is located on the bottom 
of the  unit.  Please retain  this  information. 

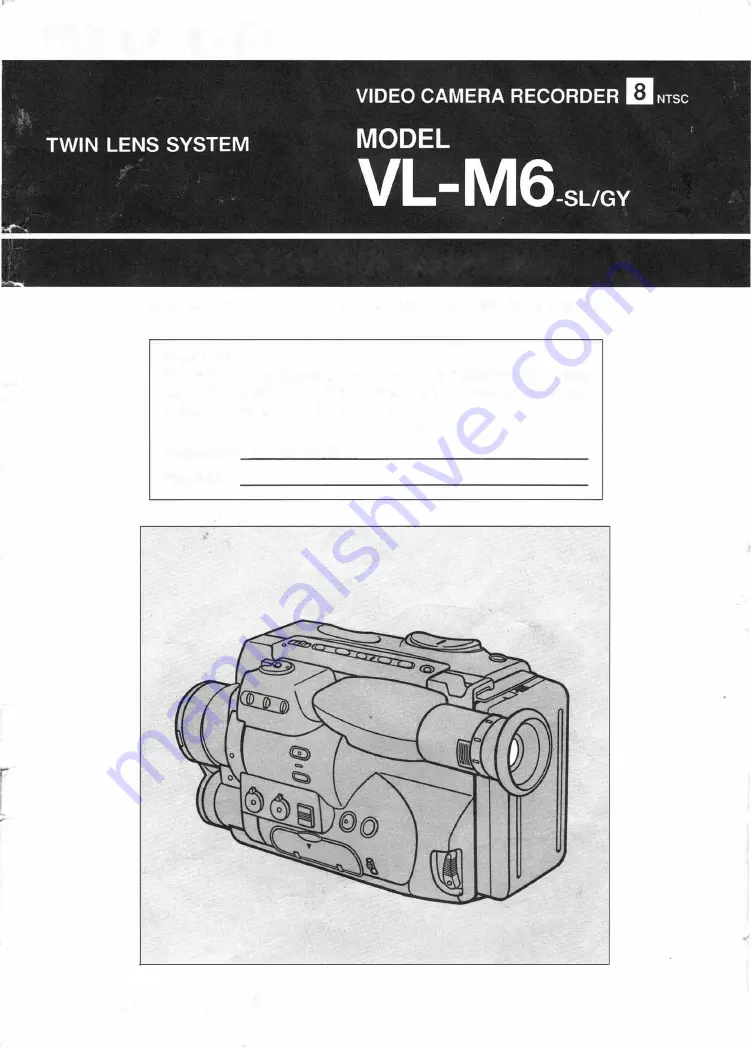
Model  No.:  VL-M6-SUGY 

Serial  No.: 

TWIN CAM 

Summary of Contents for TWINCAM VL-M6-GY

Page 1: ...using the camcorder Important For assistance in rep orting the theft or loss of this product record on the line provided theserial number which is located on thebottom of the unit Please retain this information Model No VL M6 SUGY Serial No _ ______ _____ __ _ ___ _ TWINCAM ...

Page 2: ...d fire hazards do NOT use any other power source AC PLUG ADAPTOR QPLGA0006GEZZ CAUTION ON LITHIUM BATIERY MEMORY BACK UP BATIERY If a battery is reversed positive end where the negative end belongs and vice versa it can overheat and rupture This has happened when young children install batteries backwards Warn children not to take out batteries or install them Parents should install the lithium ba...

Page 3: ...R 17 POWERING THE CAMCOR DER FROM AN AC OUTLET 18 USING THE CAR BATTERY AD A PTOR BATTERY CHARGER OPTIONAL ACCESSORY 18 VIEWFINDER INFORMATION 19 ALARM I N DICATORS 19 OPERATING INFORMATION I N DICATORS 20 CAMERA RECORDING 2 1 EASY CAMERA RECOR DING WITH FULL AUTO 2 1 USING THE AUTO DATE TIME FUNCTION 23 EDIT SEARCH 23 AUTO WHITE BALANCE AUTO IRIS 24 AUTO FOCUS 25 AUTO MACRO 25 LIGHTING 26 LIGHTIN...

Page 4: ...AND CAR BATTERY with optional VR U40CH Minimum illumination Since there is no widely accepted testing procedure for determining minimum illumination capability tux ratings are comparable only between models from the same manufacturer SUPPLIED ACCESSORIES BT 70 SL Silver or BATTERY PACK BT 70 BK Black DC OUTPUT CABLE BATTERY CHARGER UADP 0137GEZZ OCNW 1140TA01 Silver grey RF CONVERTER SHOULDER STRA...

Page 5: ...oid shocks and dropping Do not drop or otherwise subject the camcorder to hard shocks or strong vibrations Bumping or striking the unit during recording will generate noise in the recorded image 1 Watch the temperature and humidity You can use your camcorder at 0 c to 40 C and at 35 to 80 relative humidity Do not store the unit in an unventilated car in the summer in direct sunlight or near strong...

Page 6: ...f the word DEW flashes in the viewfinder remove the cassette leave the cassette com partment open and wait several hours to allow the camcorder to acclimate to the surrounding temperature To use the camcorder again turn on the power after waiting for several hours Be sure that the word DEW has disappeared from the viewfinder Do not insert a cassette while the word DEW is flashing this may result i...

Page 7: ...e battery pack and the unit Battery power is consumed even when the camcorder s power is turned off If the cam corder will not be used remove the battery pack See page 15 mm Please use the SHARP BT 70 or BT 80 battery packs designed specifically for use with this camcorder Extending battery pack life This camcorder uses a Ni Cd type battery pack 1 We recommend that you use the battery pack until i...

Page 8: ...ses and stand them on edge USING YOUR CAMCORDER ABROAD Television system signals electrical system voltages and frequencies vary substantially from country to country When you are abroad please check the sections below before using the AC adaptor or connecting the camcorder to a TV AC Power Sources The AC adaptor is compatible with 50 Hz and 60 Hz electrical systems in the range of 110 V to 240 V ...

Page 9: ...r and cart combination should be moved with care Quick stops excessive force and uneven surfaces may cause the camcorder and cart combination to overturn 7 10 Ventilation Slots and openings in the cabinet are provided for ventilation to ensure reliable operation of the video product and to protect it from overheating These openings must not be blocked or covered by placing the video product on a b...

Page 10: ... outlets and extension cords this can result in a risk of fire or electric shock 18 Object and Liquid Entry Never push objects of any kind into this video product through openings They may touch dangerous voltage points or short out parts that could result in a fire or electric shock Never spill liquid of any kind on the video product 19 Servicing Do not attempt to service this video product yours...

Page 11: ...LANCE button 35 Use this button to lock the white balance PLAY button 30 Press for playback 0 SHUTTER SPEED button 36 Used to select the shutter speed FF Forward Search button 30 Used to fast forward the tape and for forward video search during playback 0 EDIT SEARCH button 23 Used to search forwards and record over a previously recorded scene STOP button 30 Used to stop recording playback FF and ...

Page 12: ...n 31 DATE TIME INITIAL button 13 Built in microphone 4D Lens cap CD P IN P button 40 G MOVE WIPE button 39 40 CD LENS SELECT button 38 Eye Cup G Diopter adjustment 16 Rotate this ring to match the viewfinder focus to your eyesight Electronic Viewfinder Monitor 16 This displays the subject and functions as a convenient black and white monitor for playback of recorded material 10 ...

Page 13: ...IONIDEO INPUT OUTPUT jacks AN IN OUT select switch 27 EDIT switch 32 FOCUS F N buttons 34 for manual power focusing Battery pack mounting panel e STANDBY switch REC START STOP button f BATTERY EJECT lever 15 6 Cassette compartment cover G Lid fD fi e OPEN button 14 EJECT button 14 G Hand strap 11 ...

Page 14: ...OR EMERGENCY TREATMENT fif iii elO BATIERY MAY EXPLODE IF MIS TREATED OR INSTALLED WITH POLARITY REVERSED DO NOT RECHARGE DISASSEM BLE OR DISPOSE OF IN FIRE umm If the memory backup battery is not installed the date and time settings will be erased when the main battery pack is detached This lithium battery is available at local electronic appliance shops and audio video shops The battery life exp...

Page 15: ...Set the STANDBY switch to the STANDBY and turn the POWER switch to CAMERA 2 Press the DATE TIME DISPLAY button to display the date and time in the viewfinder 3 Press and hold the INITIAL button for a few seconds 4 Using the SELECT and S ET buttons set the calendar and time mmn The DATE TIME button is also the COUNTER button If setting is not completed and no button is pressed for more than 60 seco...

Page 16: ...amcorder lift 2 the lid up until it opens Press EJECT The cassette compartment cover will automati cally rise up and open 3 Take out the cassette and then press the PUSH mark on the compartment to close it 4 After the compartment cover is completely closed close the lid Press the lid down until both the left and right tabs are locked firmly in position liffljlt U J Never try to close the lid while...

Page 17: ...d slide it to the right as illustrated HM j Make sure the battery pack fits exactly Attempting to install the battery pack improperly may damage the battery holder on the camcorder When the battery becomes weak BATIERY blinks in the viewfinder Replace the battery pack with a fully charged one DETACHING THE BATTERY PACK While pressing the BATIERY EJECT lever in the direction indicated by the arrow0...

Page 18: ...CAMERA 4 Set the STANDBY switch to STANDBY 5 Turn the diopter adjustment ring so that the viewfinder screen is in sharp focus titt I lei Do not pick up the camcorder by the viewfinder barrel as shown on the left CLEANING Clean the lens with a soft dry lens cloth To clean dust off the viewfinder screen 1 Pull the viewfinder eye piece outward about 8 mm until the lines that run left to right on the ...

Page 19: ...H lamp lights up The battery pack i s first discharged while the REFRESH lamp is on and then it is automatically recharged USING THE AC ADAPTOR BATTERY CHARGER hi41foi111 J H If used near a radio the AC Adaptor Battery Charger may interfere with reception Prevent flammables liquids and metal objects from entering the unit This is a sealed unit Do not attempt to open or modify Do not damage drop or...

Page 20: ...TTERY A DAPTOR BATTERY CHARGER OPTIONAL ACCESSORY 1 Start the car engine and leave it idling while using the SHARP Car Battery Adaptor Battery Charger VR U40CH Insert the plug into the cigarette lighter socket The POWER indicator will light 2 Connect the DC cable of the supplied connect ing plate to the DC out jack on the Car Battery Adaptor Battery Charger 3 Rotate the viewfinder upward 4 Align t...

Page 21: ... is covered and recording is not possible 6 TAPE END TAPE END The tape will end in about 3 minutes Prepare a new video cassette with an erasure pro t2 sec later tection hole open _ 1 T APE END 1 TAPE END l2 sec later EJ The cassette has reached its end during Camera Record mode The TAPE END indicator lights when the cassette reaches the end CJ 7 ERROR MESSAGE if an error message appears in the vie...

Page 22: ...shown on the screen If the counter memory is engaged M appears to the left of the tape counter indicator LJ 6 High Speed Shutter Recording When the SHUTIER SPEED but ton is pressed the shutter speed changes as follows 1 1 00 1 1 00 sec 1 250 1 250 sec 1 1 000 1 1000 sec 1 4000 1 4000 sec 1 1 0000 1 10000 sec Not displayed Standard mode 1 60 sec EJ 7 Manual Focus When the Full Auto Lock mode is off...

Page 23: ...ough the grip strap and adjust it until your fingers can easily touch the zoom button and LENS SELECT button and your thumb is resting on the REC START STOP button 2 Pull the viewfinder out 3 4 5 6 Pop off the lens cap and secure it as shown Turn the POWER switch to CAMERA Turn the STANDBY switch to the STANDBY position Slide the FULL AUTO switch to ON Full Auto indicator lights The camcorder is n...

Page 24: ...the strap until it fits snugly and seal the velcro closures For Low Position Recording The viewfinder can be rotated to the vertical position for low angle shooting Notes on Recording If you plan to record from the beginning of a tape play the tape forward for about 1 0 seconds first to take up any tape leader on the reel Then begin recording If you turn the POWER switch during recording recording...

Page 25: ...nd time will be recorded superim posed on the scene EDIT SEARCH Insert Editing To record over a previously recorded scene 1 Turn the STANDBY switch to STANDBY 2 Look into the viewfinder and locate the point where you want to begin recording by holding down the EDIT SEARCH EB button to search forward search at normal speed or holding down the EDIT SEARCH 8 button to search backward search at 3x nor...

Page 26: ...ck AUTO WHITE BALANCE AUTO IRIS Slide the FULL AUTO switch to ON to let the cam corder automatically adjust colour and brightness to their best settings for each scene When the ambient light changes for example when you redirect the lens from a subject under fluorescent light to one under incandescent light or sunlight etc allow the auto white balance to readjust by turning the power off then on a...

Page 27: ...s on the subject mml To shoot in macro mode first press the W wide angle side of the power zoom button the camcorder will focus more quickly The wide angle lens is not equipped with the macro function Therefore it is not possible to focus on sub jects in front of the lens umm The Auto Focus may not be able to focus on the subject in the situations shown on the left Manually focus the lens to obtai...

Page 28: ...ording 500 to 100 000 lux is needed Recording is also possible with less light but the picture quality may suffer Adequate lighting is also essential for correct white balance Reference Lighting is not only one of the most important areas in home videos but also one of the most overlooked Good lighting can often mean the difference between a great picture and a poor picture Lighting is also essent...

Page 29: ...dio video input jacks 2 Turn the POWER switch to VCR 3 Set the AN IN OUT select switch to OUT 4 Select the TV to AN or VIDEO mode 5 Press the PLAY button on the top of the camcorder to begin playback Em This camcorder will not perform normal playback for programs pre recorded in LP mode The AN jack cover s hinges may turn white after several openings and closings This is normal ...

Page 30: ...coaxial antenna socket on the TV 4 Plug the RF converter cable into the AUDIO VIDEO and RF DC OUT jacks on the camcorder Set the AN IN OUT select switch to OUT Set the channel select switch to channel 3 or channel 4 whichever channel is not used in your area If both are used select the least watched llifr4 J 5 Set the TV tuner to the same channel 6 Turn the camcorder s POWER switch to VCR 7 Load a...

Page 31: ...t the camcorder to the VCR s audio and video input jacks with the supplied audio video cable AUDIONIDEO INPUT AUDIONIDEO OUTPUT 2 Set the A V IN OUT select switch to OUT 3 Set the input selector on the VCR to LINE or A V and set the TV to the VIDEO or A V mode ...

Page 32: ...an forward at 7 times standard playback speed Reverse Search Press the REW button during playback or dur ing rewind to scan backward at 5 times standard playback speed The audio is muted during forward and reverse search search If the TV picture rolls vertically during forward or reverse search adjust the TV s vertical hold control There may be some picture noise during forward or reverse search t...

Page 33: ...he COUNTER MEMORY button The M indicator will appear in the viewfinder 4 Press the REW or the FF ffi button The tape will rewind or fast forward until the counter reaches zero then stop To Return to One Specific Point During Recording 1 Press the COUNTER RESET button to set the counter to zero at the point you want to return to To reset the counter press the RESET button lightly and release it im ...

Page 34: ...act into the VCR press the REC button and then press the PAUSE button Select the TV channel which will let you monitor the recording 6 Use the camcorder s tape counter and the PLAY REW and FF buttons to locate the t eginning of the scene that you want to copy Press the camcorder s PLAY button and PAUSE STILL button to pause the tape at the beginning of the scene 7 Simultaneously press the PAUSE ST...

Page 35: ...deo cassette that has an open erasure protection hole into the camcorder To record from a TV tune the TV to the channel you wish to record To record from a VCR load a recorded cassette and press the VCR s PLAY button When you see the program or scene that you wish to record press the REC button on the top of the camcorder Recording will begin To end the recording press the STOP button on the top o...

Page 36: ...T COMPENSATION This camcorder has Auto Exposure which automat ically adjusts to the scene s brightness However if the subject is backlit or in a shadow the subject may be too dark In this case BLC Back Light Compensation will prevent the subject from appearing dark Press and hold the BLC GAIN UP button for BLC The indicator appears in the viewfinder In this mode the iris opens about 1 F stop more ...

Page 37: ... will not shift even when recording a close up of a solid coloured subject 2 If a pure white subject is available 1 Zoom in close on a white piece of paper until the viewfinder is filled with it and keep focusing for about 8 seconds 2 Cancel the Full Auto mode by sliding the FULL AUTO switch to OFF 3 Press the WHITE BALANCE button to lock the white balance setting W BALANCE LOCK appears in the vie...

Page 38: ... by sliding the FULL AUTO switch to OFF 2 Press the SHUTIER SPEED button to record fast action Pressing the SHUTIER SPEED button changes the shutter speed as follows Display in the Approx min Shutter speed viewfinder brightness required 1 60 Normal none 1 100 sec 1 100 30 LUX 1 250 1 250 75 LUX 1 1000 1 1000 300 LUX 1 4000 1 4000 1 200 LUX 1 10000 1 10000 3000 LUX mmD Using fast shutter speeds und...

Page 39: ... the Fade In standby mode is engaged When the REC START STOP button is pressed FADE IN is displayed the viewfinder becomes white and recording begins with a fade in of the audio and the visual image FADE OUT If the FADER button is pressed during recording FADER is displayed in the viewfinder and the Fade Out Standby mode is engaged When the REC START STOP button is pressed FADE OUT is displayed an...

Page 40: ...lens and the power Zoom Zone display disappears zoom lens The picture will change alternately from Zoom lens B one to the other each time you press the LENS SELECT button This can be used to create the appearance of instantaneous zooms on the recorded tape And it can also be used to create special fades and wipes and to make picture in picture recordings as described on the next page 1 When the fi...

Page 41: ...the FADER button again if you want to disengage the fade mode 1 FADER Zooming zone frame Zoom lens TWO LENS WIPES You can also switch lenses with a wipe for another effective scene transition 1 Press the MOVE WIPE button WIPE appears in the viewfinder 2 Press the LENS SELECT button The screen changes as the view wipes from one lens to the other After that the Wipe mode is disengaged Wide angle len...

Page 42: ...icture mode 3 A small inset picture showing the view through the zoom lens will appear in the viewfinder Press the power zoom button to select a com fortable size of a zoom lens picture 4 When you want to move the position of the small inset picture press the MOVE WIPE button While the button is held down the inset picture mov s horizontally When you release the but ton the inset picture stops at ...

Page 43: ...ttons be careful not to jiggle the camcorder especially when zoomed in Using a Tripod or Other Support Tripods provide the steadiest support Use a tripod that is sturdy and stable A fluid head tripod is recommended for extra smooth tilts and pans If you already have a still camera tripod it may be usable with this camcorder If no tripod is available you may wish to put the camcorder on a table top...

Page 44: ...PEED set to high speed Press the SHUTIER SPEED button to select is too dark mode standard mode Page 36 Playback No image appears Improperly connected to TV Reconnect properly Page 27 28 TV s channel not properly set Set TV to channel 3 or 4 if the RF converter is used Page 28 Set TV to AV channel position if the AN input is used Page 27 Poor colour White balance not properly adjusted Make sure the...

Page 45: ...h diop ter Electret condenser microphone Auto white balance with white balance lock 3 lux F2 0 with Gain up 1 Vp p 75 ohms unbalance negative sync 8 dBs impedance less than 2 2 kohms DC 6 0 V 6 7 W when the Auto Focus is in focus and the POWER ZOOM is OFF 1 1 4 W x 1 04 H x 204 D mm 690 g Battery Pack BT 70 DC Output 6 V Dimensions 46 0 W x 1 9 3 H x89 5 D mm Weight 1 50 g Specifications are subje...

Page 46: ...SHARR Sharp Electronics of Canada Ltd 335 Britannia Road East Mississauge Ontario L4Z 1 W9 SHARP CORPORATION Osaka Japan Printed in Japan TINSZ1 337TAZZ T84 2 9 A ...

Reviews: