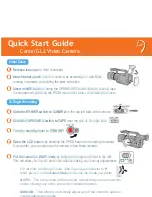


Quick Start Guide
Canon GL2 Video Camera
11
Remove lens cap on front of camera
Attach battery pack to rear of camera by extending the viewfinder,
rotating it upwards, and sliding the pack into place
2
Insert miniDV tape by sliding the OPEN/EJECT button forward, placing tape
in compartment, pressing the PUSH mark until it clicks, and closing the cover
3
Initial Setup
To Begin Recording
Slide the POWER switch to CAMERA on the top left side of the camera
4
Slide the TAPE/CARD switch to TAPE near the grip on the right side
5
Turn the standby lever to STANDBY
6
8
Put the camera in EASY mode by sliding the program selector to the left.
This will allow you to point and shoot without making any manual adjustments.
For all other recording modes, slide the program selector to P.
Next, push in on the Select Dial and choose the mode you prefer.
AUTO - This is the same as Easy mode, except that you now have the
option of using any of the camcorder’s manual options.
MANUAL - This allows you to freely adjust any of the camera’s audio or
visual settings as you like.
For a more detailed description of all the camera’s possible settings,
please consult the full Instruction Manual.
7
Open the LCD screen by pressing the OPEN button and rotating it outward.
If you prefer, you can also use the camera’s Viewfinder instead.
9
Press the START/STOP button to begin recording. Press the START/STOP
button again to pause the recording. You can stop and restart as often as you like.
Canon GL2 Video Camera
Shotgun microphone
Additional Features
The shotgun mic will typically provide better sound quality for your
recording. To use it, slide the mic onto the accessory shoe and tighten
it with the shoe lock. Then select one of the following modes:
Shotgun: Best for recording clear sound from the front
Stereo 1: For recording sound from the front and surrounding area
Stereo 2: For recording surrounding sound in a wider area than Stereo 1
Zoom
To zoom in and out while recording, use the W and T controls.
T (telephoto) zooms in. W (wide-angle) zooms out.
Charging the battery
To charge the camera battery - place it in the power
adapter, connect the power cord to the adapter, and
plug it into an electrical outlet. When the power
light glows steadily, the pack is fully charged.
Running on AC power
To run the camera on AC power - 1) connect the power cord to the
adapter 2) plug the adapter into an outlet 3) connect the DC coupler
to the adapter and 4) attach the DC coupler to the camera
To playback your recording:
1. Slide the power switch to PLAY (VCR)
2. Load the casette tape
3. Open cover on top of the handle, and use the controls
To playback on a TV monitor:
Follow the 3 steps above, then connect the RCA cable to the A/V input
on the back of the camera, and the audio/video inputs on your TV.
If you encounter any problems, please give us a call at 1-877-633-8866 or
consult the full instruction manual included in this package.
Quick Start Guide
Canon GL2 Video Camera