


ENGLISH
CS-2635RHGYSE
ELECTRONIC
PRINTING CALCULATOR
OPERATION MANUAL
OPERATIONAL NOTES
To insure trouble-free operation of your SHARP calculator, we recommend the following:
1. Keep the calculator away from extreme heat such as on a car dashboard or near a
heater, and avoid exposing it to excessively humid or dusty environments.
2. Clean with a soft, dry cloth. Do not use solvents or a wet cloth. Avoid using a rough
cloth or anything else that may cause scratches.
3. Since this product is not waterproof, do not use it or store it where fluids, for
example water, can splash onto it. Raindrops, water spray, juice, coffee, steam,
perspiration, etc. will also cause malfunction.
4. If the battery for memory protection is not installed, the tax rate / discount and
conversion rate will be lost when the power supply is turned off. The tax rate
/ discount and conversion rate will be deleted even if the battery for memory
protection is removed.
5. Do not wind the AC cord around the body or otherwise forcibly bend or twist it.
6. Place the product near an easily accessible socket.
7. If service should be required, use only a SHARP servicing dealer, a SHARP
approved service facility or SHARP repair service.
8. This product, including accessories, may change due to upgrading without prior notice.
SHARP will not be liable nor responsible for any incidental or consequential
economic or property damage caused by misuse and/or malfunctions of this product
and its peripherals, unless such liability is acknowledged by law.
USING THE CALCULATOR FOR THE FIRST TIME
First, pull out the insulation sheet for the memory protection battery (installed for
retaining the tax/discount rate and conversion rate information).
Removing the insulation sheet, and resetting
1. Pull out the insulation sheet for the memory protection battery.
2. Connect the power supply plug to an outlet, then press the RESET switch on the
back of the unit after pressing the power on switch.
OPERATING CONTROLS
:
POWER ON SWITCH:
When the “I” side of the power on switch is pressed, the calculator
is turned on.
:
POWER OFF KEY:
When the power off key is pressed, the calculator is turned off.
:
PRINT / ITEM COUNT MODE SELECTOR:
“
•
“ :
Set to the non-print mode.
(“• • • ... • • • –P” will be printed.)
“
P
“ :
Set to the print mode.
(“• • • ... • • • +P” will be printed.)
“
P•IC
“ :
Set to the print and item count mode.
The counter will count the number of times that
has been pressed in addition.
Notes:
• Each time is used in subtraction, 1 will be subtracted from
the count.
• The count is printed when the calculated result is obtained.
• Pressing of , , or clears the counter.
• The counter has a maximum capacity of 3 digits (up to ±999).
If the count exceeds the maximum, the counter will recount
from zero.
:
RATE SETTING MODE SELECTOR:
This selector is used to set the conversion rate or the tax / discount
rate.
“
RATE SET
” : Set this selector to the “RATE SET” position
before storing an each rate.
Conversion rate:
• Enter the conversion rate, then press
.
• A maximum of 6 digits can be stored (decimal
point is not counted as a digit).
Tax / discount rate:
• Enter the adding tax rate, then press .
• To store a discount rate, press before
pressing .
• A maximum of 4 digits can be stored (decimal
point is not counted as a digit).
“
•
” :
Set this selector to the “
•
” position before starting
calculations.
Note:
• Be sure to set this selector to the “•” position after storing an each rate.
• For the conversion rate and the tax / discount rate, a single value
can be stored for each. If you enter a new rate, the previous rate
will be cleared.
:
CONSTANT/ADD MODE SELECTOR:
“
K
“ :
The following constant functions will be performed:
Multiplication:
The calculator will automatically
remember the first number entered (the multipli
-
cand) and instruction.
Division:
The calculator will automatically re-
member the second number entered (the divisor)
and instruction.
“
•
“ :
Neutral.
“
A
“ :
Use of the Add mode permits addition and
subtraction of numbers without an entry of the
decimal point. When the Add mode is activated,
the decimal point is automatically positioned
according to the decimal selector setting.
Use of , and will automatically override
the Add mode and decimally correct answers will
be printed at the preset decimal position.
:
ROUNDING SELECTOR:
Example: Set decimal selector to “2”.
4 ÷ 9 = 0,444... ; 5 ÷ 9 = 0,555...
4 9
5 9
0.45
0.56
5/4
0.44
0.56
0.44
0.55
Note:
• The decimal point floats during successive calculation by the use
of or .
• If the decimal selector is set to “F” then the answer is always
rounded down ( ).
: DECIMAL SELECTOR:
Presets the number of decimal places in the answer. In the “F”
position, the answer is displayed in the floating decimal system.
:
PAPER FEED KEY
:
CONVERSION KEY:
This key is used to obtain a value by dividing a given number with a
specified conversion rate.
:
CONVERSION KEY:
This key is used:
• To store the conversion rate (by the use of the rate setting mode
selector).
• Obtains a value by multiplying a given number with a specified
conversion rate.
• To recall the presently stored rate for check. Press
first to
clear the calculation register and reset an error condition, then
press
.
The conversion rate is printed with the symbol “TC”.
:
LAST DIGIT CORRECTION KEY
:
CLEAR ENTRY KEY:
Clears numbers entered prior to use of a function key. Also used to
clear an overflow error caused by an entry.
:
NON-ADD / SUBTOTAL KEY:
Non-add
:
When this key is pressed right after an entry of
a number in the Print mode, the entry is printed
on the left-hand side with the symbol “#”. This
key is used to print out numbers not subjects to
calculation such as code, date, etc.
Subtotal
:
Used to get subtotal(s) of additions and/or
subtractions. When pressed following the
or key, the subtotal is printed with the symbol
“◊” and the calculation may be continued.
• By pressing this key even in the Non-print mode, the displayed
number is printed without any symbol.
:
TOTAL KEY:
Prints the total of addition and subtraction with “ ”. This key also
serves as a clear key for the calculation register and resets an
error condition.
:
FIRST RECALL MEMORY KEY
:
FIRST RECALL AND CLEAR MEMORY KEY
:
SECOND RECALL MEMORY KEY
:
SECOND RECALL AND CLEAR MEMORY KEY
:
CHANGE SIGN KEY:
Changes the algebraic sign of a number (i.e. positive to negative
or negative to positive).
:
MULTIPLE USE KEY:
Performs mark-ups, percent change and automatic add-on / discount.
:
TAX-INCLUDING KEY:
This key is used for calculations with the tax/discount rate. To recall
the presently stored rate for check, press to clear the calculation
register and reset an error condition, then press .
The tax / discount rate is printed with the symbol “TX”.
DISPLAY SYMBOLS
M
:
First memory symbol. Appears when a number has been stored
in First memory.
:
Second memory symbol. Appears when a number has been stored
in Second memory.
–
:
Minus symbol. Appears when a number is a negative.
E
:
Error symbol. Appears when an overflow or other error is detected.
•
:
Appears when a number is in the grand total memory.
• Although all available symbols are shown here for instruction purposes, these
symbols will not appear on the screen simultaneously.
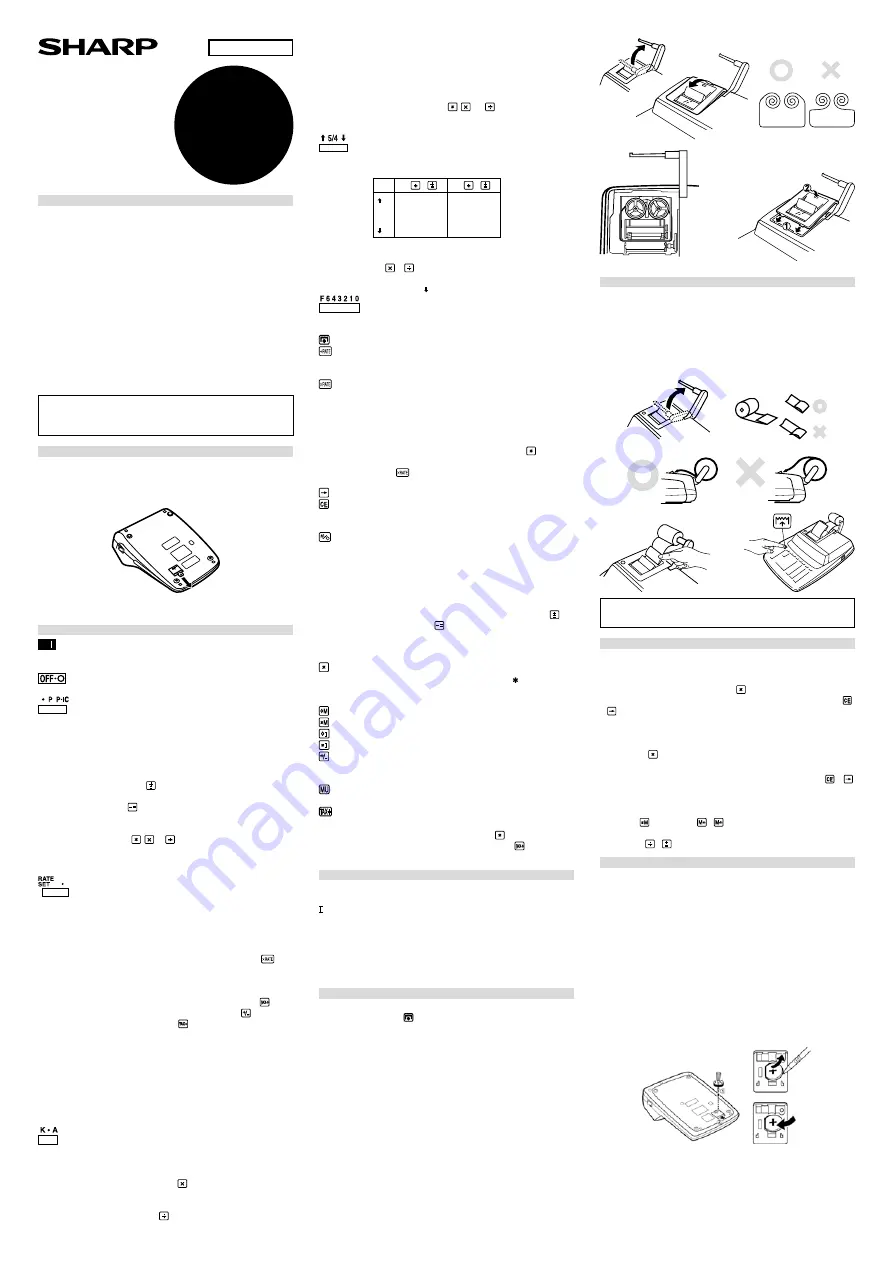
INK RIBBON REPLACEMENT
1. Remove the paper roll from the calculator. (Tear the paper and remove it from the
print mechanism by using ).
2. Turn the power off before replacing ribbon.
3. Remove the printer cover. (Fig. 1)
4. Remove the old ribbon by pulling it up.
5. Insert the new ribbon.
6. With the black side of the ribbon facing upwards, place one of the reels on the reel
shaft on the right. (Fig. 2) Make sure that the reel is securely in place.
7. Thread the ribbon around the outside of the metal guides. (Fig. 3)
8. Take up any slack by manually turning one of the reels.
9. Replace the printer cover. (Fig. 4)
10. Replace the paper roll.
Fig. 1
Fig.3
Fig.4
Fig. 2
PAPER ROLL REPLACEMENT
1. Lift the paper holder up. (Fig. 1)
2. Fold the leading edge of the paper roll 3 to 5 cm. (Do not fold it slantwise.) (Fig. 2)
3. Insert the paper roll from the left side of the paper holder and make sure the paper
roll is set in the proper direction (with the paper feeding from the bottom). (Fig. 3)
4. Insert the leading edge of the paper into the opening directly behind the print
mechanism. (Fig. 4)
5. Press the paper feed key and feed the paper under the edge of the paper cutter.
(Fig. 5)
Fig. 1
Fig. 2
Fig. 3
Fig. 4
Fig. 5
DO NOT PULL PAPER BACKWARDS AS THIS MAY CAUSE DAMAGE TO
PRINTING MECHANISM.
ERRORS
There are several situations which will cause an overflow or an error condition. When
this occurs, “E” will be displayed. The contents of the memory at the time of the error
are retained.
If an “0•E” is displayed at the time of the error, must be used to clear the calculator.
If an “E” with any numerals except zero is displayed, the error may be cleared with
or and the calculation can still be continued.
Also, in rare cases, printing may stop midway and the indication “E” appear on the
display. This is not a malfunction but is caused when the calculator is exposed to
strong electromagnetic noise or static electricity from an external source. Should this
occur, press the key and then repeat the calculation from the beginning.
Error conditions:
1. Entry of more than 12 digits or 11 decimals. This error can be cleared with or .
2. When the integer portion of an answer exceeds 12 digits.
3. When the integer portion of the contents of the memory or grand total memory
exceeds 12 digits.
(Example: 999999999999 1 )
4. When any number is divided by zero.
(Example: 5 0 )
REPLACEMENT OF BATTERY FOR MEMORY PROTECTION
Time for battery replacement
Replace with a new battery once a year. When the battery power becomes weak,
printing may be halted, and displayed images may disappear. If such symptoms are
observed, replace the batteries with new ones.
Battery: lithium battery, size CR2032 × 1
When replacing the battery, the set tax / discount rate and conversion rate, the
memory contents will be lost. You may want to write down the tax / discount rate and
conversion rate, other important numbers on a sheet of paper.
1. Press the power off key and unplug the power supply plug from the outlet.
2. Remove the battery cover on the back of the unit.
3. Remove the exhausted battery and install one new lithium battery. Wipe the battery
well with a dry cloth and place the plus “+” side upward.
4. Replace the battery cover by reversing the removal procedure.
5. Connect the power supply plug to an outlet, then press the RESET switch on the
back of the unit after pressing the power on switch.
After battery replacement
• Connect the power supply plug to an outlet and press the power on switch. Check
that “0.” is displayed. If “0.” is not displayed, remove the battery, reinstall it, and
check the display again.
• Reset the tax / discount rate.
• In the box on the right, fill in the month/year that you changed the battery, as a
reminder of when to change it again.


