

DRAFT Internal Use Only
©2013 Samsung Telecommunications America, LLC. Samsung is a registered trademark
of Samsung Electronics Co., Ltd. LTE is a trademark of ETSI. T-Mobile and the magenta
color are registered trademarks of Deutsche Telekom AG. Other company names, product
names and marks mentioned herein are the property of their respective owners and may be
trademarks or registered trademarks. Device and screen images simulated. Appearance of
device may vary. Printed in Korea.
Printed in Korea | 08/2013 | GH68-39497A
SAMSUNG TELECOMMUNICATIONS AMERICA
1301 E. Lookout Drive | Richardson, TX 75082
1.800.SAMSUNG
www.samsung.com/mobile
TCS519348.1
Samsung
TM
LTE Mobile HotSpot PRO
My Carrier
This guide provides you with the information you need to get started.
For more information and additional support, please visit
www.t-mobile.com/support/
where you can:
•
Register at
my.t-mobile.com/
to check your minutes, pay your
bill, upgrade your device, and change your rate plan.
•
Review your device’s User Manual and troubleshooting FAQs.
•
View the latest troubleshooting solutions in the Support
Forums or ask a question of your own.
Access account information:
1.
From within the Web portal, tap
(
Home tab
).
2.
Tap the
My T-Mobile
button located within the
Visit My
T-Mobile
area of the page.
3.
Log into to view your account information.
NOTE:
Devices and software are constantly evolving—the screen images,
icons and procedures you see here are for reference only.
Device Functions
Display
USB connector
WPS
Power
Notification bar
WARNING:
Please use only an approved charging accessory
to charge your device. Improper handling of the
charging port, as well as the use of an incompatible
charger, may cause damage to your device and void
the warranty.
NOTE:
The WPS (Wi-Fi Protected Setup) key allows you to pair
your WAP-capable device without the need for entering a
passcode. This process is similar to Wi-Fi Direct pairing.
Charging port
USB connector
Mini USB
connector
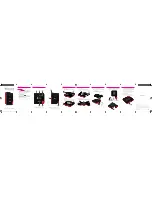
Setting Up Your Device
Step 1. Remove the Back Cover
•
Place your fingernail in the groove and firmly “pop” the
cover off the device.
Step 2. Install the SIM Card
•
With the label side facing upwards, carefully slide the SIM
card into the SIM card slot until it “clicks” into place.
Step 3. Insert the Battery
•
Insert the battery, making sure to align the gold
contacts (1). Press down gently to secure the battery (2).
Step 4. Replace the Back Cover
•
Position the battery cover over the battery compartment
and press down firmly along the edges of the cover.
Step 5. Installing the Optional microSD Card
NOTE:
The installation of an optional microSD card can provide additional
storage and access to additional files such as document, image, and
other multimedia content.
•
Using your fingertip (1), slide the mini USB connector out
from its current location (2).
•
Pull the cable all the way round the unit (3) and then
carefully remove the other USB connector from its slot (4).
This action exposes the internal microSD card slot.
•
Slide the memory card into the card slot until it “clicks”
into place.
•
Carefully re-insert the USB connector until it is securely
inserted back into its corresponding USB slot.
•
Wrap the cable around the unit and carefully reinsert the
mini USB cable into its corresponding slot.
NOTE:
It is recommended that the battery be fully charged prior to initially
using the device for wireless connection and setup. You can also
connect the device to an AC wall charger for additional power.
Step 6. Charging the HotSpot
•
Before turning on your device, charge it fully.
Be sure to use the charger that came with the device.
V100T_QRM_English_Accordion_MGB_081413_F4_Rev1.indd 1-10
8/14/2013 2:18:25 PM