Quick Installation Guide
Circle Reliance , Inc
802.11b/g/n 300Mbps Access Point with Cloud Support
www.cranberrynetworks.com
Model: Cranberry Red CN-AP-2040 / CN-AP-2050
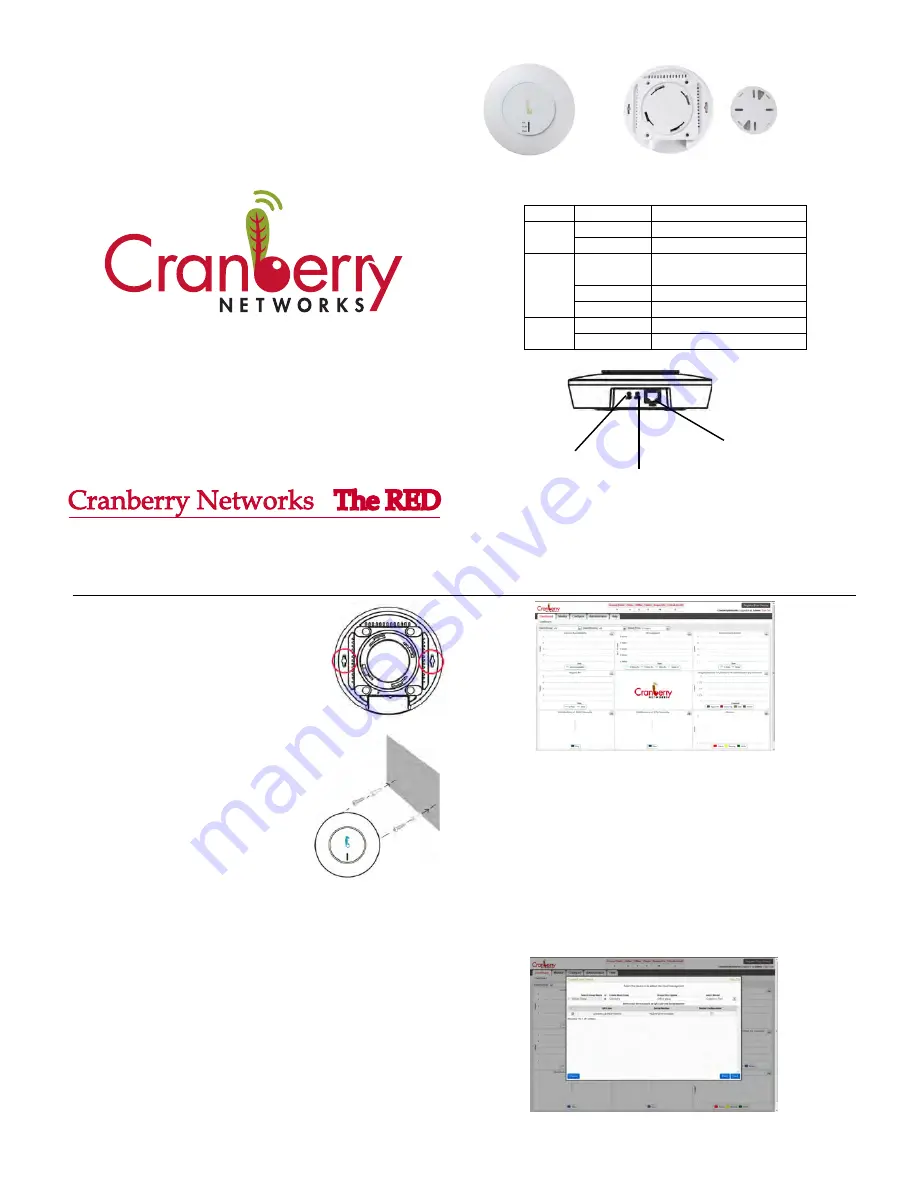
II. Hardware Installation
Wall Mount
a. Use a pencil to mark the two wall-mount
screw locations with X on the wall.
b. Carefully insert the anchors into the holes, and then screw
the provided M3 screws into the anchors.
c. Place the Red AP over the screws and
slide carefully to lock the AP in place.
Ceiling Mount
a. Remove the Mounting Bracket from the RED AP.
b. Remove the ceiling tile. Place the Bracket in the center of the
ceiling tile.
c. Secure the Mounting Bracket to the ceiling tile using M
3 screws.
d. Set the ceiling tile back into place.
e. Align the notches on the RED AP with
the notches on the Mounting Bracket.
Turn the RED AP
counterclockwise
to lock it into place.
III. Registering the RED AP to Cloud
1. Log into Cloud Management website
(http://199.30.94.95:8080/asr/) with your Login ID and Password.
2. Connect the purchased/licensed devices into your internet and power it on.
Click on ‘Register Your Device’ on the top right corner of the current page
(see below).
This will display a Wizard for adding one or more devices.
I. Product Overview
Ports
LED
3. First page of this wizard instructs you to connect the devices to the network.
Click ‘Next’ to go to second page. This will display all the devices waiting to
be added into cloud management.
4. At the first time, create a new group and select the Model (Cranberry Red) of
your device to be added.
5. For adding device into existing group, select the group where you want to add
the device. This group should have the same model of your device. The
model name of selected groupwould be displayed under ‘Select Model’.
This operation will show all the devices of this model waiting to be added.
6. Select your devices based on the QR_Code and Serial Number to be added
to the group and click ‘Next’.
Operating Temperature: -20 to 50° C
Power Source Requirements: 48 VDC from IEEE 802.3af
*To power on the RED AP using PoE injector:
Use IEEE 802.3af compliant PoE Injector with Output Rating of 300 mA
(or above) @ 48 Volts DC nominal
7. This will categorize device to beadded with “
√
” mark and offline device with
“
x
” as status. Offline device can’t be added into cloud. To change the selection,
go back to previous page and re-select (step 6).
Reboot
(Power Cycle)
Front View with LED
Rear View with Ceiling Mount Plate
Software Reset
(Factory Default Settings)
WAN Port
(IEEE 802.3af PoE/PD)
LED
Color
Status
PoE
Solid Green
AP is powered up.
O
ff
AP is down.
WLAN
Solid Green
WLAN interface is up but no current
wireless ac
ti
vity.
Blinking Green
There is wireless ac
ti
vity.
O
ff
WLAN interface is down.
Cloud
Solid Green
AP is connected to Cloud.
O
ff
AP is not connected to Cloud.