Samsung HMX-R10SN, User Manual
The Samsung HMX-R10SN is a high-quality camcorder with an array of advanced features. Capture exceptional videos and photos with ease using this user-friendly device. To make the most of your camcorder, download the free user manual from manualshive.com to get detailed instructions on how to optimize your filming experience.
Share
Download


Reviews:
No comments
Related manuals for HMX-R10SN

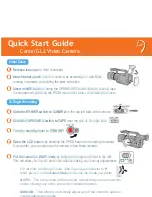
GL1
Brand: Canon Pages: 3
GL-2
Brand: Canon Pages: 2

GR-D370 - Camcorder - 800 KP
Brand: JVC Pages: 26

GR-D51
Brand: JVC Pages: 48

GR-D370UC
Brand: JVC Pages: 50

GR-D270US
Brand: JVC Pages: 20

GR-D295U - MiniDV Camcorder w/25x Optical Zoom
Brand: JVC Pages: 1

GR-D350 - MiniDV Camcorder w/32x Optical Zoom
Brand: JVC Pages: 44

GR-D32
Brand: JVC Pages: 40

GR-D390EK
Brand: JVC Pages: 72

GR-D370UC
Brand: JVC Pages: 87

GR-D366EK
Brand: JVC Pages: 56

GR-D275
Brand: JVC Pages: 56

GR-D270US
Brand: JVC Pages: 56

GR-D280
Brand: JVC Pages: 56

GR-D370 - Camcorder - 800 KP
Brand: JVC Pages: 72

GR-D290 GR-D270
Brand: JVC Pages: 5

GR-D347US
Brand: JVC Pages: 4


