

Installation / User Guide: Basic Gateway (SG888ZB )
I
N THE
B
OX
S
AFETY
I
NSTRUCTIONS
Read these instructions
before installing and using
the Basic Gateway and keep
this guide in a safe place for future reference.
•
Verify compatibility
with your connected home system before installation.
•
Follow all instructions provided by your connected home manufacturer
regarding the addition of devices to your connected home system. An
authorized, qualified installer may be required.
Salus accepts no responsibility for damage caused by not following these
instructions.
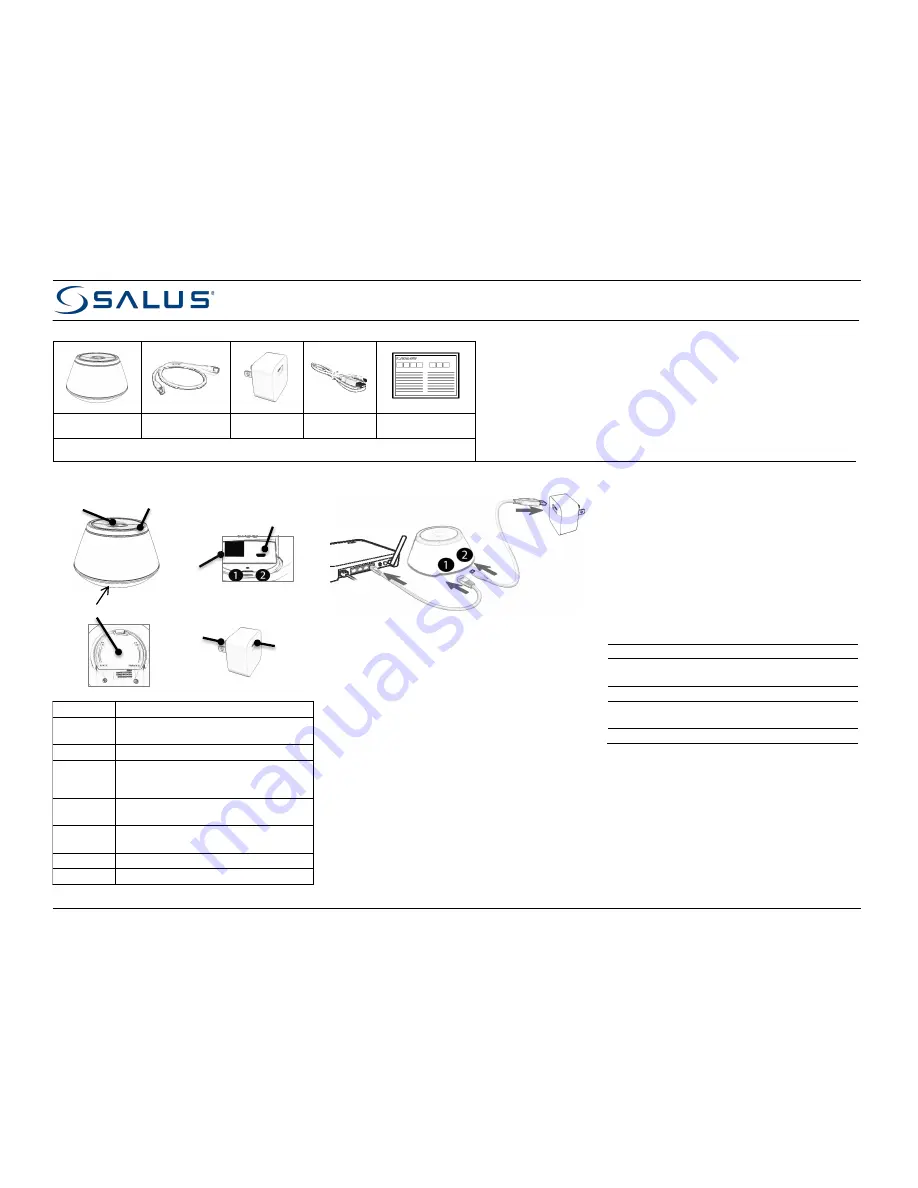
Basic Gateway w/
Port Cover
Ethernet Cable
USB Power
Adapter
USB Power
Cable
Installation /
User Guide
N
OTE
:
Additional equipment may be required due to building construction or materials, or other
radio interference that may reduce the radio range.
C
ONTROLS
,
P
ORTS
,
AND
I
NDICATORS
Item
Description
Multi
Button
Multi-function user input button:
Pair, Rejoin, and Factory defaults
Light Ring
Tri-color ring of light to indicate status
AC Plug
NEMA 1 (Type A) plug - Compatible with US
and Canadian standard 120 VAC, 15 A
electrical outlets
USB Port
USB Type - A receptacle configured as a
dedicated charging port
Ethernet
Port
RJ-45 wired connection to the home Internet
router/gateway
Power Port
USB micro-A port for power input
Port Cover
Protective cover for power and Ethernet ports
I
NSTALLING THE
G
ATEWAY
* The port cover under the gateway can be removed for
easier access to the power and Ethernet ports.
Recommended cabling sequence: first connect the
Ethernet cable to the gateway port, then attach the USB
power cable to the gateway power port. Refer to the
wyse.ly
Pairing Guide for more information on how to
connect the gateway to
wyse.ly
.
U
SING THE
D
EVICE
P
AIRING
D
EVICES TO THE
G
ATEWAY
•
To pair devices to the gateway, first ensure the gateway
is connected to the Internet (LED ring will be blue).
•
Press the Multi Button until the LED ring flashes red (~3
seconds) and release to start the pairing process.
•
Follow the instructions on
wyse.ly
or the
wyse.ly
app
to complete the device pairing process. Repeat the
process for each device.
•
Press Multi Button again for more than 3 seconds to
exit pairing state. The LED ring will turn solid blue when
the pairing process is complete.
R
ESET TO
F
ACTORY
D
EFAULTS
•
To reset the device to factory default settings, press the
Multi Button until the LED ring is a solid red (~10
seconds). The LED ring will flash red, then go solid red.
•
Release the Multi Button when the LED ring is solid red.
The device LED ring will turn solid green when it has
been returned to factory default settings.
LED
I
NDICATIONS
Connected = connected to wyse.ly
Linked = connected to local router
Paired = connected to local ZigBee devices
Solid Blue
On, Linked and Connected
Solid Green
Powering Up or
On, Linked, NOT Connected
Solid Red
On, NOT Linked, NOT Connected
Flashing Green Attempting to Connect or
In IDENTIFY Mode
Flashing Red
Ready for Device Pairing
T
ROUBLESHOOTING
W
ILL NOT PAIR WITH DEVICES INITIALLY
•
Radio interference is present at the desired location:
1) Relocate the gateway; 2) Select a different location for
the device; or 3) Add a ZigBee repeater to the system
D
EVICE LOSS OF CONNECTION AFTER PAIRING
•
Radio environment may have changed: (1) Force rejoin
from device to possibly find a better radio path; or (2)
Apply radio interference solutions above
AC
Plug
Ethernet
Port
USB
Port
Power
Port
Multi Button
Light
Ring
Port Cover
*
Customer’s Internet
Gateway / Router
WH
BK


