XTS
Wall-mounted Touchscreen
Installation Manual
Overview
The Russound XTS is an elegant, in-wall
touchscreen with a 4.7” QHD display that is
designed to be a primary user interface for
controlling a compatible Russound audio system.
By running the MyRussound™ app, the XTS allows
full control of any zone in a Russound system and
provides metadata feedback from compatible
sources, including song titles, artist name, album
titles, and album art.
Russound, Inc.
1 Forbes Rd., Newmarket, NH 03857, USA
tel 603.659.5170 • fax 603.659.5388
www.russound.com
technical support: 866.888.7466
e-mail: [email protected]
Limited Warranty
The Russound XTS is guaranteed for one (1) year from
the date of purchase against all defects in materials
and workmanship. During this period Russound will
replace any defective parts and correct any defect in
workmanship without charge for either parts or labor.
For this warranty to apply, the unit must be installed
and used according to its written instructions. If service
is necessary, it must be performed by Russound.
Russound assumes no responsibility for defects
resulting from abuse or servicing performed by an
agency or person not specifically authorized in writing
by Russound. Damage to or destruction of components
due to improper use voids the warranty. In these
cases the repair will be made at the owner’s expense.
Accidental damage and shipping damage are not
considered defects under the terms of the warranty.
To return for repairs, the unit must be shipped to
Russound at the owner’s expense, along with a
Return Authorization number and documentation
explaining the nature of the service required. Any
product returned without prior written permission will
be returned to sender. Russound sells products only
through authorized Dealers and Distributors to ensure
that customers obtain proper support and service. Any
Russound product purchased from an unauthorized
dealer or other source, including retailers, mail order
sellers and online sellers will not be honored or serviced
under existing Russound warranty policy. Any sale of
products by an unauthorized source or other manner
not authorized by Russound shall void the warranty on
the applicable product.
Copyright ©2016 Russound® All rights reserved.
All trademarks are the property of their respective
owners. Specifications are subject to change without
notice.
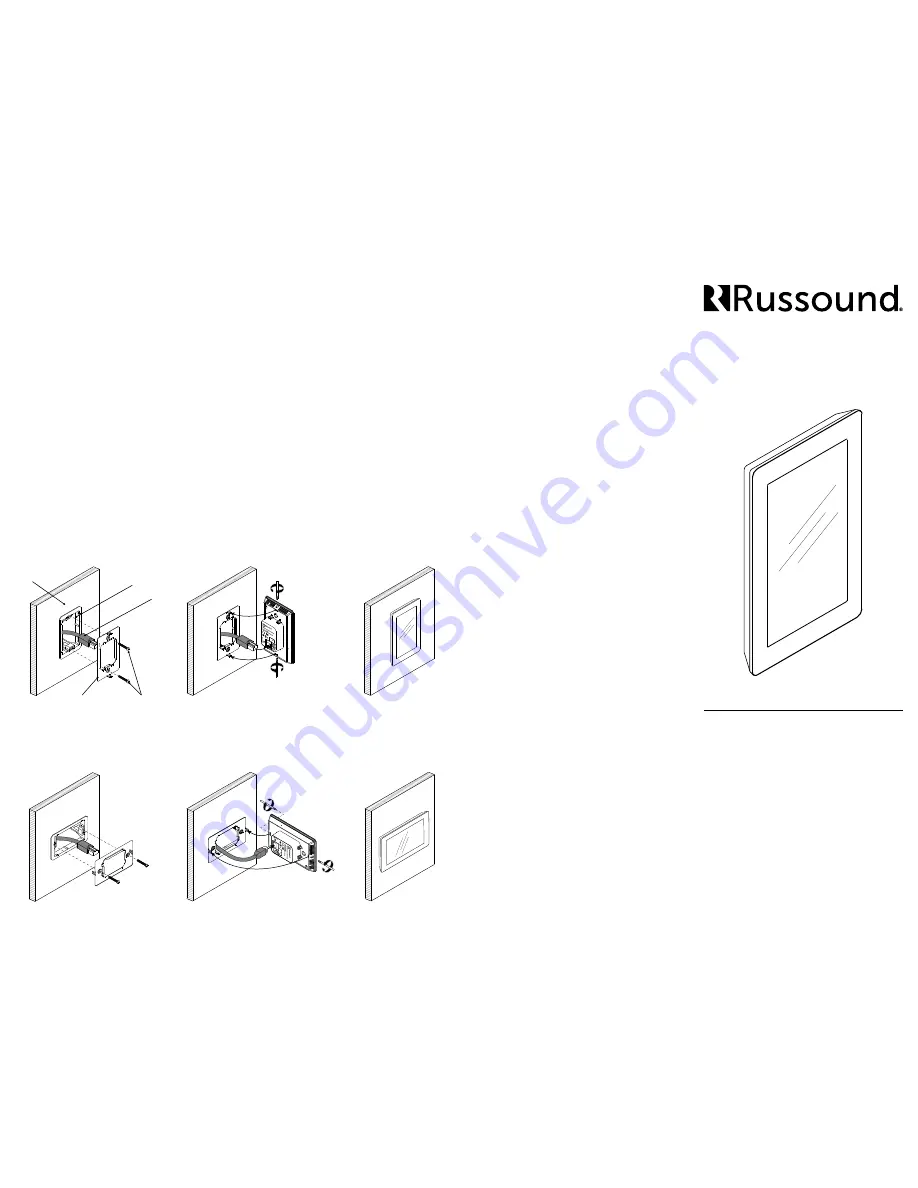
Wall
Single gang
electrical box
CAT-5
Mounting bracket
Screws
Step 3
Attach the Ethernet cable from the electrical box
to the rear of the XTS touchscreen. If using PoE
power, no other wiring connection is needed. If
using 12VDC power, connect the 12VDC terminal
to the rear of the XTS touchscreen as well.
Note: The XTS uses a dynamic DHCP network
address. A DHCP-reservation may be used on a
compatible router when a more permanent IP
address is required.
Step 4
Attach the XTS touchscreen to the mounting
bracket by inserting the prongs of the mounting
plate into the matching slots on the rear of the
XTS. Make sure that the XTS is oriented as shown
in the diagram below. There are two captive
mounting screws. Use a Phillips screwdriver to
tighten the screw at both the top and bottom of
the XTS to secure it in place.
Installation Instructions
Step 1
Install the electrical box or P-Ring. The typical
recommended mounting height for a wall-
mounted touchscreen is for the center of the
electrical box/p-ring to be at 59” (150cm) from
the floor height. This may be adjusted for user
preference, but the 59” height is recommended
to accommodate all users.
Note: The electrical box/P-Ring must be a
1-gang piece. Make sure that the box/P-ring is
mounted level and flush to the wall surface.
Step 2
Attach the XTS mounting plate to the electrical
box or P-ring using the supplied screws. The
plate should be mounted so that the two prongs
at either end are facing into the room. These
prongs will be used for attaching the XTS to the
mounting plate.
28-1399 11.29.16, Rev. 2
Portrait Orientation -
Default setting
Landscape Orientation -
The XTS may also be installed in a landscape orientation, set the “Screen
Orientation” setting in the Settings Menu to “Landscape”


