

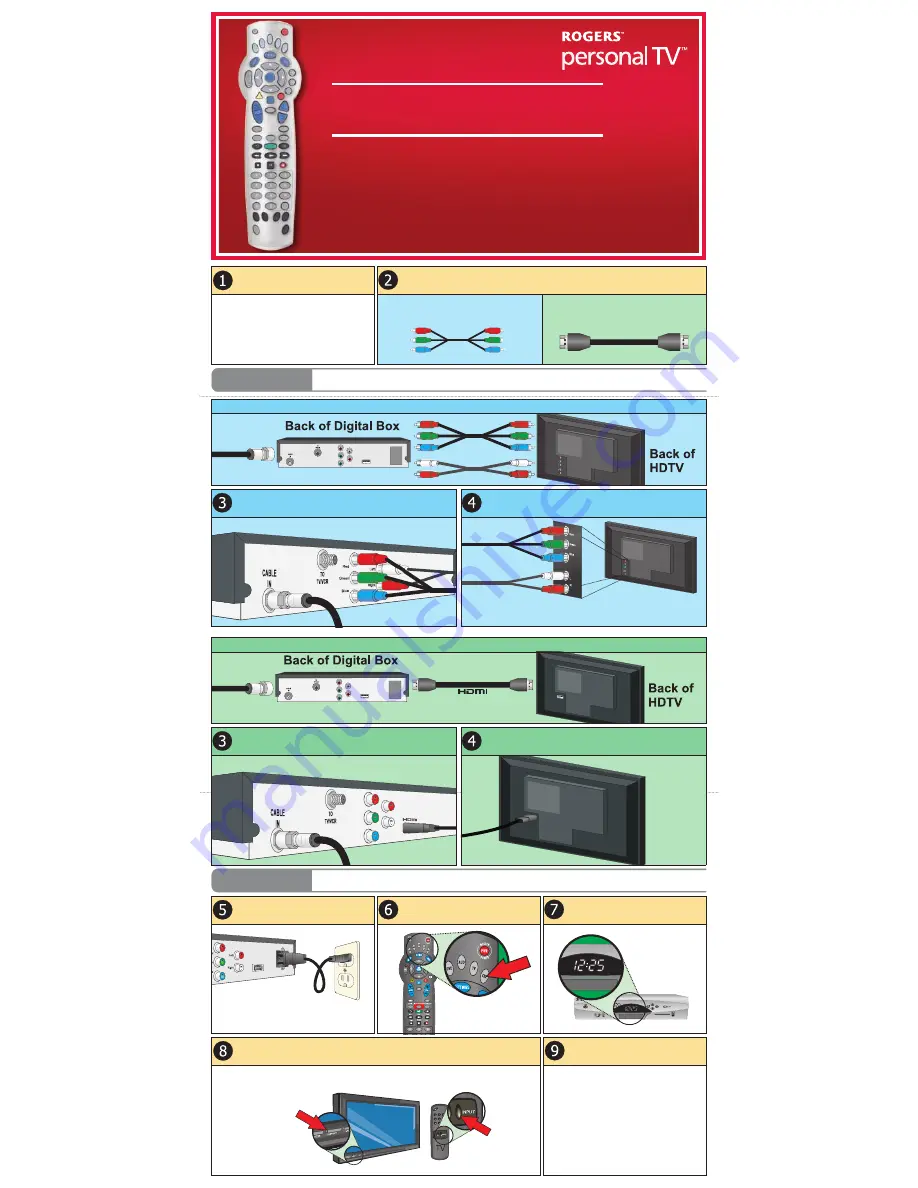
Connect the end of the Coaxial cable coming from your wall to the
CABLE IN port. Connect one end of the Component (RGB) and RCA
Audio cables to the matching coloured ports.
Connect the other end of the Component (RGB) and RCA Audio cables to
the matching coloured ports on the back of your HDTV.
Connect one end of the power cord to the
back of the digital box and the other end to
the wall outlet.
With your TV turned off and your Rogers
remote pointing at the digital box, press the
CBL
then
PWR
buttons on the remote.
A
Connect The Digital Box To Your TV
B
Authorize The Digital Box
Note: To ensure the digital box remains authorized
and updated, keep the power cord and
Coaxial cable connected at all times.
Wait for the time to appear on the digital
box.
Turn your HDTV on and set it to the input used in Step 4.
Confirm the digital box is authorized.
1. Turn on the digital box by pressing
PWR
on the
Rogers remote.
2. Change the channel to 99 by pressing
0
-
9
-
9
on your Rogers remote.
Is Channel 99 being displayed?
Yes: Continue to Section C on the reverse of this
guide.
No: Channel 99 is “Not Authorized”.
Call 1 866 894 9962 to have the digital box
authorized. You will be asked for the phone
number associated with your account.
Installing your Rogers digital box is as easy as A - B - C.
A
Connect The Digital Box To Your TV
B
Authorize The Digital Box
C
Program Your Rogers Remote And Additional Options
Most TVs can be connected
to multiple video sources
like DVD players and VCRs.
To view programming from
your digital box, your HDTV
must be set to the input
selected in Step 4.
Change your HDTV input by
pressing the Input or
Source button on the front
of the TV or by using your
TV's remote control.
Note: Be sure to securely finger tighten all cable connections.
From Digital Box
Note: Remember the name of the Component port you selected, ex. COMP 1,
RGB 1, etc. You will need this for Step 8.
Component Connection: This connection uses the Component (RGB) Video and RCA Audio cables, provided by Rogers.
HDMI Connection: This connection uses an HDMI cable, sold separately. (RCA Audio cable not required)
Connect the end of the Coaxial cable coming from your wall to the
CABLE IN port. Connect one end of the HDMI cable to the HDMI port.
Connect the other end of the HDMI cable to the HDMI port on the back
of your HDTV.
Note: Be sure to securely finger tighten all cable connections.
From Digital Box
Note:
Remember the
name of the
HDMI port you
selected, ex.
HDMI 1 or
HDMI 2. You
will need this
in Step 8.
High Definition
Easy Installation Guide
Choose a connection option; Component or HDMI.
To connect your digital box to your HDTV with the
Component (RGB) Video cable provided by Rogers,
follow the steps in BLUE.
Component (RGB) Video
To connect your digital box to your HDTV with an
HDMI cable, sold separately, follow the steps in
GREEN.
HDMI Cable
Are you installing the digital box yourself?
If you are installing the digital box y ourself, contin-
ue to Step 2.
If a technician installed your digital box, go to
Section C on the reverse of this guide.
Note:
Your Rogers
remote can-
not be used
to change
the HDTV
input until it
has been
programmed
to control
your TV.


