

PLAY
USB DOWNLOAD
(Fig. 1)
MAIN
Exit
Photo Scroll
Auto Off
Contrast
Delete Photo
Clock Set
Clock Disp
(Fig. 3)
AUTO OFF
Non Stop
1 Minute
5 Minutes
10 Minutes
30 Minutes
(Fig. 2)
PHOTO SCROLL
Off
5 Seconds
10 Seconds
15 Seconds
30 Seconds
(Fig. 4)
CONTRAST
Level 1
Level 2
Level 3
Level 4
Level 5
Exit
Delete One ?
Delete All ?
(Fig. 5)
2008-08-27
15:21:32
Wednesday
(Fig. 6)
Compatibility
The VKC180 is only compatible with a Windows
®
PC.
The Photo Viewer software is pre-installed on the VKC180 Keychain.
For the majority of users when the VKC180 is connected to a Windows
®
PC the soft-
ware will automatically start. If your computer is con
fi
gured in a way that it does not
automatically recognize the Photo Viewer software, then you need to install the Photo
Viewer software
from the supplied CD-ROM.
Charging the Battery
The VKC180’s battery will have a nominal charge when it leaves the factory.
We reccomend fully recharging the battery before using the VKC180.
1. To charge the unit’s battery, insert the supplied USB
cable into your computer’s USB port, then insert the
other end into the mimi USB port on the side of the
VKC180. While charging the VKC180 will display the
photos that are stored on it. The battery takes about
3.5 hours to charge. The battery will last up to 5 hours
on a single charge.
2. After the battery is charged disconnect the unit.
3. Press the Power button once to access the menu.
4. Use the Up & Down button to navigate the menu to
Power OFF, then press the Power/User Menu button
once to shut the unit off.
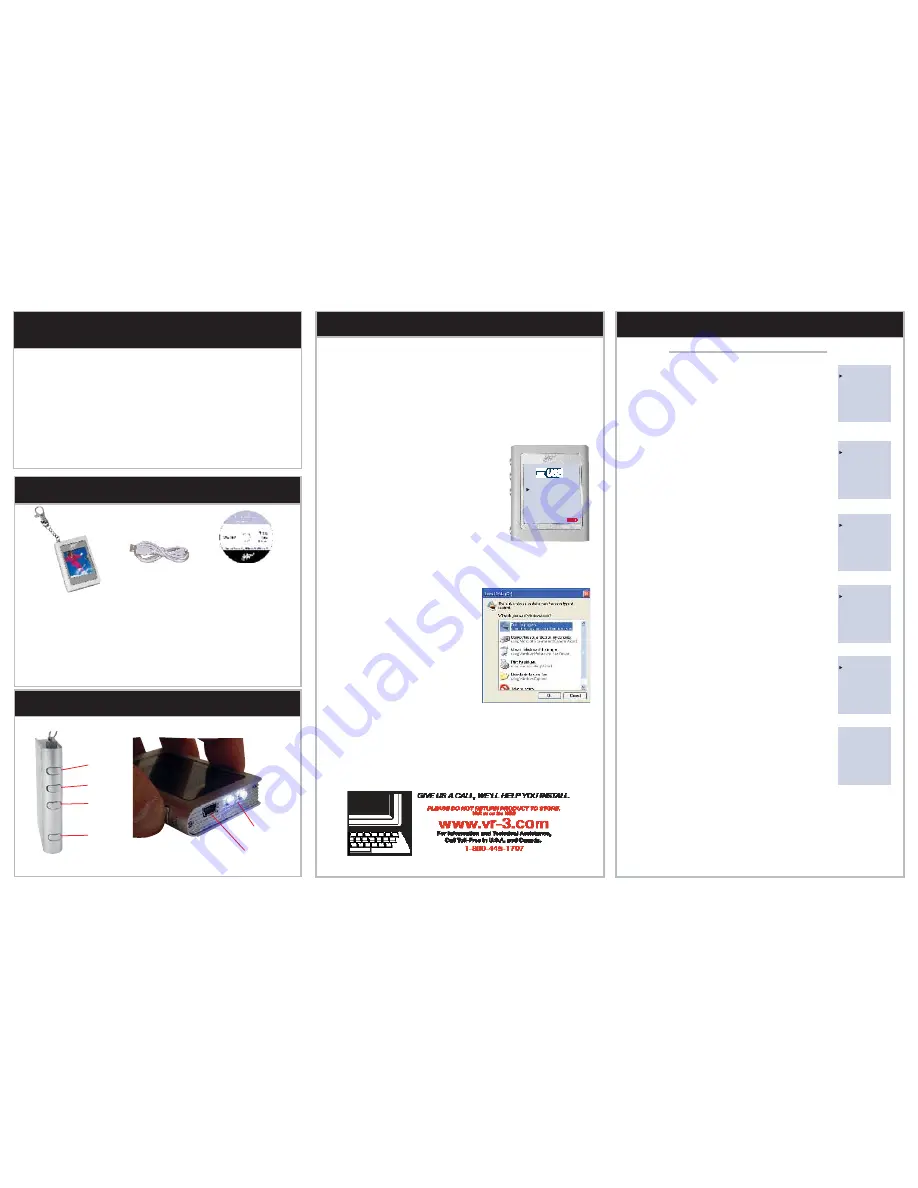
Photo Viewer Browser & Software Installation
From The Keychain
1. Connect the VKC180 to a Windows
®
PC with
the included USB cable.
2. Press the Down button to move the cursor to
USB Download, then press the Power/User
Menu button.
3. After windows install the necessary drivers
you will see a menu screen stating “This disk
or device contains more than one type of
content.”
4. Choose “Run the program using the program
provided on the device”, then the software
will be temporarily installed on the PC until
the VKC180 is disconnected. If the software
can not be started on the VKC180, use the
Supplied CD-ROM.
From The CD-ROM
1. Turn off any programs, including Virus Protection software on the PC that you are
installing the Photo Viewer software.
2. Load the CD-ROM into the PC’s CD drive and the setup software should start
automatically.
3. Follow the the on-screen instructions to install the Photo Viewer software on the
PC. For most users the default installation settings are the best to use.
VKC180
Dear Customer,
CONGRATULATIONS. The VKC180 Photo Keychain, when used as described, will give
you years of dependable service in your car, truck, RV or mini-van. We have taken exact-
ing measures in quality control to ensure that your product arrives in top condition, and
will perform to your satisfaction. In the rare event that your VKC180 Photo Keychain is
missing a part, contains a damaged item, does not perform as speci
fi
ed, requires war-
ranty service or you have an installation problem,
DO NOT RETURN THIS PRODUCT
TO THE STORE. PLEASE CALL OUR TOLL FREE NUMBER FROM THE U.S.A. AND
CANADA (800-445-1797)
and ask to speak with a member of our technical service team,
or submit your questions by e-mail via our web site vr-3.com, and a member of our techni-
cal service team will respond by e-mail to your questions. Our in-house technical service
team will expedite delivery of your part, advise you on installation, or help troubleshoot
a problem with you. If your product needs warranty service, our technical service team
representative will help you obtain the fastest remedy possible under the warranty.
Parts
VKC180 Photo Keychain
USB Cable
Features & Functions
Software Installation
Speci
fi
cations
• Storage Volume .............................................................. 98 or more photos
• Image Format ............................................................. JPG / BMP / GIF / TIF
• Computer Compatibility ..................................................................... PC - Windows
®
• Interface ............................................................................................USB 1.1
• Functions ........ Exit, Photo Scroll, Auto Off, Contrast, Delete Photo, Clock Set, Clock Disp
Photo Viewer Ver 4.2.5 CD
Operation
Main Menu
Main
1. Press and hold the Power/User Menu button for 3 seconds to
turn the unit on.
2. The unit will start to display any photos that are on it.
3. Press the Power/User Menu button once and the Main Menu
will be displayed. (Fig. 1)
4. Use the UP and DOWN buttons to move the arrow to the item
on the menu you would like to select, then press the Power/
User Menu button to confirm your choice.
Photo Scroll
1. On the Main Menu choose Photo Scroll.
2. You can choose between OFF and 5, 10,15, and 30 seconds
for the time each photo is displayed.
(Fig. 2)
3. If you choose OFF press the UP or DOWN button to change
the photo being displayed.
5. Choose Exit from the Main menu for normal operation.
Auto Off
1. On the Main Menu choose Auto Off.
2. Use the UP and DOWN buttons to choose Non Stop, 1 Min-
ute, 5 minutes, 10 minutes, and 30 Minutes.
(Fig. 3)
Non-Stop
means the unit will stay ON until you turn it OFF.
3. Press the Power/User Menu button to confirm your choice.
Contrast
1. On the Main Menu choose Contrast.
2. Use the UP and DOWN buttons to choose between the 5
levels of contrast.
(Fig.4)
3. Press the Power/User Menu button to confirm your choice.
Delete
1. When you want to delete a photo from the VKC180, choose
Delete from the Main menu.
2. Choose Exit, Delete One? or Delete All?.(Fig. 5) The photo
displayed when you choose delete is the one that will be
deleted, unless you choose Delete All, then all photos will be
deleted.
Clock Set
1. On the Main Menu choose Clock Set.
2. You will see a screen with the date, time, and day of the
week.(Fig. 6)
3. When the Clock Set menu is displayed the year will blink on
and off. Use the Up and Down buttons to change the year, then
press the Power/User Menu button to confirm your choice.
4. After choosing the year, the day of the week will blink On and
Off. Use the Up and Down buttons to change the day, then
press the Power/User Menu button to confirm your choice.
5. After choosing the day, the month will blink On and Off. Use the Up and Down
buttons to change the month, then press the Power/User Menu button to confirm
your choice.
6. After confirming the Day, the Hour will begin to blink. Use the Up & Down arrows
to change the Hour, then press the Power/User Menu button to confirm.
7. After confirming the Hour, the Minutes will begin to blink. Use the Up & Down ar-
rows to change the Minutes, then press the Power/User Menu button to confirm.
Up
Down
Power/
User Menu
Flashlight
LED Flashlight
USB Port


