
Ritron, Inc.
505 West Carmel Drive
•
Carmel, IN 46032
P.O. Box 1998
•
Carmel, IN 46082
Ph: 317-846-1201
•
Fax: 317-846-4978
Email:
•
web: www.ritron.com
Publication No. 14670027
Recording .wav Files to the
RQA Series Quick Assist
®
and RQT Series Quick Talk
™
The Ritron RQA Series Quick Assist
®
and RQT Series Quick
Talk
™
are capable of recording audio signals from the sound
card output of your PC. Using Ritron programmer RQT-PCPS-1
you can play a pre-recorded .wav sound file on your computer,
apply the computer’s audio output to the RQA or RQT, and
record it into the radio.
IMPORTANT
The RQA Series Quick Assist
®
and RQT Series Quick Talk
™
does
NOT
allow you to “download” the .wav audio file directly
into the radio via USB. The .wav file must be played on the
computer with it’s audio output applying the audio signal to the
radio.
STEP-BY-STEP INSTRUCTIONS:
Before you begin, be sure the radio has been completely
programmed to your desired, final configuration.
1. Connect the computer audio output to the RQA Series
Quick Assist
®
or RQT Series Quick Talk
™
This will typically be a 3.5mm stereo jack on the back or side
of your computer marked as AUDIO OUT. This output is
where you might connect desktop speakers or headset. The
computer audio is connected to the RQA or RQT Audio Input
via 2-pin header J300 shown below, located beside the RQA
or RQT on-board microphone. A 3.5mm to 2-pin audio cable
(60201123) is available from Ritron for connecting to the
computer. If you choose to create you own cable, a 2-pin
mating connector is available from Ritron (2142D020) with a
6” wire length.
When removing the 2-pin connector from J300
Audio Input grasp and pull the connector
housing. Do
NOT
remove by pulling on the
wires as damage may result.
2. Connect the USB programming cable from the computer
to the RQA or RQT and read the radio programming
using the Ritron RQT-PCPS-1 Programmer.
Consult the RQT-PCPS-1 user manual for detailed
information on programming the radio.
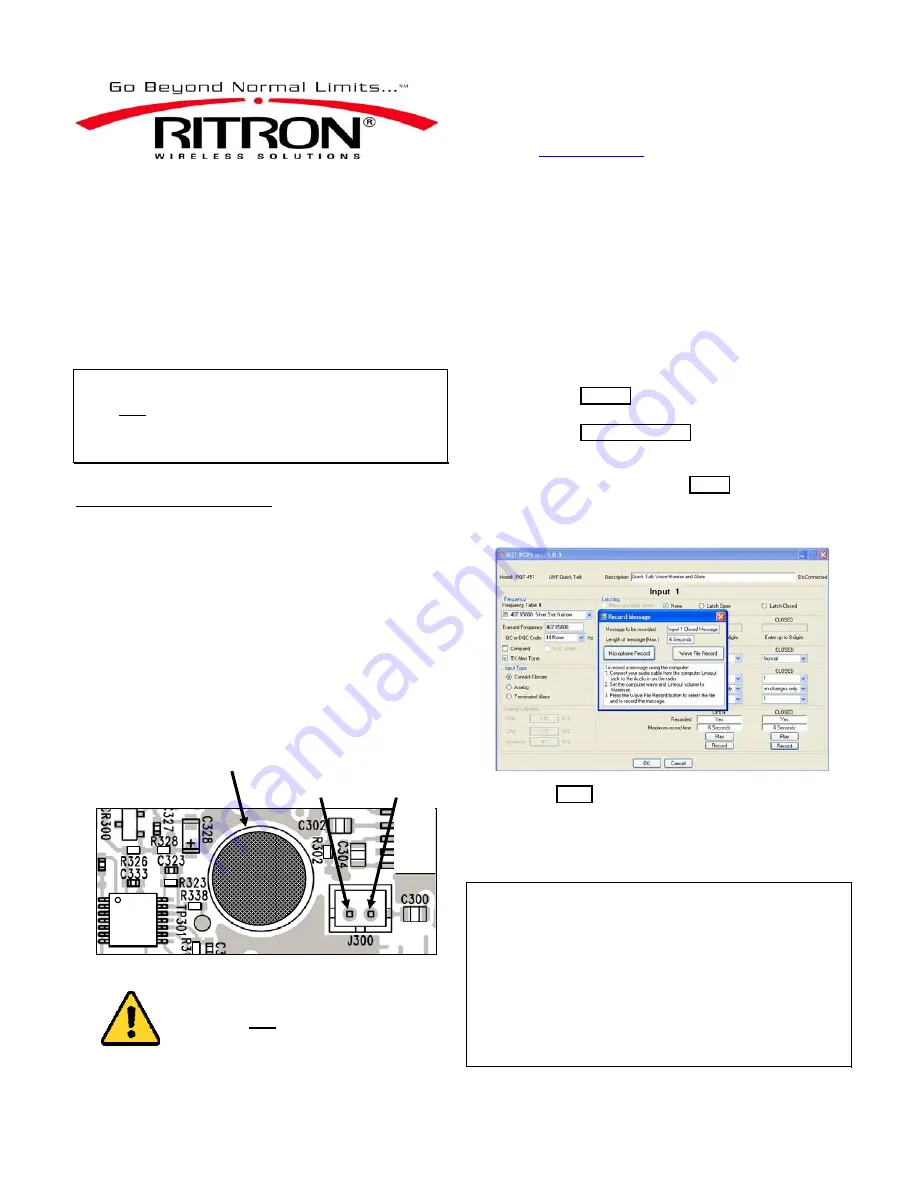
3. Using the Ritron RQT-PCPS-1 Programmer, select the
message you would like to record.
a.
Press the Record button for the desired message. A
Record Message screen will appear as shown below.
b.
Press the Wave File Record button to select the .wav
file to be recorded.
c.
Using standard Windows navigation, select the .wav file
to be recorded and press the Open button.
d.
The programmer will place the radio into record mode
and play the selected .wav file.
5. Press the Play button to hear the recorded message
transmitted on the programmed radio frequency.
To hear the message you will need a companion radio whose
receiver is programmed to the RQA or RQT transmit
frequency.
Adjusting the audio output level from a PC
The overall sound quality of the message heard through a
receiving radio will depend on the quality of the recorded
message. Because the recording of .wav files does not engage
automatic gain control, it is imperative that the signal level of the
audio presented to the input of the recording circuit be optimal.
This can be achieved by opening the SOUND PROPERTIES
applet from the CONTROL PANEL of your PC. If using test
equipment to check the signal level, a 1V P-P signal measured
at J300 is recommended. If test equipment is unavailable, a
simple trial and error approach can be used to achieve the best
sound quality of the broadcasted message.
Positive
(Audio)
Red
Negative
(Gnd)
Black
Microphone


