Summary of Contents for LUCINE
Page 1: ...1 10 ...
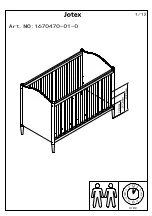
The RH Baby&child LUCINE is a beautifully designed and high-quality product. To ensure easy assembly, we provide an Assembly Instructions Manual that you can download for free from manualshive.com. This comprehensive manual will guide you through the assembly process, ensuring a hassle-free and enjoyable experience.
Page 1: ...1 10 ...