background image


BA No.: 02.07.147/2017-01 

User Instructions 

GB 

Important! 

Read the User Instructions before using the chair the first time and keep it at hand for the user.

Keep the User Instructions booklet at hand for future use and subsequent sales.

The user instructions and the maintenance manual are downloadable on our homepage.

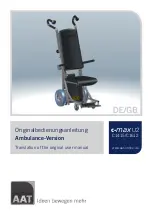
Electric Tilt & Lift Shower Chair

Phoenix Multi

Seat with hygiene opening

352.xx.10

Serial Number 

Phoenix 

Multi

Enclosed seat

352.xx.40

Serial Number


Height adjustment 

Laying position 

Sitting position 

REBOTEC

®

Rehabilitationsmittel GmbH 

PO Box Q541

Queen Victoria Building 

NSW 1230

rebotec.com.au 

[email protected]

Summary of Contents for Phoenix PS-E

Page 1: ...subsequent sales The user instructions and the maintenance manual are downloadable on our homepage Electric Tilt Lift Shower Chair Phoenix Multi Seat with hygiene opening 352 xx 10 Serial Number Phoe...

Page 2: ...4 4 Re use product lifetime 4 5 Disposal 4 6 Safety advisories for use 4 7 Product specifications 5 7 1 Delivery scope 5 7 2 Technical specifications 5 8 Spare parts accessories 6 9 Setting up the cha...

Page 3: ...torage The product s temperature range for use must be between 41 F and 104 F Store the product in a dry room with a relative humidity of 30 50 The product may be used outside of these ranges but only...

Page 4: ...nd its general condition 5 Disposal Disposal and recycling of used products as well as the packaging material must be done according to the applicable rules and legal regulations Please contact your l...

Page 5: ...rst cool off before use When the chair is to be used by patients with insensitive skin persons who cannot feel temperature rises and or have skin damage an attendant must first check the chair for hea...

Page 6: ...ional tolerances 5 mm 0 2 Schematic 8 Spare parts accessories Article No name 440 10 62 PUR seat pad 440 10 04 PUR care seat with care opening 309 10 Pan holder black 440 10 24 PUR care seat w o care...

Page 7: ...A upwards and insert the tubes of the headrest unit into the openings Push the tubes down until the push buttons C click in the holes D Next push the button C all the way in and push the tube to the e...

Page 8: ...delivered To remove it fold away the armrests as described in Section 11 8 on page 12 and pull the loops down from the armrest locking mechanism When re installing be sure the safety belt is not twis...

Page 9: ...pply LED 1 ON green If the LED green lights up the wall charger is ready for operation LED 2 CHARGE not illuminated No battery in the charger or the battery is fully charged LED 2 CHARGE orange If the...

Page 10: ...on class IPX5 IPX6 all electrical components must be installed with each other and none of the connections C must be open When connecting the manual switch make sure that the female connector D groove...

Page 11: ...ed up 1 The patient must be positioned as near to the chair as possible By firmly holding on to the armrests the patient must then slowly sit down onto the seat If this is not possible due to physical...

Page 12: ...ur foot 1 The wheel is now braked and the castor locked against swiveling 2 The wheel and castor are released by pressing the lever upwards with your foot 2 11 6 Removing the seat pad The seat with I...

Page 13: ...Castor brakes do not work Generally defective See maintenance Castor wheels turn with difficulty Caked gummed up Clean Castor wheels do not turn Generally defective See maintenance Wheels wobble Uneve...

Page 14: ...bility check function of the wheels replace defective wheels Function of the castor locking brakes replace defective brakes Function of the headrest Function of the chair inclination Check accessories...

Page 15: ...REBOTEC BA No 02 07 147 2017 01 GB 15...

Page 16: ...o 02 07 147 2017 01 GB 16 Notes We also supply Walking aids Shoulder crutches Shower stools Shower and commode chairs Multifunction Wheel Chairs Rollators Patient lifting hoists Standing up aids Your...

Reviews: