background image

Documentation Center

RAK2171 Quick Start Guide

Prerequisites

What Do You Need?

Before going through each and every step in the guide of the RAK2171 WisNode TrackIt, make sure to prepare
the necessary items listed below:

RAK2171 WisNode TrackIt
WisGate Edge gateway
An Android or iOS device with Bluetooth

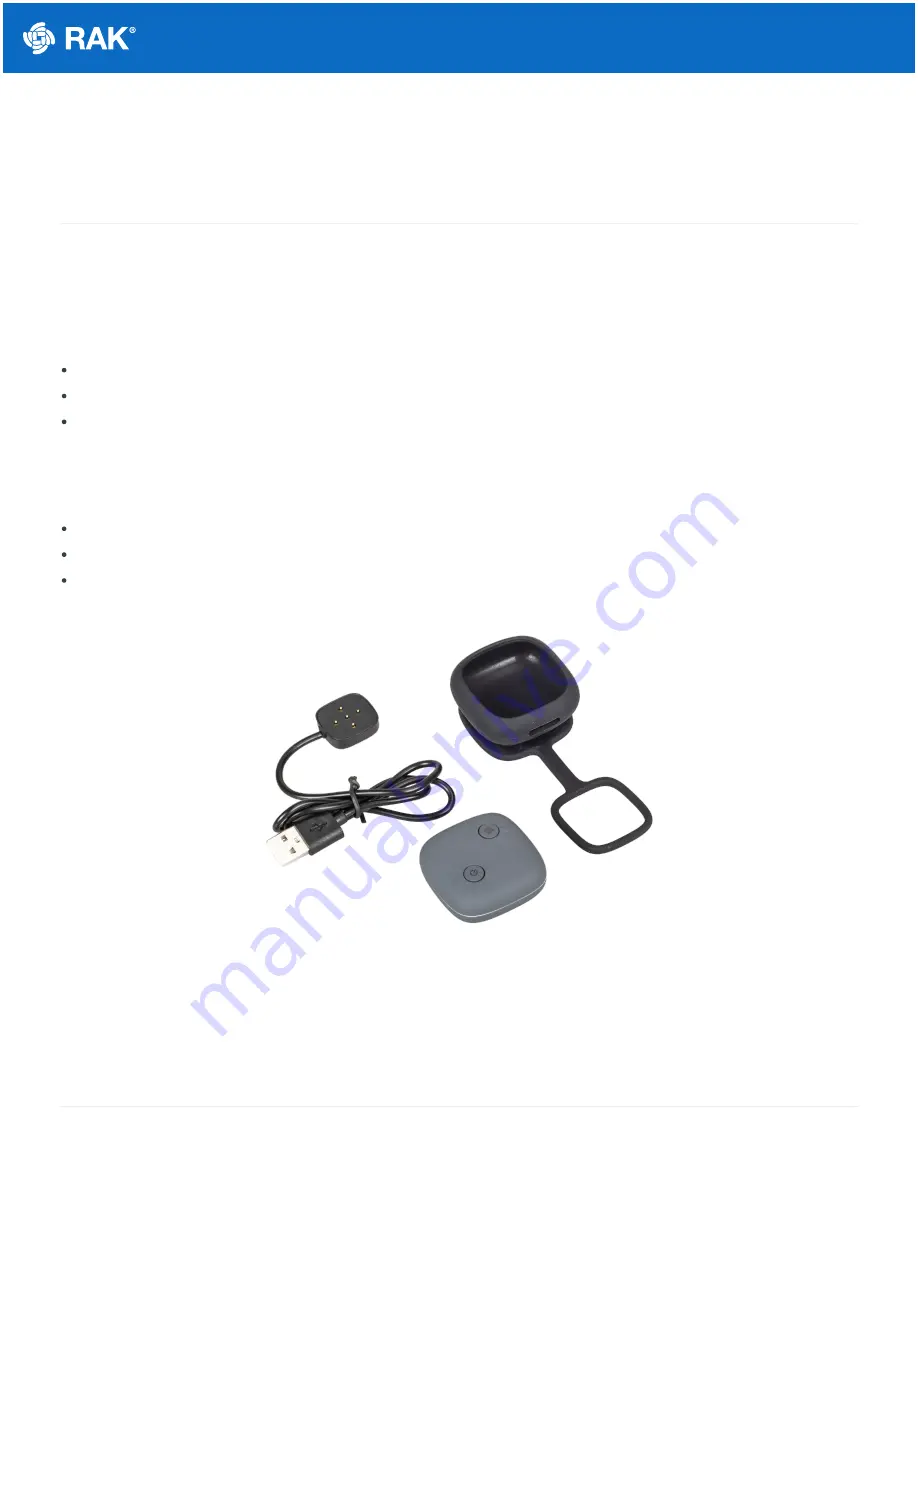
What’s Included in the Package?

2pc RAK2171 WisNode TrackIt
2pc Charging cable with magnetic plate
2pc Protective silicone case

Figure 1: Inclusion list

Product Configuration

WisNode TrackIt supports three working modes:

1. 

LoRaWAN Mode

2. 

P2P Mode

,

3. 

Third-party LNS

.

LoRaWAN Mode

To fully utilize the WisNode TrackIt and the TrackIt App in this mode, you need to use RAK WisGate Edge
gateway/s.

In this mode, the WisNode TrackIt is configured via the TrackIt application on your phone. The TrackIt application
automatically registers the RAK2171 trackers in the WisGate Edge gateways' Built-in Network Server.

Summary of Contents for RAK2171

Page 1: ...ode TrackIt 2pc Charging cable with magnetic plate 2pc Protective silicone case Figure 1 Inclusion list Product Configuration WisNode TrackIt supports three working modes 1 LoRaWAN Mode 2 P2P Mode 3 Third party LNS LoRaWAN Mode To fully utilize the WisNode TrackIt and the TrackIt App in this mode you need to use RAK WisGate Edge gateway s In this mode the WisNode TrackIt is configured via the Trac...

Page 2: ... install the TrackIt App on your smartphone 2 Turn on the Bluetooth on tour smartphone 3 Start the TrackIt App Location permission may be requested allow it 4 Agree with the Terms and Conditions and the Privacy Policy and press the Sign in with RAK ID button ...

Page 3: ...gn up for a new RAK ID if you don t have an account If you do not have a RAK ID press the Create new link and fill the needed information Figure 4 Sign in screen 6 After you log in the App will prompt you to add a tracker To start the pairing process press the ADD TRACKER button ...

Page 4: ...eviously you may need to restart it as the Bluetooth is available for pairing for 3 minutes 8 Press the Start Pairing in the app An information screen will be displayed to inform you of the process Figure 6 Pairing screen If the tracker is turned off or the Bluetooth pair period has expired you will see a Tracker not found message Restart the tracker and try again ...

Page 5: ...fter successful pairing you will see a configuration screen where you will be able to change the tracker s default name and the working mode This section is for the LoRaWAN mode so press the LoRaWAN button to change the mode from LoRa P2P to LoRaWAN ...

Page 6: ...red and ready by pressing the GATEWAY ON button Figure 9 Gateway on confirmation 12 You will be prompted to connect to the Wi Fi AP of your RAK gateway Press the GO TO WI FI SETTINGS button You will be redirected to your phone s Wi Fi settings where you need to find the RAK WisGate Edge gateway Wi Fi AP and connect to it You will be promoted for the gateway s login credentials ...

Page 7: ... the gateway s Wi Fi screen 13 After successful login the TrackIt app will create an application in the gateway s built In NS and will register the TrackIt device automatically Once you are done press the VIEW ON MAP button to see the WisNode TrackIt location on the application map ...

Page 8: ...least two RAK2171 devices One of the trackers is permanently connected via Bluetooth to the TrackIt App on your smartphone and acts a Host The other tracker s is are registered as Client and send their data to the Host tracker Figure 12 P2P mode 1 Download and install the TrackIt App on your smartphone 2 Turn on the Bluetooth on tour smartphone ...

Page 9: ...he Terms and Conditions and the Privacy Policy and press the Sign in with RAK ID button Figure 13 Welcome screen 5 Sign in with your RAK ID or sign up for a new RAK ID if you don t have an account If you do not have a RAK ID press the Create new link and fill the needed information Figure 14 Sign in screen ...

Page 10: ... tracker and Start Pairing screen 7 Hold the Power button of your RAK2171 for 3 seconds to turn it on If the device was turned on previously you may need to restart it as the Bluetooth is available for pairing for 3 minutes 8 Press the Start Pairing in the app An information screen will be displayed to inform you of the process Figure 16 Pairing screen ...

Page 11: ...een 10 After successful pairing you will see a configuration screen where you will be able to change the tracker s default name and the working mode Figure 18 Set up screen 11 Select the LoRa P2P mode and press ADD Your tracker is now added as a Host then press the VIEW ON MAP button to see its location As the Host should be always connected to your smartphone this is also your position ...

Page 12: ...ckers added will be Clients Figure 19 Host tracker is added 12 To add a Client tracker press the button on the map The adding process is the same as for the Host If you go to the map and slide up the menu at the bottom you will see the registered trackers their role and battery status ...

Page 13: ... a configuration tool for the trackers no map or location data is available in the App Figure 21 Client tracker is added and Registered Trackers List 1 Download and install the TrackIt App on your smartphone 2 Turn on the Bluetooth on tour smartphone 3 Start the TrackIt App Location permission may be requested allow it 4 Agree with the Terms and Conditions and the Privacy Policy and press the Sign...

Page 14: ...gn up for a new RAK ID if you don t have an account If you do not have a RAK ID press the Create new link and fill the needed information Figure 23 Sign in screen 6 After you log in the App will prompt you to add a tracker To start the pairing process press the ADD TRACKER button ...

Page 15: ...eviously you may need to restart it as the Bluetooth is available for pairing for 3 minutes 8 Press the Start Pairing in the app An information screen will be displayed to inform you of the process Figure 25 Pairing screen If the tracker is turned off or the Bluetooth pair period has expired you will see a Tracker not found message Restart the tracker and try again ...

Page 16: ...26 Pairing screen 9 After successful pairing you will see a configuration screen where you will be able to change the tracker s default name and the working mode Press the LoRaWAN button to change the mode from LoRa P2P to LoRaWAN ...

Page 17: ... NS For this mode press Third Party NS 11 You can see the RAK2171 Device EUI Application EUI Application Key Class and Join mode From the Region menu you can select the LoRaWAN band to be used NOTE For now the Class and Join mode can t be changed All LoRaWAN bands will be added with next firmware updates ...

Page 18: ...oRaWAN region Then press CONTINUE 13 A notification will be displayed that in Third party LNS mode the device s position data will be not available on the TrackIt App s map as the data will be sent to the Third party Network Server directly Figure 29 Third Party NS Confirmation TrackIt LoRaWAN Payload ...

Page 19: ...e reserved Header Payload Type The different payload types that TrackIt can send are explained below If the GPS has a fix it will send data of the location If a 6 level alarm is activated in the application the device will send a message when the working pattern is activated With 5 clicks on the power button the device will start sending SOS messages When the SOS is canceled a message will also be...

Page 20: ...byte 3 reserved bits 5 bits to be used for the ID 3 Application ID 4 bytes 4 Device ID 4 bytes 5 Longitude 4 bytes 6 Latitude 4 bytes 7 Accuracy 1 byte 8 GPS Start Number 1 byte 9 Battery 1 byte 10 Time 4 bytes 11 Status 1 byte Bit 0 shows if Extended Prediction Orbit EPO worked This allows the device to predict where satellites will be in the sky Bit 1 shows if the device is charging Bit 2 and 3 ...

Page 21: ...s payload will be sent when the SOS is canceled To cancel the SOS the user needs to press 5 times the power button of the TrackIt 1 Header Payload Type 1 byte 2 Message ID 1 byte 3 reserved bits 5 bits to be used for the ID 3 Application ID 4 bytes 4 Device ID 4 bytes 6 level Sensitivity Alarm Payload The 6 level sensitivity alarm is configured in the application of the TrackIt The device will sen...

Page 22: ...ng 6 Fall 1 Header Payload Type 1 byte 2 Message ID 1 byte 3 reserved bits 5 bits to be used for the ID 3 Application ID 4 bytes 4 Device ID 4 bytes 5 Level 1 byte Last Updated 4 11 2022 9 19 53 AM 1 byte 2 byte 3 6 byte 7 10 byte 11 byte Header Payload Type Message ID Application ID Device ID Level ...

Reviews: