background image

42-4058

OWNER’S MANUAL — Please read before using this equipment.

©

 2002 RadioShack Corporation.

All Rights Reserved.

RadioShack and RadioShack.com are trademarks 

used by RadioShack Corporation.

32-Note Polyphonic Sound — lets you play 
and hear up to 32 notes at the same time, so you 
can play or create almost any type of music.

Large Display — shows you the notes and 
chords as you play them, along with the current 
tone, rhythm, and tempo. The built-in backlight 
makes it easy to read, even in dim light.

61 Full-Sized Keys with Touch Response — provide the feel of a fine musical instrument. 
The keyboard’s volume varies in response to the force of your touch, just like an acoustic 
piano, so you can add emotion to your music.

248 Tones — uses technology usually found only on 
professional equipment to allow you to set your 
keyboard to sound like anything from a harpsichord to a 
honky-tonk piano. 100 of these tones have 
corresponding advanced tones, created by 
programming in digital signal processor (DSP) effects 
and other settings. You can even create up to 32 of 
your own tones with the custom tone synthesizer 
feature (see “Using the Tone Synthesizer” on Page 13).

100 Auto-Rhythms — provide a steady beat for 
many styles of music, from rhumba to rock (see 
“Using the Preset Auto-Rhythms” on Page 9).

Data Expansion System — lets you download 
additional tones, up to four sets of accompaniment 
data, DSP settings, and registration from your PC 
and store them in your keyboard’s memory (see 
“Using the Data Download Service” on Page 21).

Auto Accompaniment — lets you automatically play a 
preset harmonic pattern to match the selected auto-
rhythm (see “Using Auto Accompaniment” on Page 10).

Mixer Function — lets you make the 
keyboard sound multiple tones for auto 
accompaniment or memory playback, or to 
play MIDI data received from another MIDI 
device (see “Using the Mixer” on Page 12).

This Owner’s Manual explains how to use this electronic keyboard. It does not teach music.

The keyboard conforms to most, but not all, General MIDI specifications. Because of this, you might 
experience some incompatibility when using the keyboard with another General MIDI device. For 
more information, see “Using MIDI” on Page 19. Your keyboard also includes a MIDI (Musical 
Instrument Digital Interface) feature, which lets you connect it to other MIDI-equipped musical 
instruments or devices — even your personal computer. 

%106'065

The FCC Wants You to Know  .....................  2
Connecting Power .......................................  2

Installing Batteries  ...................................  2
Using AC Power  ......................................  2

Connecting Headphones  ............................  3

Listening Safely  .......................................  3

Connecting an External Amplifier ................  3
Using the Sheet Music Stand ......................  3
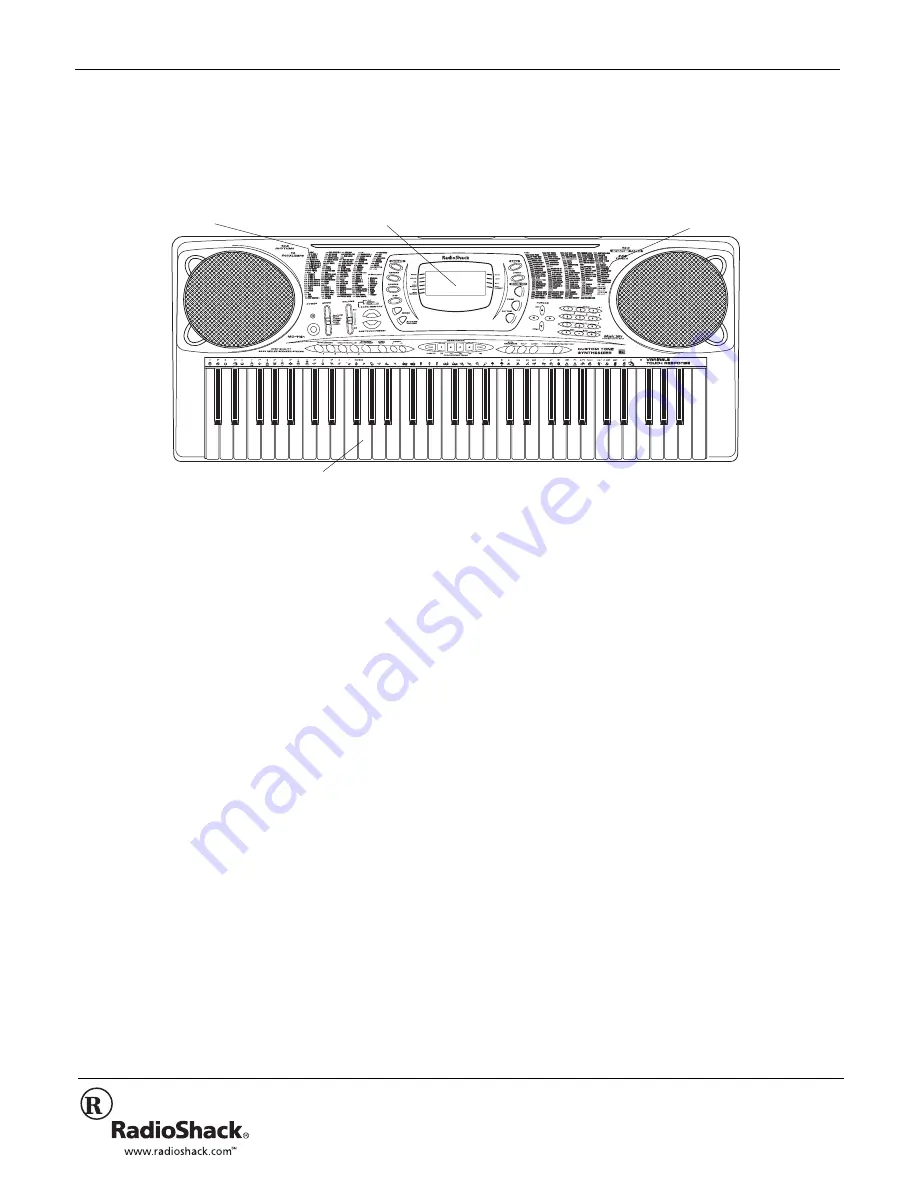
A Quick Look at Your Keyboard  ..................  3
Basic Operation  ..........................................  5

Playing the Demonstration Tunes ............  5
Using the Preset Tones ............................  5
Using an Advanced Tone  .........................  6

Using Reverb and Chorus ...........................  6

Selecting Reverb/Chorus  .........................  6
Changing the Reverb or 
Chorus Parameters ..................................  6

DSP (Digital Signal Processor)  ...................  7

Selecting a DSP Type  ..............................  7
Setting Basic DSP Parameters  ................  7
Changing DSP Parameters  .....................  7
Saving DSP Parameter Settings ..............  7

Using the Equalizers  ...................................  7

Selecting the Equalizer Type  ...................  7
Adjusting the Gain  ...................................  8

Using SPLIT  ................................................  8
Using LAYER  ..............................................  8
Using SPLIT and LAYER Together  .............  8
Using the Preset Auto-Rhythms ..................  9

Selecting/Playing an Auto-Rhythm  ........... 9
Using SYNCHRO  ..................................... 9
Using INTRO  ............................................ 9
Using FILL-IN  ........................................... 9
Using FILL-IN NEXT ............................... 10
Using ENDING  ....................................... 10

Using Auto Accompaniment  ...................... 10

Adjusting the Accompaniment Volume  ... 10
Concert Chord  ........................................ 10
Standard Fingering  .................................  11
Full-Range Chords  .................................  11
Using Auto Harmonize  ........................... 12
Using One-Touch Preset  ........................ 12

Using the Mixer .......................................... 12
Using the Tone Synthesizer  ....................... 13
Using the Registration Memory  ................. 14

Storing a Setup ....................................... 14
Recalling a Setup  ................................... 14

Special Features ........................................ 14

Changing Keys  ....................................... 14
Tuning the Keyboard  .............................. 14
Using Touch Response  .......................... 15
Using a Sustain Pedal  ............................ 15
Adjusting the Display Contrast  ............... 15
Resetting the Keyboard  .......................... 15

Using the Song Memory  ............................ 16

Real-Time Recording .............................. 16
Playing Back from Song Memory  ........... 17
Step Recording ....................................... 17

Recording Multiple Tracks ......................  18
Editing Memory Contents .......................  18
Editing a Song ........................................  18
Using MIDI  .............................................  19
About MIDI  .............................................  19
Making the MIDI Connections  ................  20
MIDI Data ...............................................  20
Changing MIDI Settings  .........................  20
Notes About the 
MIDI Implementation Chart  ....................  20
Using the Data Download Service  .........  21

Troubleshooting .........................................  22
Care ..........................................................  22
Service and Repair ....................................  22
Tone List  ....................................................  23

Panel Tones  ...........................................  23
Advanced Tones  ....................................  25
GM Tones ...............................................  27
Drum Sounds  .........................................  29
User Tones .............................................  29
Drum Assignment List  ............................  30
Fingered Chord Chart  ............................  31

Effect List ...................................................  32

Reverb ...................................................  32
Chorus ...................................................  32
DSP ........................................................  32
DSP Algorithm List  .................................  34

MIDI Implementation Chart  .......................  41
Specifications ............................................  42

/&

/+&+

-G[DQCTF

Summary of Contents for 42-4058

Page 1: ...he keyboard with another General MIDI device For more information see Using MIDI on Page 19 Your keyboard also includes a MIDI Musical Instrument Digital Interface feature which lets you connect it to other MIDI equipped musical instruments or devices even your personal computer 106 065 The FCC Wants You to Know 2 Connecting Power 2 Installing Batteries 2 Using AC Power 2 Connecting Headphones 3 L...

Page 2: ...d or the batteries lose power these settings are lost or initialized to factory settings You can also delete or initialize some settings independently See Resetting the Keyboard on Page 15 056 0 66 4 5 Your keyboard can use 6 D batteries not supplied for power For the best per formance and longest life we recommend RadioShack alkaline batteries 1 While pressing the tabs on the battery compartment ...

Page 3: ... still damage your hearing 100 6 0 0 6 40 2 4 To amplify your keyboard s sound you can connect it to an optional external amplifier using an audio cable with a 1 4 inch 6 35 mm plug not supplied To connect an external amplifier to your keyboard insert the cable s plug into PHONES OUTPUT on the back of the keyboard then connect the other end of the cable to the amplifier s input jack s such as AUX ...

Page 4: ...the same time giving your music a layered effect see Using LAYER on Page 8 Tune Control lets you adjust the pitch of your keyboard so you can play in tune with other instruments see Tuning the Keyboard on Page 14 Transpose Function lets you instantly change the key of the music even while you are playing see Changing Keys on Page 14 Effects lets you add reverb chorus and more powerful sound effect...

Page 5: ...digits appear 3 Play the keyboard to hear the selected tone and adjust VOLUME to the desired level 016 Basic Operation The keyboard automatically selects the tone GRAND PIANO No 000 when you turn the power on Each time you turn it on after that it selects the last selected tone To select a different tone see Using the Preset Tones Using the Preset Tones The keyboard has 32 note maximum polyphonic ...

Page 6: ...ange how it sounds The parameters you can control vary depending on the effect type 1 After selecting the effect you want press G ENTER The parameter setting screen appears 2 Repeatedly press I or J CURSOR to display the parameter you want to change Reverb Parameters Reverb effects are classified as reverb or delay type Parameter settings vary depending on the type Reverb Type Parameters No 0 to 5...

Page 7: ...the selected DSP See DSP Algorithm List on Page 34 HlXIdZ HlXIdZ HlXIdZ HlXIdZ DSP Reverb Send to Sets how much of the DSP processed sound is sent to reverb 9 eIdZ 9 eIdZ 9 eIdZ 9 eIdZ DSP Chorus Send to Sets how much of the DSP processed sound is sent to chorus 3 Repeatedly press or or enter a number using the number buttons to change the parameter setting 4 Press H EXIT 5 8 0 52 2 4 6 4 5 66 0 5...

Page 8: ...o hear the selected split tones To select a different low end tone enter the three digit number for the new low end tone while the SPLIT indicator appears To select a different high end tone press SPLIT to turn off its indicator then enter the three digit number for the new high end tone Then press SPLIT again so the SPLIT indicator appears To cancel SPLIT repeatedly press SPLIT until its indicato...

Page 9: ...u can press VARIATION FILL IN 1 or 2 to start the rhythm Each of the keyboard s preset auto rhythms has a built in variation alternate to its normal beat pattern The variation differs slightly from the normal rhythm so it is almost like having two rhythms in one 4 Adjust VOLUME to the desired level 5 To change the auto rhythm speed press or hold down TEMPO or The current tempo setting appears 6 Pl...

Page 10: ...ythm selection The auto accompaniment patterns consist of four parts chord 1 chord 2 bass and rhythm You can delete any of the parts by using the mixer function See Using the Mixer on Page 12 756 0 6 1 2 0 06 81 7 The keyboard lets you adjust the volume of your accompaniment separately from the overall volume of the keyboard 1 Press ACCOMP VOLUME The current accompaniment volume setting appears 2 ...

Page 11: ...to the desired levels 6 To change chords without interrupting the rhythm simply press the auto accompaniment keys required to form the new chord 7 To stop auto accompaniment and the auto rhythm press START STOP 7 4 0 14 5 While the concert chord and standard fingering methods limit chord formations to the accompaniment keys the full range chord method lets you play chords of any type using any of ...

Page 12: ...six parame ters for the selected channel 1 Select the channel you want to edit as described in Steps 1 and 2 of Editing the Status of a Channel 2 Press G ENTER to enter the parameter edit mode 3 Repeatedly press I or J to select the parameter you want to change Tone Parameters Jed De Jed De Jed De Jed De to sets the tone assigned to the channel When the assigned tone is an advanced tone the displa...

Page 13: ...ime before vibrato starts Vibrato Depth L_X fj L_X fj L_X fj L_X fj to Sets the depth of vibrato effect Vibrato Rate L_X HWj L_X HWj L_X HWj L_X HWj to Sets the speed of the vibrato effect Cut Off Frequency 9 e hg 9 e hg 9 e hg 9 e hg to Adjusts the timbre of the sound A higher cut off frequency gives brighter timber lower cut off frequency produces a softer timbre Resonance H iedWd H iedWd H iedW...

Page 14: ...t on For added flexibility as you play the keyboard lets you change transpose the musical key in which it plays You can transpose the key up or down 24 semitones two octaves 1 Press TOUCH TRANSPOSE SETTING then repeatedly press I or J CURSOR until JhWdi JhWdi JhWdi JhWdi appears The displayed number is the number of semitones to which the keyboard is set compared to its default key 2 Within 5 seco...

Page 15: ...E JACK 1 Press TOUCH TRANSPOSE SETTING then repeatedly press I or J CURSOR until B9 WYa B9 WYa B9 WYa B9 WYa appears 2 Repeatedly press G ENTER then repeatedly press I or J CURSOR until WYa WYa WYa WYa and the current setting default IKI IKI IKI IKI appear 3 Within 5 seconds repeatedly press or until the desired setting IKI IKI IKI IKI IeI IeI IeI IeI I j I j I j I j or h o h o h o h o appears Pre...

Page 16: ...kip Step 5 of Real Time Recording Recording starts when you press a key Tempo Do not change the tempo unless you already know the desired tempo Pressing START STOP to hear the tempo causes recording to begin MODE 5 Press START STOP to start recording To start recording with synchro start press SYNCHRO FILL IN NEXT instead of START STOP Recording starts when you play a note or a chord on the accomp...

Page 17: ...types are labeled above each key The chord root letter and type of chord also appear as you play a chord 5RGEKH KPI VJG GPIVJ QH C 0QVG During step recording repeatedly press or or enter a number using the number buttons to specify the length of each note Use numbers 1 through 6 to specify whole notes 1 half notes 2 quarter notes 3 eighth notes 4 16th notes 5 and 32nd notes 6 To enter a dot or tri...

Page 18: ...Y Ij f H Y appears 2 Within 5 seconds repeatedly press or to select a song number 3 Use SONG MEMORY TRACK 1 6 to select the track you want to edit 4 Press I CURSOR to enter edit mode 5 Repeatedly press I or J CURSOR to move to the entry you want to change You can change the parameter that is flashing on the display To change a different parameter repeatedly press I or J CURSOR so the parameter you...

Page 19: ...ture called MIDI Musical Instrument Digital Interface MIDI is the universal standard for sending and receiving performance data between all types of electronic musical instruments regardless of manufacturer Using MIDI you can play music on your keyboard and another instrument at the same time while pressing the keys on only one record your music to a sequencer acquire a wider selection of preset t...

Page 20: ...en press H EXIT 016 5 176 6 2 06 6 10 46 The MIDI Implementation Chart on Page 41 shows specific details about how your keyboard is compatible with the MIDI standard The following notes explain how the keyboard works within the MIDI standard Basic Channel The MIDI standard allows for the use of up to 16 channels to exchange data Like a TV broadcast each of these channels can contain different data...

Page 21: ... 48 Visit www radioshack com to download the preset accompaniments tones DSPs and registration data as well as the software to transfer the downloaded data from your PC to the keyboard The software not only allows you to transfer the downloaded data to the keyboard but also to store the various settings you made on the keyboard onto your PC s storage device See the instructions provided with the s...

Page 22: ... to ON see Changing MIDI Settings on Page 20 Mixer channel 1 is turned off or its volume is set too low Turn on Channel 1 or raise the volume setting see Using the Mixer on Page 12 No sound when connected to an external amplifier The volume is turned down Adjust VOLUME Defective connection cord Replace the connection cord No sound when receiving and playing MIDI data MIDI cables are not connected ...

Page 23: ...23 Tone List 610 56 2 0 610 5 ...

Page 24: ...24 Tone List 2 0 610 5 106 07 ...

Page 25: ...25 Tone List 8 0 610 5 ...

Page 26: ...26 Tone List 8 0 610 5 106 07 ...

Page 27: ...27 Tone List 610 5 ...

Page 28: ...28 Tone List 610 5 106 07 ...

Page 29: ...29 Tone List 47 5170 5 75 4 610 5 ...

Page 30: ...30 Tone List 47 55 0 06 56 ...

Page 31: ...31 Tone List 0 4 14 46 ...

Page 32: ...Effect List 32 6 56 4 8 4 1475 52 ...

Page 33: ...33 Effect List 52 106 07 ...

Page 34: ...rameter to eliminate such distortion 1 Resonance 0 to 127 Adjusts the resonance of the sound 2 Manual 0 to 127 Adjusts the frequency used as the basis for the wah filter 3 Depth 64 to 0 to 63 Adjusts the depth of the wah in accordance with the level of the input signal Setting a positive value causes the wah filter to open in direct proportion with the size of the input signal producing a bright s...

Page 35: ... to 127 Adjusts the level of the effect sound 4 Dry Level 0 to 127 Adjusts the level of the original sound 15 Lo Fi This is an effector that reproduces a retro type Lo Fi sound using Noise Generator 1 phono graph record player type scratch noise generator and Noise Generator 2 FM radio type white noise and pink noise continuous noise generator and by using noise modulation amplitude modulation AM ...

Page 36: ...LPF 0 to 127 Adjusts the cutoff frequency of the low pass filter A smaller value cuts the high range 1 HPF 0 to 127 Adjusts the cutoff frequency of the high pass filter A larger value cuts the low range 2 Feedback 0 to 127 Adjusts the repeat of the reverb 3 High Damp 0 to 127 Adjusts damping of the high range reverb sound The smaller the value the greater the damping of high range reverb sound 4 D...

Page 37: ...that is related to Flanger 2 Tap Delay 0 Flanger LFO Rate 1 Flanger LFO Depth 2 Flanger Feedback 3 Flanger Wet Level 4 Delay Time 5 Delay Wet Level 6 Delay Feedback 7 Delay High Damp M04 Multi04 Stereo Phaser Stereo Delay 1 This is a multi effector that is related to Stereo Phaser Stereo Delay 1 0 Phaser Resonance 1 Phaser Manual 2 Phaser Rate 3 Phaser Depth 4 Phaser Wet Level 5 Delay Time 6 Delay...

Page 38: ... a multi effector that is related to Ring Modulator Sin 2 Phase Chorus 0 Ring OSC Frequency 1 Ring LFO Rate 2 Ring LFO Depth 3 Ring Wet Level 4 Ring Dry Level 5 Chorus LFO Depth 6 Delay Time 7 Delay Wet Level M13 Multi13 Ring Modulator Distortion This is a multi effector related to Ring Modulator Distortion 0 Ring OSC Frequency 1 Ring LFO Rate 2 Ring LFO Depth 3 Ring Wet Level 4 Ring Dry Level 5 D...

Page 39: ...o Auto Wah Tri 2 Phase Chorus 2 Tap Delay 0 Wah Resonance 1 Wah Manual 2 Wah Depth 3 Chorus LFO Rate 4 Chorus LFO Depth 5 Delay Time 6 Delay Wet Level 7 Delay Feedback M22 Multi22 LFO Wah Tri 2 Phase Chorus 2 Tap Delay This is a multi effector that is related to LFO Wah Tri 2 Phase Chorus 2 Tap Delay 0 Wah Resonance 1 Wah Manual 2 Wah LFO Rate 3 Wah LFO Depth 4 Chorus LFO Depth 5 Delay Time 6 Dela...

Page 40: ... Distortion High 3 Distortion Level 4 Delay Time 5 Delay Wet Level 6 Delay Feedback 7 Delay High Damp M29 Multi29 Distortion Phaser This is a multi effector related to Distortion Phaser 0 Distortion Gain 1 Distortion Low 2 Distortion High 3 Distortion Level 4 Phaser Resonance 5 Phaser Manual 6 Phaser Rate 7 Phaser Depth M30 Multi30 Distortion Sin 2 Phase Chorus This is a multi effector that is rel...

Page 41: ...41 MIDI Implementation Chart 2 06 6 10 46 ...

Page 42: ...s 6 2 through 6 are melody tracks Recording Methods Real time Step Memory Capacity Approximately 3 500 notes total for two songs Edit Function Equipped Custom Tone Parameter Function Parameters Attack time release time resonance cutoff frequency vibrato type vibrato delay vibrato depth vibrato rate octave shift level touch sense reverb send chorus send DSP line DSP type DSP parameter Mixer Functio...

Page 43: ...Notes Notes 43 016 5 ...

Page 44: ...o you In the event of a product defect during the warranty period take the product and the RadioShack sales receipt as proof of purchase date to any RadioShack store RadioShack will at its option unless otherwise provided by law a correct the defect by product repair without charge for parts and labor b replace the product with one of the same or similar design or c refund the purchase price All r...

Reviews: