background image

©

 2002 RadioShack Corporation.

All Rights Reserved.

RadioShack and RadioShack.com 

are trademarks used by 

RadioShack Corporation.

OWNER’S MANUAL — 
Please read before using this equipment.

www.radioshack.com

25-3097

5NKO

"

(NCVDGF

"

5ECPPGT

#

"

+/2146#06

"

#

If an icon appears at the end of a paragraph, go to the box on that page 
with the corresponding icon for pertinent information.

RRRRý

— Warning 

#

 — Important

±

±

±

±

 — Note 

.

.

.

.

 — Caution 


°

°

°

°

 — Hint

Thank you for purchasing a 
RadioShack Slim Flatbed 
Scanner. Your scanner is 
designed for notebook or 
desktop PCs that have a 
universal serial bus (USB) 
port. You can use the 
scanner to quickly scan 
documents and 
photographs in color, gray-
scale, or black-and-white at 
up to 15 pages per minute. 
The supplied software lets 
you convert the scanned 
images to electronic files.
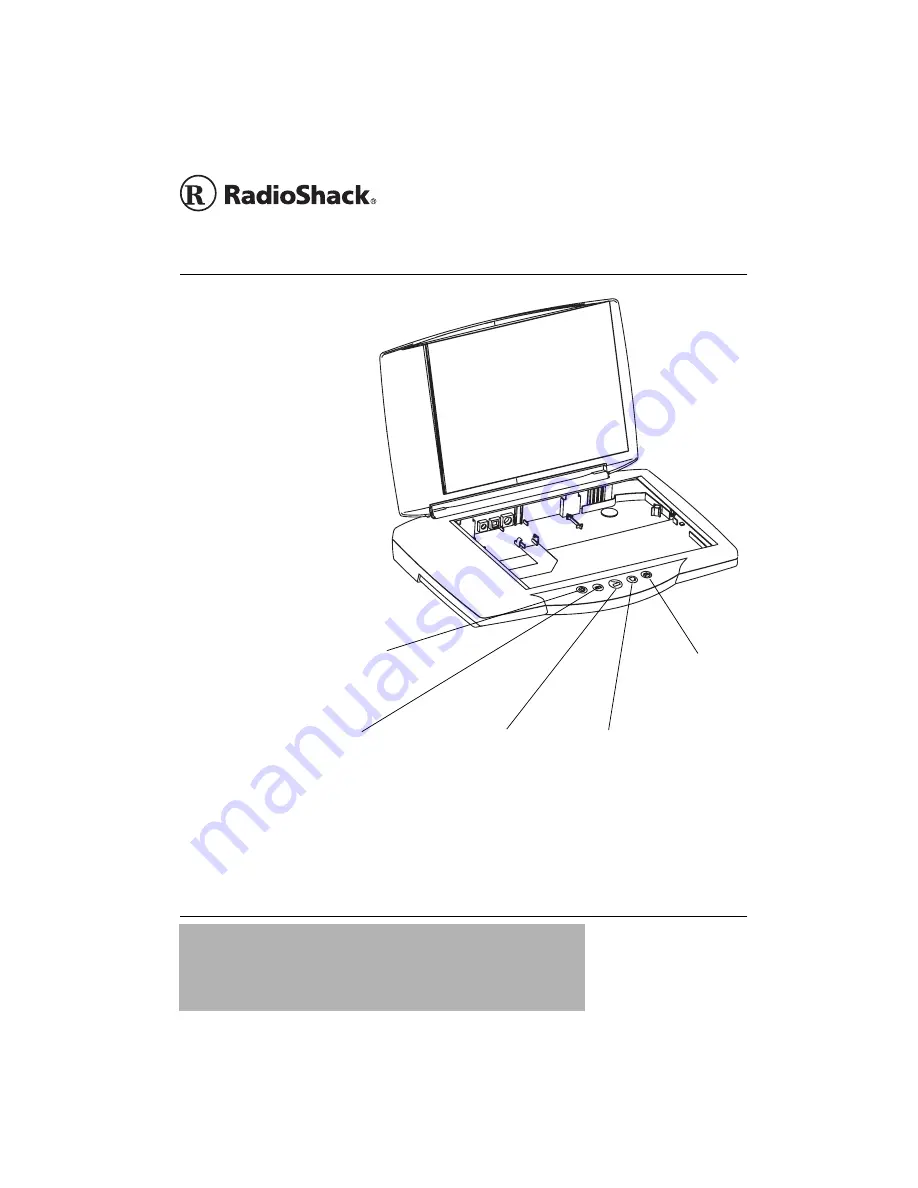
U

U

U

U

(Custom) — 

lets you assign a 
custom function.

Y

Y

Y

Y

 (Scan) — scans 

the image and 
displays the 
scanned image in an 
onscreen TWAIN 
window for editing.

WWWW

 (OCR) — (

Optical 

Character Recognition) 

converts the scanned text to 
a Windows Notepad file so 
you can import it into many 
word processing programs.

X

X

X

X

 (Copy/Print) — 

prints the scanned 
image to your 
printer or copier.

These buttons have the same functions as those in the onscreen 
scanner control pad. For detailed operating information, see 
“Using the Onscreen Scanner Control Panel” on Page 6.

V

V

V

V

(E-Mail) — 

displays the scanned 
object in a new e-mail 
message for your 
e-mail application.

Summary of Contents for 25-3097

Page 1: ...uments and photographs in color gray scale or black and white at up to 15 pages per minute The supplied software lets you convert the scanned images to electronic files U U U U Custom lets you assign a custom function Y Y Y Y Scan scans the image and displays the scanned image in an onscreen TWAIN window for editing W W W W OCR Optical Character Recognition converts the scanned text to a Windows N...

Page 2: ...ould never be blocked by placing the product on a bed sofa rug or other similar surface 8 Heat The product should be situated away from heat sources such as radiators heat registers stoves or other products including amplifiers that produce heat 9 Power Sources The product should be connected to a power source only of the type described in the operating instructions or as marked on the scanner 10 ...

Page 3: ... to rain or water If the product does not operate normally by following the operating instructions If the product has been dropped or damaged in any way When the product exhibits a distinct change in performance this indicates a need for service 13 Overloading Do not overload wall outlets extension cords or integral convenience receptacles as this can result in a risk of fire or electric shock 14 ...

Page 4: ... e mail client scan text documents and edit them with word Your scanner has a locking mechanism to protect it from vibration during shipment or while you move it Before you use the scanner slide the lock on the bottom of the scanner toward Ž Ž Ž Ž To protect the scanner mechanism when you move or ship it slide the lock toward Bottom View 76 10 You must use a Class 2 power source that supplies 12V ...

Page 5: ...ack of the scanner 6 After you connect the scanner to your computer Windows operating system except Windows XP automatically installs this scanner s software to your computer and q q q q scanner icon appears on the Windows taskbar Once you have connected the scanner through the USB port the onscreen scanner control panel automatically connects to the scanner 016 If the CD does not start automatica...

Page 6: ...to send a scanned image or document directly to an e mail program p p p p Scan click to scan documents and images The images are sent to post image editing for post processing You can change the default post processing application by clicking Preferences and selecting a different program Preferences click to set the preferences for each button You can add and choose settings for post processing ap...

Page 7: ...ation select File and then Select Source to open the Select Source dialog box Select 86 86 86 86 6FDQQHU 6FDQQHU 6FDQQHU 6FDQQHU and then click Select to finish selecting the source 2 Select File and then Acquire to open the TWAIN Scanner Settings window Crop Box Ruler Button Ruler Type Preview Help Scan Exit Preview Window General Advanced Message Bar ...

Page 8: ...scan mode resolution or scan area or create more memory space on your hard disk 3 Select General to adjust the scanning options and configuration 4 Under Scan Page For select from the following options GLWLQJ 7H W 2 5 GLWLQJ 7H W 2 5 GLWLQJ 7H W 2 5 GLWLQJ 7H W 2 5 enhances the function of OCR software such as the included TextBridge PRO 080 for converting image text to editable text It creates la...

Page 9: ...r than grayscale and twenty four times larger than black white 7UXH0FRORU 7UXH0FRORU 7UXH0FRORU 7UXH0FRORU This scan mode collects the maximum amount of color information from the original up to around 16 7 million colors Choose this option for an original that you want to display print or edit in color UD VFDOH UD VFDOH UD VFDOH UD VFDOH Use this mode for black white photos or for scanning color ...

Page 10: ...GSL 633 GSL 633 GSL 633 GSL Unless you have a specific reason for selecting a higher resolution we suggest you do not do so as the resulting file size may be very large and take up a lot of your hard disk space For example a 3 x 5 photograph scanned at 2400dpi true color will result in a file over 240MB in size Size lets you adjust the scan size in the preview window enter a width and length in th...

Page 11: ...the image brighter or darker Brightness Contrast Contrast slide to adjust the image contrast Sharpness slide to make the image sharper or fuzzier Gamma Sharpness Saturation Hue Saturation slide to change the intensity of color in the image Hue slide to adjust the image s color Moiré Reduction select to remove waves ripples dots and other overlaid patterns from your image Use higher levels of moiré...

Page 12: ...er 1 Place the paper face down on the scanner Line up the corner of the paper with the arrow at the inside corner of the scanner s glass Be sure to keep it within the correct document size marker 2 Double click q q q qýon the Windows taskbar The onscreen scanner control panel appears 3 Click t t t t on the onscreen scanner control panel or press X X X X on the scanner s control pad to scan the ima...

Page 13: ...the scanner s glass Be sure to keep it within the correct document size marker 2 Double click q q q qýon the Windows taskbar The onscreen scanner control panel appears 3 Click o o o o on the onscreen scanner control panel or press Uon the scanner s control pad for more than one second to open the TWAIN Scanner box 4 Under Scanner Settings make any necessary adjustments under General and Advanced a...

Page 14: ... arrow at the inside corner of the scanner s glass Be sure to keep it within the correct document size marker 2 Double click q q q qýon the Windows taskbar The onscreen scanner control panel appears 3 Click r r r r on the onscreen scanner control panel or press V V V V on the scanner s control pad for more than one second to scan the image 4 The scanned image is sent to your default e mail program...

Page 15: ... of the buttons on the scanner to open the onscreen scanner control panel USB Scanner Utility Preferences box 70 6 10 5 66 0 5 Click Function on the Flatbed Scanner Utility Preferences box and then select the desired function button under Select Menu 5 6 07 Select Menu lets you choose which button on the scanner control panel you want to configure and set preferences for Choose a button from the d...

Page 16: ...Resolution select the appropriate value 5 Click OK to save your changes and return to the onscreen scanner control panel Preferences box or click Cancel to exit without saving changes To remove an application from the Select Default Application menu select the application and click Remove Application To return the button s application list to the default settings select the application and click R...

Page 17: ...fference Try small changes at first and watch the effect For most photos and documents you will not need to adjust these values The Color Correction Control also allows you to adjust the gamma If you have an off color original for example one in which skin tones are a little green try reducing green gamma and or increasing red gamma Gamma may be adjusted either by increasing reducing the gamma of ...

Page 18: ...eep the scanner away from dust and dirt and wipe it with a damp cloth occasionally to keep it looking new 5 48 0 4 2 4 If your scanner is not performing as it should take it to your local RadioShack store for assistance Modifying or tampering with the scanner s internal components can cause a malfunction and might invalidate its warranty and void your FCC authorization to operate it 52 6 105 Bit D...

Page 19: ... not set too high preferably 300 dpi or lower Check your connections see Problems with connections above Error Scanner not found There is a problem communicating with the scanner This may be caused by a power outage incorrect connection or an installation problem First check your connections and check that your wall socket and power switches are all turned on Make sure USB setting is enabled the p...

Page 20: ... AND FITNESS FOR A PARTICULAR PURPOSE ARE LIMITED IN DURATION TO THE DURATION OF THE WRITTEN LIMITED WARRANTIES CONTAINED HEREIN EXCEPT AS PROVIDED HEREIN Ra dioShack SHALL HAVE NO LIABILITY OR RESPONSI BILITY TO CUSTOMER OR ANY OTHER PERSON OR ENTITY WITH RESPECT TO ANY LIABILITY LOSS OR DAMAGE CAUSED DIRECTLY OR INDIRECTLY BY USE OR PERFORMANCE OF THE PRODUCT OR ARISING OUT OF ANY BREACH OF THIS...

Reviews: