Nikon AX-110, User Manual
The Nikon AX-110 User Manual is a comprehensive guide designed to help you maximize the potential of your camera. It provides step-by-step instructions and expert tips for capturing stunning photos. Download this manual for free at manualshive.com, enhancing your photography skills and unleashing your creativity.
Share
Download


Reviews:
No comments
Related manuals for AX-110

MS916
Brand: Unitech Pages: 2

MS912
Brand: Unitech Pages: 16

MS838
Brand: Unitech Pages: 2

MS832
Brand: Unitech Pages: 2

Nmark SSaM
Brand: Aerotech Pages: 58

TSMA
Brand: R&S Pages: 52

MS 230
Brand: Unitech Pages: 59

Granit XP 1990i
Brand: Honeywell Pages: 11
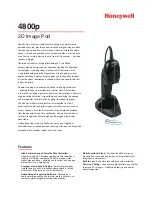
4800p
Brand: Honeywell Pages: 2

Stratos MS2400
Brand: Honeywell Pages: 2

6300dpm
Brand: Honeywell Pages: 2

8620
Brand: Honeywell Pages: 13

Voyager XP 1470g Series
Brand: Honeywell Pages: 16

HH480
Brand: Honeywell Pages: 36

HH400
Brand: Honeywell Pages: 36

StratosH MS2321
Brand: Honeywell Pages: 62

4850DR
Brand: Honeywell Pages: 34

HH450
Brand: Honeywell Pages: 36


