background image


Owner's Manual 


UX Series 

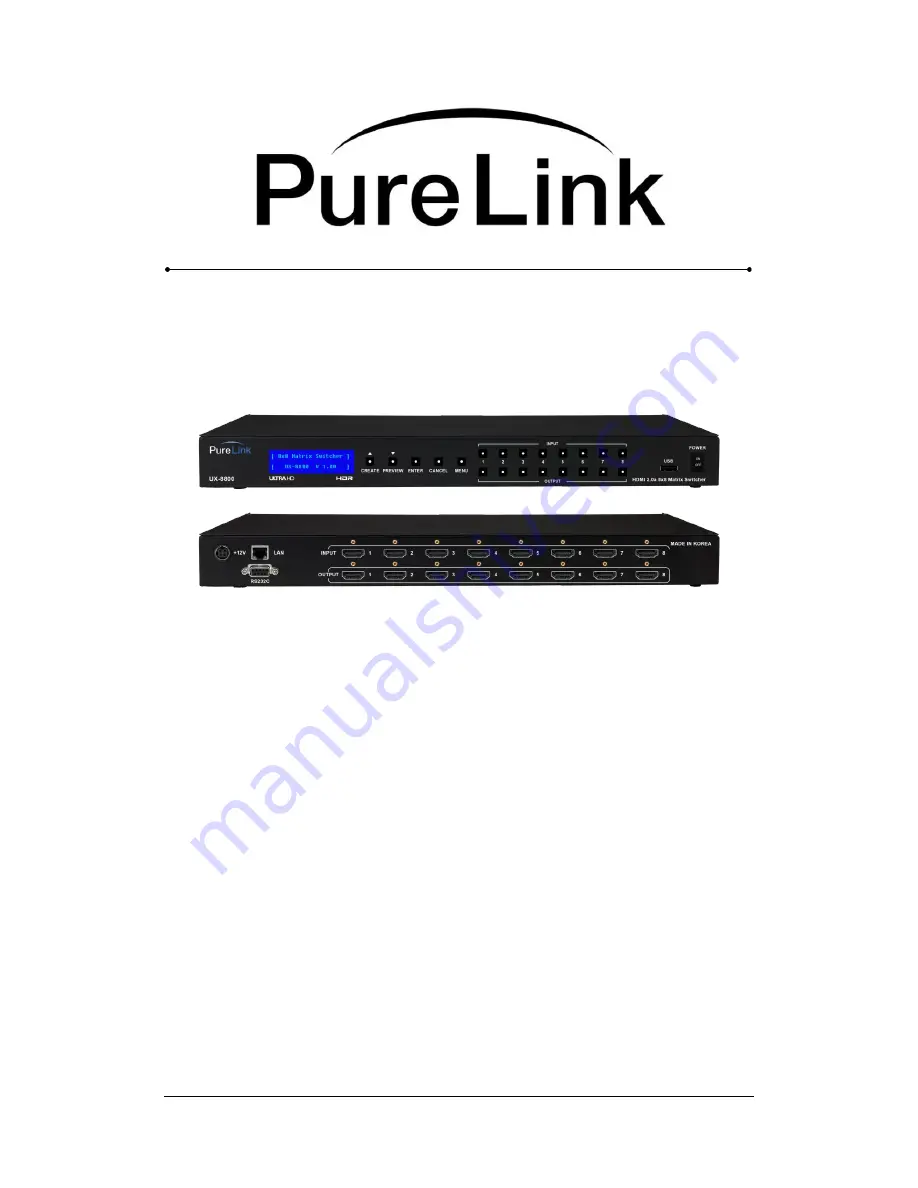
HDMI 2.0 Integrated Matrix Switcher


PureLink

TM


For technical support, please contact us at

 [email protected] or 877.312.4547

Summary of Contents for UX-4400

Page 1: ...Owner s Manual UX Series HDMI 2 0 Integrated Matrix Switcher PureLinkTM For technical support please contact us at info solidsignal com or 877 312 4547 ...

Page 2: ...nu User Guide 10 Chapter 4 Communication Code Configuration 4 1 Control Programmer s Guide 15 4 2 Overview 15 4 3 Command Code Formats 15 4 4 General Rules for Command Codes 16 4 5 Command Ack Value Response 18 4 6 Connecting Switches 18 4 7 Disconnecting Switches 20 4 8 Connection Status Check 22 4 9 LAN Code Configuration 25 Chapter 5 Web UI Guide and Firmware Instruction 5 1 Web UI Guide 26 5 2...

Page 3: ...ng this unit This unit may be equipped with a 3 wire grounding type plug a plug having a third grounding pin This pin will only fit in to a grounding type power outlet If you are unable to insert the plug in to the outlet contact your electrician to replace your obsolete outlet Air vents should be kept clean and unobstructed at all times Please refrain from using frayed power cords and damaged wal...

Page 4: ...3 23 EEC Low Voltage Equipment Safety and or CPU Boards and Power Supplies used Council Directive 93 68 EEC with Matrix Dtrovision LLC 535 E Crescent Ave Ramsey NJ 07446 201 488 3232 declares under sole responsibility that the product identifies with 93 66 EEC of the Council Directive Low Voltage Equipment Safety Each product marketed is identical to the representative unit tested and found to be ...

Page 5: ...ing consistent connectivity and quick clean switching from source to display for a seamless presentation experience 4x4 or 8x8 HDMI 2 0b Matrix Switching PureLink s UX Series Matrix Switchers are available in the 4x4 UX 4400 and 8x8 UX 8800 configurations Supported Resolutions Video resolutions up to Ultra HD 4K 4096 x 2160 50 60Hz RGB 4 4 4 YCbCr 4 4 4 4 2 2 4 2 0 Full 3D up to 1080p 60Hz HDMI v2...

Page 6: ... to previous setting USB PORT Firmware upload port IN1 8 Select input channels 1 8 OUT1 8 Select output channels 1 8 1 6 Rear View of UX 8800 Back Panel Figure 1 2 DC 12V Power supply DC 12V input port LAN LAN TCP IP input port RS 232 C RS 232 Serial Port for Control INPUTS HDMI v2 0b Input ports 1 8 Female type OUTPUTS HDMI v2 0b Output ports 1 8 Female type The UX 8800 features a 19 rack mountab...

Page 7: ...d control options CREATE Program input and output channels PREVIEW View saved channel ENTER Save select desired setting CANCEL Revert to previous setting USB PORT Firmware upload port IN1 4 Select input channels 1 4 OUT1 4 Select output channels 1 4 1 8 Rear View of UX 4400 Rear Panel Figure 2 2 DC 12V Power supply DC 12V input port LAN LAN TCP IP input port RS 232 C RS 232 Serial Port for Control...

Page 8: ...ation settings are recommended for optimal performance Operational temperature should be 30 C or below Operational humidity should be 60 or below Operational environment should be dust free and well ventilated Stabilized AC input power AVR based power supply is highly advised ...

Page 9: ... displays Bi directional RS232 LAN control Locking HDMI ports Ultra HD 4K support Video resolutions up to 4K 50 60Hz RGB YCbCr 4 4 4 Full 3D up to 1080p 60Hz Multiple control options Front panel push buttons RS 232C COM port Select by LAN TCP IP or Web UI Instant noise reduction on all input and output circuits to prevent electrical interference Convenient firmware upgrade via USB port or PC ...

Page 10: ...tus and video resolution Press the CANCEL KEY to return to the initial screen Create Menu Press the IN OUT KEY to set a channel Press the ENTER KEY to save or switch input channels Press CANCEL to reverse a selection and return to the previous screen Menu Select a Menu button to view the sub menu Use the Create UP Preview Down buttons to control the sub menu options On the sub menu user can check ...

Page 11: ...on will be displayed Select Input where selected EDID data will be saved on to Multiple Inputs can be selected at once Push enter button to save P will display on the LCD when EDID is successfully saved F will display on the LCD when EDID is NOT successfully saved Switcher ID By setting different ID to the Matrix Switcher up to 255 units of HX series Matrix Switcher can be connected and operated i...

Page 12: ... button Numbers going down Please use Enter button to save the setting Note Please contact your Network Administrator for network information to avoid any IP conflict Factory default settings for LAN communication are IP Address 192 168 000 099 Gateway Address 192 168 000 001 Subnet Mask 255 255 255 000 Mac Address Matrix Switcher has its own MAC address and that MAC address allows user to communi...

Page 13: ...ton twice to save the IP setting Use same method to change Gateway Subnet Mask IP Address Using Dynamic IP 1 Press Menu 2 Select 3 LAN Set 3 Select 1 IP Config 4 Press Create or preview button to select Dynamic IP DHCP and Enter 5 Select 6 LAN Config Upload and press Enter twice Default IP setting for the UX is Dynamic IP Factory Reset Factory reset will put the general setting back to the factory...

Page 14: ...PureLink by Dtrovision 14 Firmware Version Matrix Switcher s Web UI firmware version can be checked EX UX 4400 CT V1 1 0 Controller Matrix firmware is 1 1 0 UX 4400 UI V1 1 0 Web UI Firmware is 1 1 0 ...

Page 15: ...via an RS 232 or Ethernet port 4 3 Command Code Formats A command code is a series of command characters and numbers used to send commands to the system Commands include basic formulas for creating and disconnecting switches as well as for verifying the status of switches In a command code each character is either general command e g C for connect or an identifier that indicates what the following...

Page 16: ...with End byte All s will be executed when Enter is entered The correct Switcher ID must be entered in a command code Systems will not react to the command if a wrong Switcher ID is entered The Factory Default Switcher ID is set to 255 and the universal Switcher ID is 999 Systems will react to the command whenever universal Switcher ID is entered in command code Command codes typically are not case...

Page 17: ...D D Disconnect Disconnect command for both Video and Audio this must precede input and output specification 1 Space Separates the numbers within entries that contain multiple numbers 1 Range Specifies a range of numbers in entries containing multiple numbers 1 0x49 0x69 I I Switcher ID check Switcher ID check command check switcher s current ID number 1 version Firmware version check Firmware vers...

Page 18: ...ror Indicates that system has rejected all or part of the command Switcher ID Error Indicates that the wrong ID number was entered Command Code Ack Value Examples Command Code Entered Ack Value as appears in the control program Explanation of Result 255CI01O01 255sC I01O01 The command was successfully executed 255CO01 Command Code Error The command was not executed because the input number was not...

Page 19: ...2O03 I04O04 I05O05 I06O06 I07O07 I08O08 response 255sCI01O01 I01O02 I02O03 I04O04 I05O05 I06O06 I07O07 I08O08 Examples Connect Video Command Codes Response 255CI01O01 255sCI01O01 255CI01O08 I08O02 255sCI01O08 I08O02 255CI01O01 I02O02 I03O03 255sCI01O01 I02O02 I03O03 255CI01O01 02 03 255sCI01O01 I01O02 I01O03 255CI01O01 06 255sCI01O01 I01O02 I01O03 I01O04 I01O05 I01O06 I00 Disconnect Example 255CI0...

Page 20: ...the Disconnect command below Replace the s with the input and output number s 255DI O Examples Disconnect Video Command Codes Action 255DI01O00 Disconnect both video and audio input 1 to no output 00 255DI00O03 04 05 Disconnects both video and audio outputs 3 4 and 5 255DI00O03 06 Disconnects both video and audio output 3 4 5 and 6 255DALLIO Disconnects both video and audio all inputs and outputs ...

Page 21: ...nel L14 2160p 4 4 4 60 2ch L15 2160p 4 4 4 60 Bitstream L16 2160p 4 4 4 60 PCM Multichannel Internal EDID Setting Example Command Codes Action 255ESL03I01 EDID load 1080p Bitstream EDID to input 1 255ESL11I01 02 03 EDID load 2160p 2ch EDID to input 1 2 3 External EDID Setting Example Command Codes Action 255ESO01I01 EDID load output 1 EDID to input 1 255ESO02I01 02 03 EDID output 2 EDID to input 1...

Page 22: ...s 255 I or 255 O Channel connecting information UX 4400 255 C response 255s CI01O01 I01O02 I02O03 I04O04 Channel connecting information UX 8800 255 C response 255s CI01O01 I01O02 I02O03 I04O04 I08O05 I08O06 I08O07 I08O08 Firmware Version Check User can confirm switcher s current firmware version Web UI version 255 VERSIONUI response 255s VERSIONUI UX 4400 UI Vx x x Controller version 255 VERSIONCT...

Page 23: ...5 NGW response 255s NGW192 168 000 001 Current subnetmask information 255 NSM response 255s NSM255 255 255 000 Current Mac address information 255 NMA response 255s NMA00 00 C2 B0 20 05 RS232 Configuration User can check RS232 configuration for LAN control RS232 baudrate settings information 999 RB response 999s RB01 RS232 stopbit settings information 999 RS response 999s RS01 ...

Page 24: ...response 999s RD01 RS232 parity settings command 999 RP response 999s RP01 Preset Command User can call check saved preset Preset call command 999PC01 response 255sCI01O01 I01O02 I02O03 I04O04 Preset status command 999 PC01 response 255 sCI01O01 I01O02 I02O03 I04O04 ...

Page 25: ...through the LAN port using WINDOWS XP DOS prompts hyper terminal or TELNET program the control code is fully compliant with RS 232C Enter TELNET Switcher IP Address in the DOS prompt Message indicating TELNET connection will appear Switcher ID verification command code Send 255I000 Switcher will send response 255sI Switcher ID 255 255I000 255sI Switcher ID 255 ...

Page 26: ... web UI Default log in ID and password is 1 We recommend using Google Chrome 5 Menus for the Web UI 1 CREATE 2 PRESET 3 EDID 4 SETTING 5 INFO 1 CREATE CREATE Configurating the name of Input and Output 1 Click on blue buttons to set the name for both input and output 8 letters maximum Example for Input ...

Page 27: ...PureLink by Dtrovision 27 Example for output Completion of labelingboth inputs and outputs CREATE Switching Inputs and Outputs 2 Switching can be made by pressing each buttons For example ...

Page 28: ...ut1 Input 2 is routed to output 2 The color will change once the buttons are clicked Input 3 is routed to output 3 and input 4 is routed to output 4 Example format 1 3 Input 1 Output 3 2 4 Input 2 Output 4 You can un route by clicking the buttons again ...

Page 29: ...commands can be pre programmed and saved in the memory It can be recalled in the future for east time saving switching 1 Select the preset from the preset select option 2 You are able to set the name of the preset in the preset name section Movie was set on the above example picture ...

Page 30: ...PureLink by Dtrovision 30 3 You can label each inputs to the output as seen above 4 Press Save button to save the Preset ...

Page 31: ...set Call Calling the saved preset 1 You can select saved presets by selecting from the preset select option under PRESET CALL 2 Once the preset is selected press Call button to complete the switching that was saved on to the preset ...

Page 32: ...2 3 EDID EDID Configuring EDID setting Internal and external 1 There are 13 preloaded EDID selection on the EDID Edit list 2 Once the selection is made pressing Load button to the selected input will save the EDID to the input ...

Page 33: ...he Output port and press LOAD to bring and save the EDID from the display to the selected input EDID from output port 1 was saved to IN1 Roku on example picture above Refresh buttons shows the EDID that is currently used saved on the input 4 SETTING SETTING Change the Network setting Rs 232 setting User ID and Password Upload firmware ...

Page 34: ...etwork Dynamic IP Address 2 The IP settings can be manually set with DHCP Off Static IP Address RS232 3 RS232C Setting can be changed by selecting each option Press save button to save the changes made 4 User ID and password can be modified up to 3 users Press save button to save the changes made ...

Page 35: ...re that may be required to be upload UX 4400 UI V1 1 0 Web UI Firmware is version 1 1 0 UX 4400 CT V1 1 0 Controller Matrix firmware is version 1 1 0 Confirm the proper firmware type is selected 2 Once update is selected search for the proper firmware Please confirm the firmware version is the correct firmware ...

Page 36: ...PureLink by Dtrovision 36 3 Select and open the firmware to load the firmware 4 Once the firmware upload is completed check the front of the LCD panel of the matrix ...

Page 37: ...LCD panel 6 It will return to the original state once the firmware upload is fully completed 7 Power cycle the matrix Procedures of uploading firmware for both controller and Web UI are identical 5 INFO 1 Information of both input and output can be found on the Info page ...

Page 38: ...PureLink by Dtrovision 38 5 3 Firmware Upload USB 1 Confirm the USB file system is FAT32 USB Disk is not included in the package ...

Page 39: ... Confirm only the firmware is in the USB disk 3 Insert the USB disk in to the USB port in the front 4 Power cycle the Matrix while the USB is inserted 5 Once the upload start you will see the Flash writing on the front LCD panel ...

Page 40: ...PureLink by Dtrovision 40 6 Once the upload is completed UX will return to its original state 7 Remove the USB disk and power cycle the matrix once the firmware upload is completed ...

Page 41: ...quivalent product or part to replace the defective item 3 Refund to customer the purchase price paid for the defective product All products that are replaced become the property of PureLink Replacement products may be new or reconditioned Repaired or replacement products or parts come with a 90 day warranty or the remainder of the warranty period PureLink shall not be responsible for any software ...

Reviews: