AP-2500 Quick Installation Guide
1
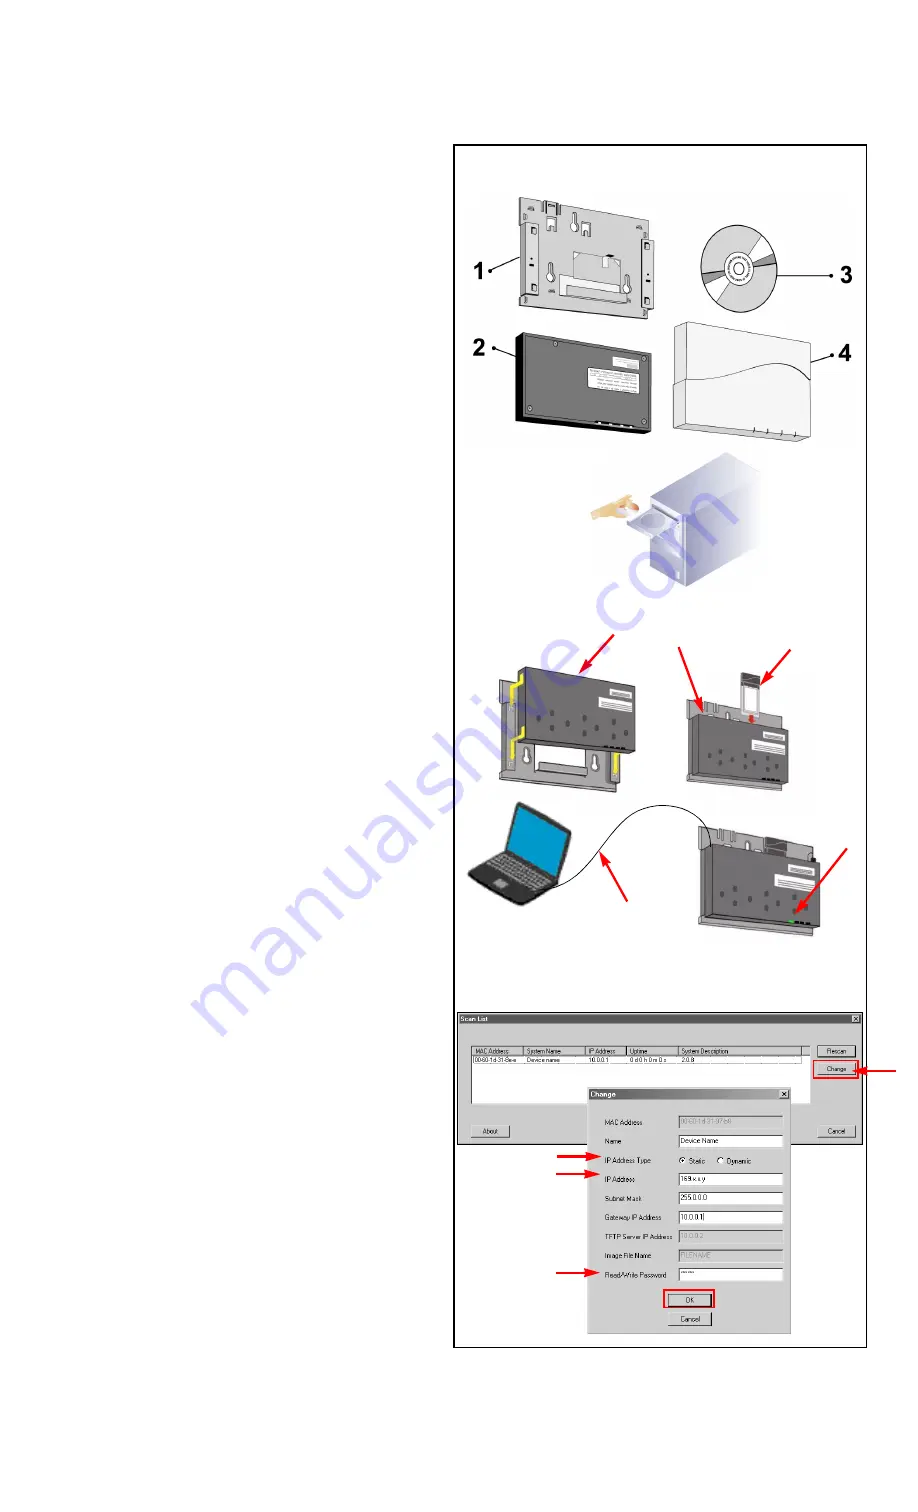
Verify Kit Contents
1.
Wall mounting plate
2.
AP-2500 Module with integrated Active Ethernet
3.
CD-ROM containing software and documentation
4.
AP-2500 cover
Additional Items Required
Q
Desktop PC or laptop with a CD-ROM drive
Q
Windows 95 or higher
Q
Power DC Injector
Q
At least one 802.11b and/or 802.11a compatible wireless
card for the AP-2500 device
Q
A “cross-over” Ethernet cable to initialize the unit (Step 4)
Q
MS IE 5.0 or Netscape 4.0 or higher web browser -
disable
the proxy server (do not use a proxy server to access the
Internet)
2
Install Software &
Documentation
Insert the CD into your computer CD-ROM drive and install the
software and documentation.
—
Help files are installed on
C:\Program Files\
Wireless
LAN
\AP2500\Help
.
—
The ScanTool icon is installed on your desktop and added
to the
Start >
Wireless LAN
menu.
3
Setup the AP-2500 unit
1.
Slide the AP-2500 module onto the mounting bracket.
Make sure it is properly seated.
2.
Slide an 802.11b wireless card
(not included in the kit)
into
Slot A or B.
3.
Connect power to the AP-2500 unit from a DC injector
device, such as the Wireless LAN
1-Port Active Ethernet
DC Injector hub.
4.
You can leave the cover off until Step 8. Wait for the LED
indicators to turn green before proceeding.
5.
Connect the AP-2500 unit to a stand-alone PC using the
cross-over Ethernet cable (see Step 1).
4
Initialize the AP-2500 unit
There are two ways to connect the AP-2500 unit to your
computer:
A.
Connect the AP-2500 unit to a stand-alone PC
using the cross-over Ethernet cable (see Step 1),
and determine the IP address of your computer
(e.g.
169.x.x.x
).
B.
Connect the AP-2500 device to a DHCP server
on the same subnet
as your computer.
If you choose path “A”, follow these steps:
1.
Double-click on the
ScanTool
icon on your desktop.
ScanTool is a Windows-based program that displays the
AP-2500 devices and their IP addresses and allows for
limited initial configuration of the unit.
2.
Click on the
Change
button.
3.
Select
static
under IP Address Assignment Type.
4.
Enter an IP address for the AP-2500 unit within the same
subnet as your computer (e.g.
169.x.x.y
).
5.
You will need to enter a Read/Write Password before
clicking
OK
. The default password is
public
.
If you choose path “B”, double-click on the
ScanTool
icon on
your desktop to find the IP address of your AP-2500 unit, and
continue with the next step.
1
2
4
3
4
5
3
1
3
2
5
4
2