background image

DEAR CUSTOMER

In order to achieve the best performance of your product, please read this 
instruction manual carefully before using, and keep it for future reference.
If you need extra support, please write to [email protected] 
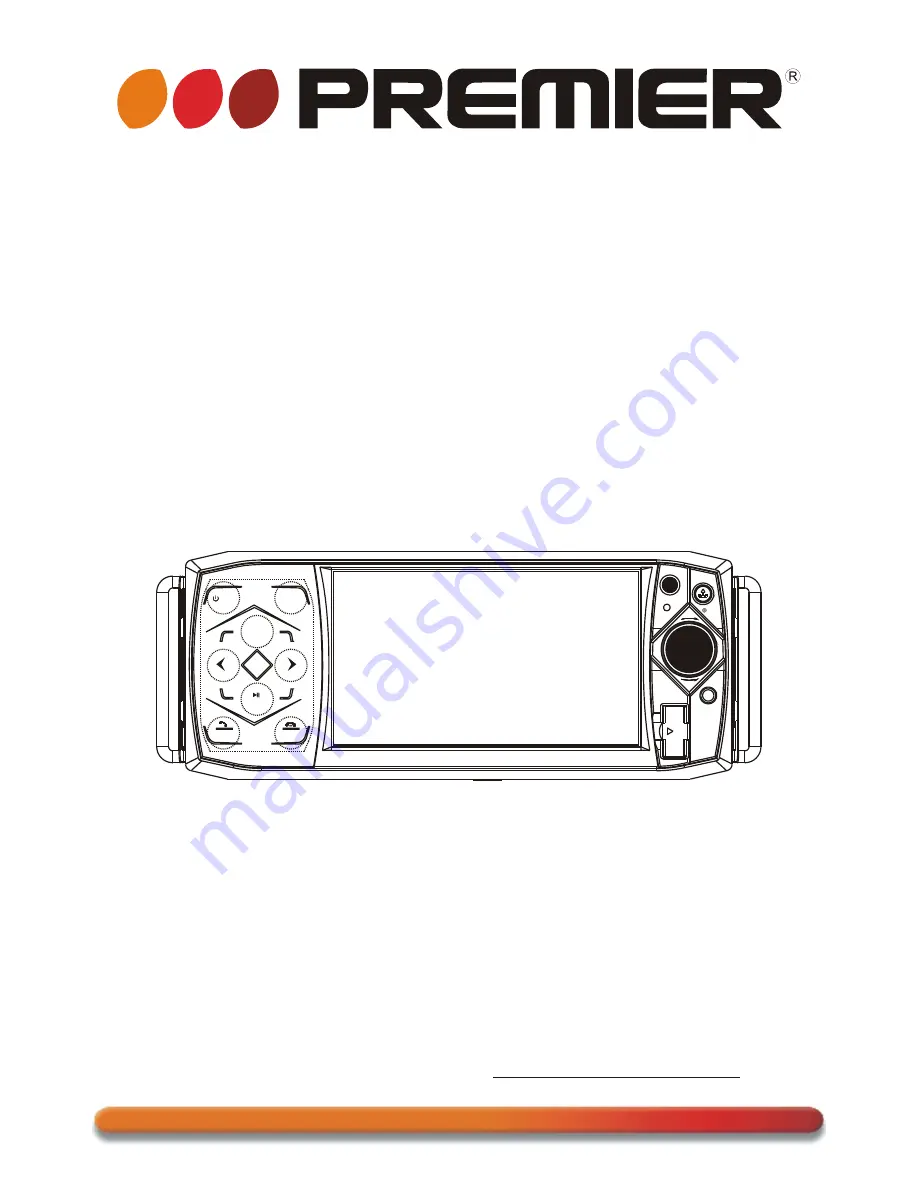
SCR-4710TVD

INSTRUCTION MANUAL

Car Audio/Video System

/MOD

MUT E

IR

AUX

REL

MIC

P U S H

S E L

VOL+

VO L-

EQ

CH1~6

USB

BND

PAIR

Summary of Contents for SCR-4710TVD

Page 1: ...please read this instruction manual carefully before using and keep it for future reference If you need extra support please write to info premiermundo com SCR 4710TVD INSTRUCTION MANUAL Car Audio Video System MOD MUTE IR AUX REL MIC PUSH SEL VOL VOL EQ CH1 6 USB BND PAIR ...

Page 2: ... in specifications characteristics and or operation without prior notice to the user in order to continue improving and developing its technology Venezuela 0800 ELECTRIC 353 2874 Panama 300 5185 Website www premiermundo com E mail servicioalcliente premiermundo com P 1 ...

Page 3: ...ould cause Hazardous radiation exposure if directed Be sure to operate the car multi media player correctly as instructed Use of controls or adjustments or performance of procedures other than those specified herein may result in hazardous radiation exposure Do not open covers and do not repair yourself Refer servicing to qualified personnel Precaution P 2 ...

Page 4: ... USB card operation 1 Loading or unloading a disc USB or card 1 1 Loading a disc USB or card 1 2 Unloading a disc USB or card 2 Popping up Function Icons board 2 1 Function Icons board of Digital Video VCD MPEG4 Image MP3 WMA 2 2 CD interface 3 Function of controls on the touch screen main unit remote control Region Code Parental Control AV IN operation Rear View Camera Troubleshooting Specificati...

Page 5: ...using in the position of car multi media system and bend some tabs of Sliding Bracket Housing to fix it see Installation Diagram 3 Connecting all wires 1 Remove control panel from chassis as follows A Press the REL button to flip down control panel INSTALLATION STEPS KEY PLATE PLASTIC FRAME KEY PLATE If you want to take CHASSIS out of the SLIDE BRACKET HOUSING first remove the PLASTIC FRAME of the...

Page 6: ...l be displayed only after 3 Before finishing wiring do not attach control panel onto chassis applying parking brake IGNITION SWITCH RED WHITE WHITE BLACK GREY GREY BLACK GREEN GREEN BLACK VIOLET VIOLET BLACK YELLOW CONSTANT 12 VOLTS BLACK GROUND B BLUE AUTO ANTENNA FRONT Lch SPK REAR Lch SPK FRONT Rch SPK REAR Rch SPK BROWN B PARKING BRAKE PINK RADIO ANTENNA JACK B 12V REAR CAMERA SWITCH REAR CAME...

Page 7: ...tachment will deteriorate panel connectors To minimize deterioration periodically wipe the panel connectors with a clean soft dry cloth 4 Testing it for making sure that it can work properly 4 Installing main unit according to installation diagram 1 Insert the chassis of the car multi media system into the sliding metal housing 2 Use the metal strap to fix the rear part of chassis Uninstalling mai...

Page 8: ...Installation diagram HEX NUT SPRING WASHER PLAIN WASHER TAPPING SCREW DASH BOARD METAL MOUNTING STRAP CONSOLE SLIDE BRACKET HOUSING FIXING TAB HEX BOLT P 7 ...

Page 9: ...ow 2 as right 2 Replace the old cell by a new one with polarity side upward as right 3 Insert the cell holder into remote control again as right 3 Note about using remote control 1 You should face the emitting window of remote control towards the sensor window of the unit 2 Operation angle for front panel About 30 degree 3 The distance between the emitting window of remote control and the sensor w...

Page 10: ...TE TOUCH BUTTON 5 IR SENSOR WINDOW 6 REL BUTTON 7 USB PORT AND COVER 8 AUX IN JACK 9 EQ TOUCH BUTTON 10 BAND TOUCH BUTTON 11 TOUCH BUTTON 12 SEL BUTTON AND VOL KNOB 13 OR CH1 6 TOUCH BUTTON 14 DISC SLOT 15 CARD SLOT 16 EJECT BUTTON 17 RESET BUTTON 18 MICROPHONE P 9 Control Panel 1 8 2 3 4 5 6 7 9 10 11 12 13 MOD MUTE IR AUX REL MIC PUSH SEL VOL VOL EQ CH1 6 USB BND PAIR 18 ...

Page 11: ...ON 27 BUTTON 28 ENTER BUTTON 1 POWER or MODE BUTTON 2 MUTE BUTTON 3 HANG UP or REDIAL BUTTON 4 ZOOM BUTTON 5 CALL or PAIR BUTTON 6 MENU or SW BUTTON 7 or SEARCH BUTTON 8 SUBTITLE or LO DX BUTTON 9 or FINE BUTTON BAND or OSD or SKIP BUTTON 12 A PS or TITLE PBC BUTTON 13 TOP BUTTON 14 VOL BUTTON 15 RDM BUTTON 10 BUTTON 11 35 MENU MENU SETUP SETUP ENTER ENTER 1 1 2 2 3 3 4 4 5 5 6 6 7 7 8 8 9 9 0 0 V...

Page 12: ... button To switch MUTE mode on or off press MUTE button on remote control or touch MUTE button on control panel 5 EQ button To select a desired preset EQ mode from JAZZ CLASSIC POP ROCK and USER press EQ button on remote control or touch EQ button on control panel continuously 6 To switch LOUD mode To switch on or off LOUD mode long press EQ button on remote control 7 SW button To switch on or off...

Page 13: ... of SETUP menu as follows In the SYSTEM page of SETUP menu repeatedly touch the or icon to highlight one setting item of BRIGHTNESS CONTRAST COLOR TINT ANIMATION WALLPAPER TV SYSTEM and BT After highlighting a desired setting item touch the or icon to set it 2 SETTING SOUND In SETUP menu touch SOUND icon to display SOUND page of SETUP menu as follows Source Menu System page of SETUP menu Sound pag...

Page 14: ...ht one setting item of HOUR MINUTE and 24H 12H After highlighting a desired setting item touch the or icon to set it After finishing setting touch icon to return back to normal playback 11 REL button Press REL button on control panel to flip down the control panel then hold the left part of the control panel to push it rightwards and pull it to you to remove it 12 RESET button When LCD displays wr...

Page 15: ... v or button on remote control or briefly touching or button on control panel can manually search down or up for a your desired station beginning from the current frequency 4 To preset and scan all memory stations APS icon or A PS button 1 When long touching APS icon or long pressing A PS button on remote control the radio searches from the lowest frequency and checks the signal strength level unt...

Page 16: ...a desired memory bank and then search for a desired station finally long touch CH1 6 button to store the station in the memory bank 2 To listen to a preset station with CH1 6 button first switch on a desired band then continuously touch CH1 6 button highlight and listen to it 6 To switch on between stereo and mono mode MO ST button Press MO ST button on remote control to select STEREO or MONO mode...

Page 17: ...ct a desired channel 0 9 Use the 0 9 icons or the 0 9 buttons to directly select the channel the 10 button is not available 5 To fine tune the current channel FINE and FINE Touching FINE or FINE icon or pressing FINE or FINE button to fine fune for better signal 6 To add or delete a channel SKIP After searching channels automatically the CH CH buttons on remote control and buttons on control panel...

Page 18: ...nter it then it will show an interface that asks you to input a password input 8888 and enter it then i with the BT device BC_HF_V03 of the car A V system Confirm it then the frame of the BT logo will be filled by blue color and they are light all the time finishing pairing and ing or the mobile phone plays music 2 BT PHONE 1 Make a call 1 Dial with mobile phone directly 2 Dial with the controls o...

Page 19: ...ouch icon or touch button on control panel or press button on remote control 4 End phone talking When you want to end phone talking touch icon or use or button 5 Switch audio between car A V system and mobile phone During phone BT handfree system of the car A V system if you want to change the phone audio to your mobile phone touch icon or touch button on control panel or press button on remote co...

Page 20: ... stereo audio from your mobile phone T the car A V system so these icons on the BT MUSIC interface except BT Music and their buttons on control panel or on remote control are available for audio video playback of your mobile phone during playback But n for icon and buttons and the function of resume playback after pausing or stopping is available only for some mobile phone to display BT to BT 2 Wh...

Page 21: ... disc out of disc slot put the disc inside disc case to keep it clean 4 Do not stick paper or tape on the disc surface of play side If there is glue or analog on the disc surface must wipe it up before using To play files in a USB firstly open USB port cover then insert USB storage into USB port and then it will play files in the USB automatically To play files in a card firstly press REL button t...

Page 22: ...back tapping any place on touch screen can pop up Function Icons board 1 as next page then tap icon to pop up Function Icons board 2 as next page During MP3 WMA playback tapping any place except folder area track area and MP3 WMA Image MPEG4 icons can pop up Function Icons board 1 same as one of Digital Video VCD MPEG4 Image then tap icon to pop up Function Icons board 2 same as one of Digital Vid...

Page 23: ...CD playback the CD interface displays as follows Some icons on the CD interface descript as follows Poping up source Menu EQ Same as EQ button Same as VOL button or rotating VOL knob with anti clock wise Same as MUTE button Same as EQ button Same as CLK button Same as long pressing EQ button Same as SW button Poping up Function Icons board 1 To redial the last dialed number To pop up BT PHONE inte...

Page 24: ...tinuously tapping or icon or continuously pressing or button can fast backwards or forwards at the following multiple of normal When displaying root menu use or button to highlight the current chapter track the current folder or the kind icons If there are no track for a kind icon you can t highlight the kind icon When highlighting a kind icon press ENTER button to enter it When highlighting the c...

Page 25: ...en use direction buttons to select your desired title and then press ENTER button to open the chapter list of the title then use direction buttons to select your desired chapter and then press ENTER button to play You can also tap a desired title and then chapter to play During VCD playback use icon or TITLE PBC button to switch PBC mode on or off When PBC mode is switched on it will play from the...

Page 26: ...uttons to input desired SN of title or chapter track then use ENTER icon or button to play the selected chapter track When highlighting elapsed time of current chapter track disabled for image use number icons or buttons to input desired playback time point for the playback time of the whole media for Digital Video VCD and of the current chapter track for MPEG4 MP3 WMA then use ENTER icon or butto...

Page 27: ...bellows Digital Video MPEG4 VCD Image MP3 WMA 11 icon or REPEAT button During Digital Video playback use icon or REPEAT button to switch repeat mode between REP CHAPTER REP TITLE REP ALL and REP OFF use icon or to E 1 For MP3 WMA ZOOM button disabled VCD For CD OSD button is disabled During VCD PBC OFF CD playback REPEAT button switch repeat mode between R P REP ALL or REP OFF P 26 ...

Page 28: ... 13 icon or INT button During VCD CD playback tapping icon or long pressing INT button switches intro mode on or off For Digital Video MP3 WMA MPEG4 image icon and INT button are disabled icon or button During Digital Video playback use icon or button to switch between audio tracks depending on the current playing media CD icon or icon and are 15 icon or button During Digital Video playback use ic...

Page 29: ...m value or press button to enter the setup item then press v or button to select a desired value finally press ENTER button to confirm it After finishing setting tapping EXIT icon or press SETUP button to exit Media Setup Menu to resume normal playback 1 SYSTEM SETUP TV SYSTEM This setup item is for setting up video system in NTSC PAL or AUTO If you set a non matched video system for playing a vid...

Page 30: ...0 3 Press ENTER button to confirm then it will unlock or lock parental control e of the PASSWORD RATING This setup item is for setting a new rating level of parental control 1 First highlight PASSWORD item to see whether parental control is locked or not If it is in locked mode unlock parental control referring to PASSWORD above 2 Highlight RATING item and press or ENTER button to enter it then us...

Page 31: ...r selecting the type of subtitle language depending on current playing media MENU LANG This item is for selecting the type of menu language depending on current playing media 3 VIDEO SETUP BRIGHTNESS For adjusting brightness of video output CONTRAST For adjusting contrast of video output HUE For adjusting hue of video output SATURATION For adjusting saturation of video output SHARPNESS For adjusti...

Page 32: ...MIC RANGE This item is for adjusting linear compression ratio If you set it to FULL Peak to Peak value of audio signal is minimum if you set it to OFF Peak to Peak value is maximum DYNAMIC RANGE DIGITAL SETUP E X I T P 31 ...

Page 33: ...s of the car multi media system and the used disc do not match each other igital Video igital Video igital Video as the code of the igital Video igital Video igital Video impose this restriction igital Video igital Video has motivated the igital Video igital Video Basically a coded D player can play only the discs if its region code is the same D player Otherwise it cannot play the disc note that ...

Page 34: ...ideo player to be a certain rating level of parental control using the Media Setup Menu If the rating level of parental control of a disc is higher than the one of the Digital Video player the Digital Video player cannot play the disc The Digital Video movie can be designed so that the Digital Video player can play different versions of content of a particular movie according to the different rati...

Page 35: ...output through the monitor of the car AV system and the speakers connected to the car AV system The icons on the AUX interface descript as follows Popping up Source Menu Same as VOL button or rotating VOL knob with clock wise Same as VOL button or rotating VOL knob with anti clock wise press it to pop up BT PHONE interface 3 In AV IN mode you can use SEL VOL MUTE EQ SW and LOUD buttons or icons to...

Page 36: ...he REAR CAMERA INPUT jack in the rear cabinet of the car AV system and the VIDEO OUTPUT jack of the rear view camera Make the REAR CAMERA SWITCH line in the rear cabinet of the car AV system connected to B 12V power supply 2 When you change the gear level to the back position the screen of the car AV system will display the actual status behind your car Note the external monitor can not display th...

Page 37: ...Ensure that you have inserted a disc into the disc slot Check whether disc is inserted with label side upwards Check whether disc is bent Check whether disc is stained or scratched badly Ensure that disc format is compatible to the player Ensure that temperature inside the car is not too high If so cool off until the ambient temperature returns to normal Insert another disc into the disc slot REMO...

Page 38: ...e 20 Hz 20 KHz S N Ratio 90 dB JIS Wow and Flutter Below measurable limits Monitor Screen Size Inch Wide Color System NTSC PAL Format B specification V1 2 Class 2 B profile supported Headset Handsfree and A2DP AVRCP profiles Range of frequency 2 4GHz Spectrum Specification and design are subject to modification without notice due to improvements in technology 4 3 TFT Monitor BT NOTE isc Compatible...

Page 39: ...P 38 ...

Page 40: ...P 39 ...

Page 41: ...P 40 ...

Page 42: ...P 41 ...

Page 43: ...6 QE21 87 QE22 88 QE23 89 HSO POL VCOM GPB0 93 VSO STH1 GPB1 94 DEO INVO STH2 GPB2 95 CLKO VOCLK GPB3 96 LP OEH VCOM_I GPB5 107 STV1 sD6 VOD6 GPB6 108 GCLK CKV 64 GOE OEV 65 STV2 sD7 VOD7 GPB7 109 NC4 110 RL GPA6 DBI0 VPWMP 62 UD GPA7 DRI0 VCKP VCKN 63 GND 28 GND 52 AVS33 70 AVSS 76 AVS33 84 GND 90 QE4 sD4 VOD4 GPA4 104 PVD33 120 DVD33 126 AGNDB 5 AGNDG 6 AIL1 15 AIR2 18 GND 29 SPI_S GPC4 30 VDD18...

Page 44: ...4 6 8 10 12 14 16 18 20 22 24 26 28 30 32 1 3 5 7 9 11 13 15 17 19 21 23 25 27 29 31 C44 104 MIC MIC 1 2 TC16 10u 16 TC13 47u 16 R41 1K5 J3 HEADER 14 1 2 3 4 5 6 7 8 9 10 11 12 13 14 C52 472 IR IR OUT 1 GND 2 VCC 3 TC12 47u 16 U4 1117 3V3 VOUT 2 VIN 3 GND ADJ 1 VOUT 4 USB USB 1 2 3 4 5 6 D4 1N4148 R42 1K5 VOL VOL 1 3 2 4 5 6 7 FB6 601 R54 220 LED2 C43 104 D3 1N5819 C45 104 R47 4K7 R43 47K R39 4K7 ...

Page 45: ...P 44 ...

Page 46: ...P 45 ...

Page 47: ...P 46 ...

Page 48: ...P 47 ...

Page 49: ...P 48 ...

Page 50: ...P 49 ...

Page 51: ...P 50 ...

Page 52: ...P 51 ...

Page 53: ...P 52 ...

Page 54: ...P 53 ...

Page 55: ...P 54 ...

Page 56: ...P 55 ...

Page 57: ...P 56 ...

Page 58: ...P 57 ...

Page 59: ...P 58 ...

Page 60: ...P 59 ...

Page 61: ...P 60 ...

Page 62: ...P 61 ...

Page 63: ...P 62 ...

Page 64: ...P 63 ...

Page 65: ...27 MIC 28 GND 29 K1 30 K2 CON15 DIP1 5MM_15PX2 R214 39K R250 4K3 EJ LED1 R1 6K8 1 2 MCU_5V 1 2 KEY1 1 1 REST LED2 R2 6K8 MCU 5V KEY1 KEY2 E VOL IR A5V KB_DET_EJ USB 5V USB_DN USB_DP TFT_LED_ON OFF SPI_DA SPI_CS S_SCL RESET HSYNC VSYNC DCLK DIN0 DIN1 DIN2 DIN3 DIN4 DIN5 DIN6 DIN7 AUX_R AUX_L 12V MIC_IN KEY1 KEY2 RESET S_SCL SPI_CS SPI_DA TFT_LED_ON OFF KEY1 12V 12V AUX_R AUX_L HSYNC VSYNC DCLK DIN0...

Reviews: