background image

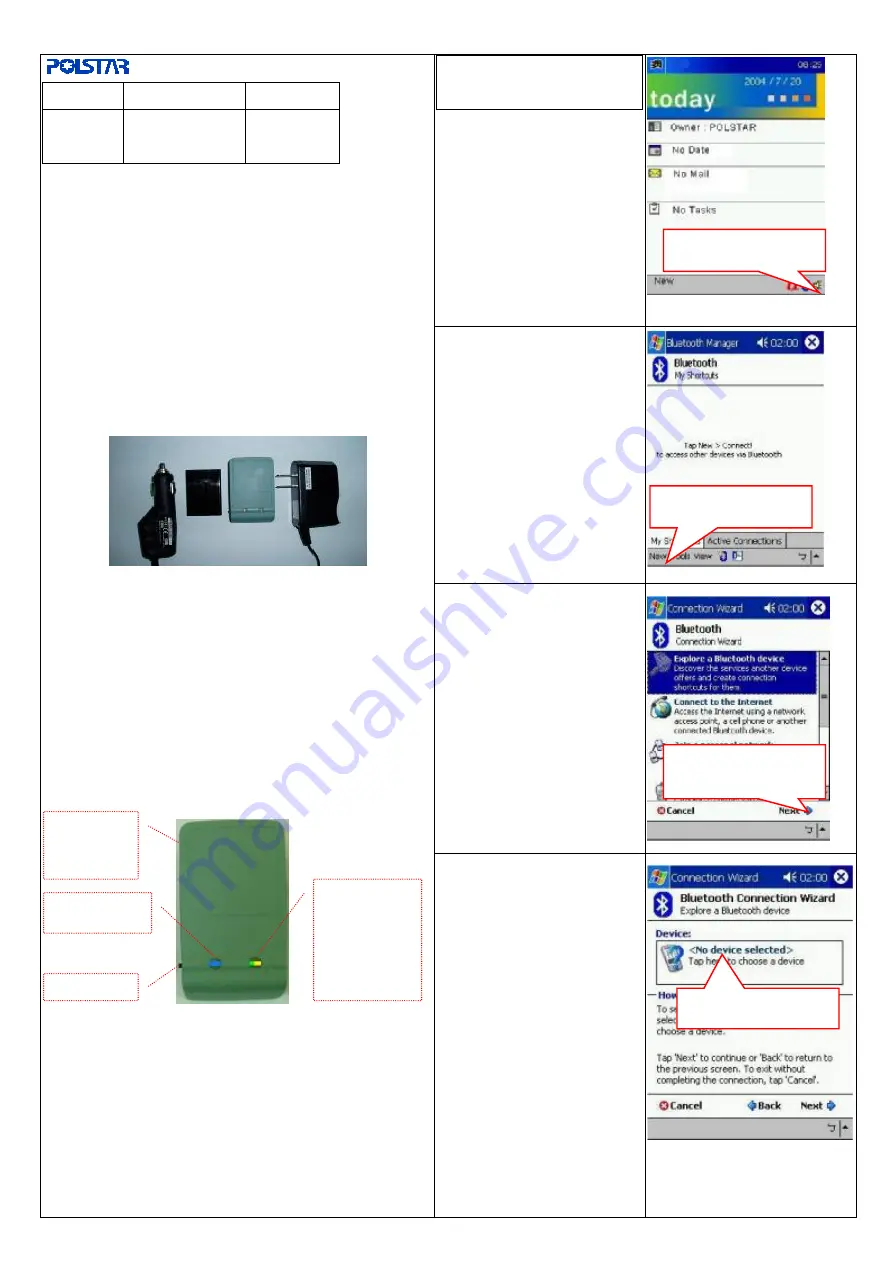
How to connect your i-Geo+ 

to your Pocket PC?


1. Keep your i-Geo+ powered on 

as well as keeping it in an open 

place. The flashing Red LED 

indicates that the GPS is 

functioning and the flashing 

Blue LED indicates that the 

Bluetooth is functioning. 

2. Turn on the Bluetooth manager 


3. Click 

 new

 to connect 


4. Select

 Explore a Bluetooth 

device

 item and click 

Next


P      i-Geo+ USERS MANUAL 

Version 

Issue date 

Description 

14 Nov. 2005 

Initial 

Release 

Your Polstar i-Geo+ GPS receiver uses world-class technology to 

provide you with a GPS receiver with superior performance to 

ensure the best possible reception wherever you go, from urban 

areas to highways to inner city streets.


What

s in the box? 

Make sure that your Bluetooth package includes the following: 


Bluetooth GPS Receiver x 1     


Car Charger x 1   


Li-ION battery x 1     


Travel Charger x 1.   


Getting Started 

The Li-ION battery needs to be charged for at least 2 hours 

before being used for the first time. Simply place the battery into 

your i-Geo unit and plug the charger into your I-Geo unit.


CAUTION:

 RISK OF EXPLOSION IF BATTERY IS REPLACED BY AN 

INCORRECT TYPE. DISPOSE OF USED BATTERIES ACCORDING TO 

THE INSTRUCTIONS MARKED ON BATTERIES.


LED Indicators 


LED Flashing

-Function needs setup.   

LED On Continuously-

Function is fully working. 

3 Step Quick Start Guide for Pocket PC Users 

1.  Turn the receiver on once the battery has been fully charged 

and placed in the receiver. 

2.  Connect the Bluetooth GPS receiver to Pocket PC. 

3.    Enable GPS navigation in your Pocket PC. 

5. Click 

Tap here to choose a 

device


Blue

 LED 


Bluetooth 

Yellow

 LED 


Low battery 
 

Green

 LED 


Battery 
Charging


Red

 LED 


GPS 
Operation 


Power 


Click on the Bluetooth 
icon 

Click 

New

 to connect 

Bluetooth   

Click 

Next

 after 

selecting 

Explore a 

Bluetooth device


Click 

Tap here to 

choose a device


Summary of Contents for i-Geo+

Page 1: ...i ION battery x 1 Travel Charger x 1 Getting Started The Li ION battery needs to be charged for at least 2 hours before being used for the first time Simply place the battery into your i Geo unit and plug the charger into your I Geo unit CAUTION RISK OF EXPLOSION IF BATTERY IS REPLACED BY AN INCORRECT TYPE DISPOSE OF USED BATTERIES ACCORDING TO THE INSTRUCTIONS MARKED ON BATTERIES LED Indicators L...

Page 2: ...ne its current location 14 Your i Geo will now automatically and continuously receive the satellite s GPS data and transfer to Pocket PC via Bluetooth for the navigation application 10 Now you have successfully created a Bluetooth Connection shortcut Tap Finish to close the Connection Wizard program Operating Tips Keep the Bluetooth GPS receiver still until the position is fixed otherwise it will ...

Page 3: ...ct connect 7 Turn on your i Geo before your phone begins searching for devices 3 Choose Bluetooth 8 You will find the Polstar icon 4 Enable Bluetooth function 9 Select POLSTAR 5 Move to next page for pairing device 10 Then key in the pass code 0000 Choose Connect Choose Bluetooth Enable Bluetooth On Choose Polstar Pass code 0000 ...

Page 4: ...ery 2 seconds compared to once every second when there were no connections established Your i Geo has now been setup and can be used to receive GPS data and transmit it to the navigation software 13 Start your Navigation software 14 You can determine your Bluetooth GPS Phone connection status by selecting the GPS status option in the navigation software 15 Execute Show GPS status and select Other ...

Page 5: ... press Menu 3 Choose Connections 9 Power on i Geo first before pressing New 4 Enter Bluetooth item The PDA phone will start searching for your i Geo 5 Enable Bluetooth On 10 Once the POLSTAR button has appeared choose Next Choose Settings Choose Connections Choose Connections Enable On Choose Devices Choose Manu Turn on PBT 248 then choose New Choose Next ...

Page 6: ...ess Done to assign COM Ports 14 Please note that GPS data is NOT connected with i Geo at this moment The i Geo will work once the pairing process has been completed 19 Following the on screen instruction 15 Because i Geo uses Bluetooth SPP profile you will see the following option 20 Choose New Outgoing Port from the Menu this is because i Geo sends GPS data to your PDA phone Passkey 0000 Then cho...

Page 7: ...t assignment has been completed 28 Once the connection is established the Blue LED will flash once every 2 seconds After that return to the navigation software s main menu select GPS status 24 Return to the main menu and start your navigation software 29 You will see this information when the navigation software can receive GPS data from i Geo 25 Enable GPS Navigation Select Polstar Choose COM 6 T...

Page 8: ...the list of available devices Select Polstar and press next 3 In Windows click Start Settings Control Panel Double click the Bluetooth Devices icon in the Control Panel 4 In the Devices Tab under Bluetooth Devices press Add 7 Select the option Use the passkey found in the documentation Enter 0000 in the space next to the option 5 Check the box My device has been setup and can be found and press Ne...

Page 9: ...our i Geo will shut down after 3 minutes of inactivity between itself and the computer PDA smart phone to conserve power but will continue to receive GPS signals and calculate its current position To reactivate the Bluetooth functions please restart your i Geo by turning the power off then on l Please recharge your batteries immediately when the yellow low battery LED indicator has been turned on ...

Page 10: ... in combination with third parties mapping software installed on a PDA it is very important that you understand the operation of your PDA prior to using this product Please notice that all the mapping data may be inaccurate or may be incompatible with your PDA which might cause error or malfunctions Please consult your navigation software or PDA vendor first to resolve the problem before returning...

Page 11: ...ed to insurance packaging or transportation 4 Exclusions of Warranty This warranty will not cover damage defects or failures caused by the following a Unauthorized repairs services and or modifications made to the product b External causes such as abuse use of the product that is inconsistent with the instructions of this manual accident shipping exposure to liquids or failure to acknowledge warni...

Page 12: ...ditions 1 This device may not cause harmful interference and 2 This device must accept any interference received including interference that may cause undesired operation To comply with FCC RF exposure requirement this device and its antenna must be not co located or operating in the conjunction with any other antenna or transmitter The Bluetooth word mark and logos are owned by the Bluetooth SIG ...

Reviews: