Plum Geek Robotics Ringo, Инструкция по обучению
Роботизированная игрушка Plum Geek Robotics Ringo - идеальное обучающее средство для детей. Бесплатное образовательное руководство поможет вам освоить управление и программирование этого удивительного робота. Скачайте его с нашего сайта и начните учиться прямо сейчас! manualshive.com
Поделиться
Скачать


Отзывы:
Нет отзывов
Похожие инструкции для Ringo

ER15-1400
Бренд: EFORT Страницы: 82

Cherokey 4WD Basic Kit
Бренд: DFRobot Страницы: 13

RollbotMicro
Бренд: SunFounder Страницы: 36

PiSloth
Бренд: SunFounder Страницы: 105

WC1500-DM6
Бренд: SuperDroid Robots Страницы: 8

EMIGLIO
Бренд: Giochi Preziosi Страницы: 48

Khepera III
Бренд: K-Team Страницы: 43

MH24
Бренд: YASKAWA Страницы: 100

Hero Jr RT-1
Бренд: Heath Zenith Страницы: 48

28990
Бренд: Parallax Страницы: 18
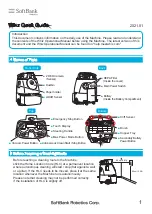
Whiz
Бренд: SoftBank Страницы: 4

AMICUS START
Бренд: Tamasu Butterfly Europa GmbH Страницы: 64

IRB 6620
Бренд: ABB Страницы: 28


