Piscine Center Poolbird, User Manual
The User Manual for the innovative Piscine Center Poolbird is now available for free download! This comprehensive manual provides step-by-step instructions to optimize your experience with this remarkable product. Unlock its full potential by downloading the manual from manualshive.com, your go-to destination for free user manuals.
Share
Download


Reviews:
No comments
Related manuals for Poolbird
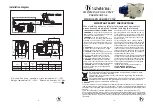
Avalanche
Brand: Jacuzzi Pages: 23

White Pool 490
Brand: C.P.A. Pages: 40

CONTURA-L
Brand: DEL Pages: 24

Dolphin WAVE 200 XL
Brand: Maytronics Pages: 16

CL Series
Brand: Viron Pages: 8

Apollo A1A 010
Brand: Tansun Quartzheat Pages: 2

Power Steel 13382
Brand: Coleman Pages: 20

HCF302
Brand: Hayward Pages: 19

Pool Pumps
Brand: Advantage Pages: 10

Nature2 N2CN25
Brand: Zodiac Pages: 12

Vortex 3
Brand: Zodiac Pages: 20

EcoSalt 2 DES2-15E
Brand: Davey Water Products Pages: 4

401767
Brand: Davey Water Products Pages: 24

SunPhase 16E LP
Brand: Parasol Pages: 11

VANTAGE IN-FLOOR CLEANING SYSTEM
Brand: Paramount Fitness Pages: 28

161248
Brand: Paramount Pools Pages: 19
HIDRO-SPR Series
Brand: Hidrotermal Pages: 2

In-Pool Ladder
Brand: Main Access Pages: 1


