background image

User’s Manual

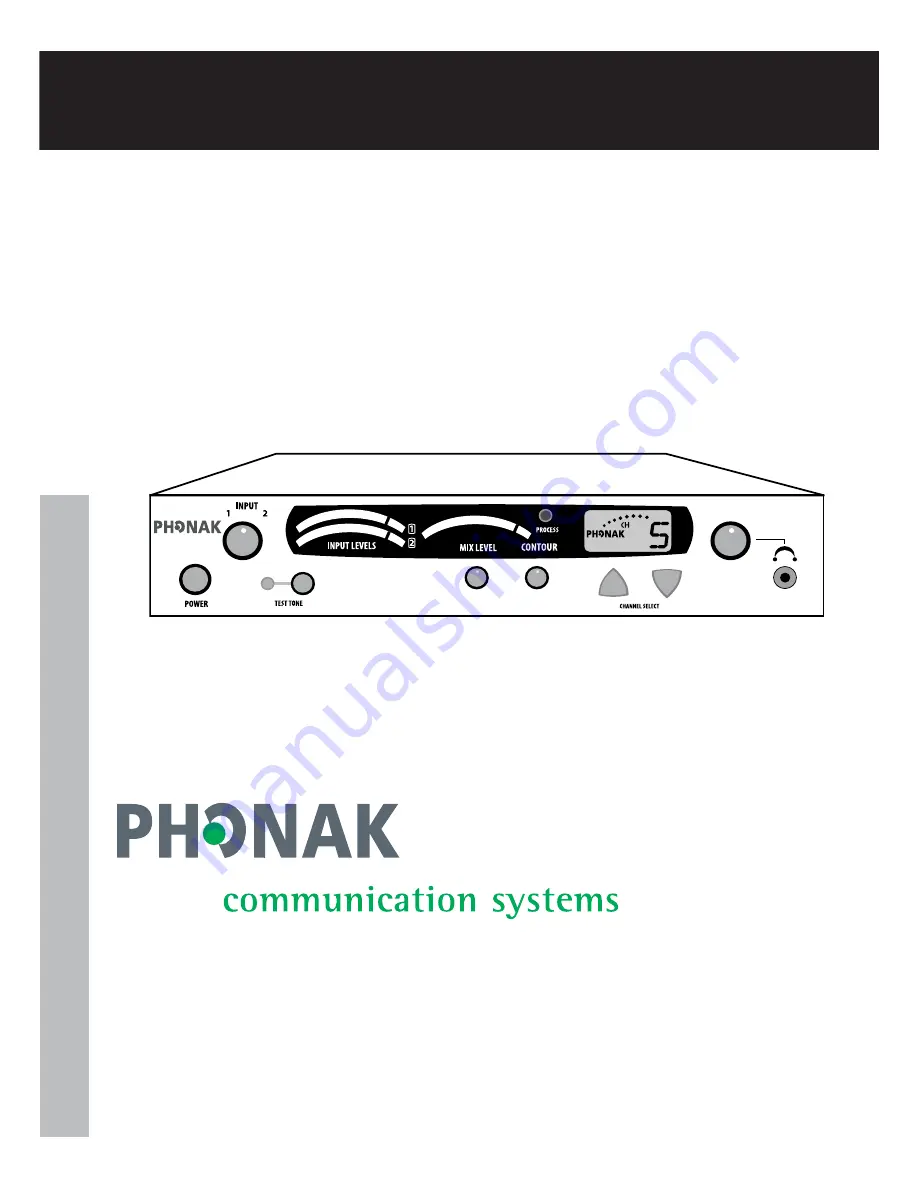
TX-300V Studio Transmitter

Phonak Communications AG
Laenggasse 17
3280 Murten
Switzerland

T +41 (0) 26 672 96 72
F +41 (0) 26 672 96 77
[email protected]
www.phonakcom.ch

Summary of Contents for TX-300V

Page 1: ...User s Manual TX 300V Studio Transmitter Phonak Communications AG Laenggasse 17 3280 Murten Switzerland T 41 0 26 672 96 72 F 41 0 26 672 96 77 info phonakcom ch www phonakcom ch ...

Page 2: ...06 Phonak Communications AG All Rights Reserved TX 300V Studio Transmitter Package Contents 116 1938 Phonak Part Number Rack Mount Kit part number 116 1940 see page 14 Optional Accessories TX 300V Studio Transmitter Power Supply User s Manual Telescoping Antenna Radials 2 Antenna Mounting Assembly 50 Ohm Coaxial Cable 7 6m ...

Page 3: ...s 4 Block Diagram 5 Quick Reference 6 Setup Instructions 7 Operating Instructions 9 Audio Control 9 RF Reception Maximization Strategies 10 Troubleshooting 11 Compliance Notice 12 Warranty 13 Optional Accessories 14 Table of Contents ...

Page 4: ...vel Contour Headset Level Rear Panel Input 1 Level Line Mic Mic Phantom Power Input 2 Level 10 10 dBu RF Power low mid high Internal Adjustments Compression ratio for audio processor Programming Processing on off Indicators Input 1 and Input 2 Mix VU Meters 8 Green 2 Red Processing Indicated by a green LED when on RF Power Indicated on the LCD Display Power Red LED illuminates when the unit is pow...

Page 5: ...n Ratio internal adjustment Red LED Green LED CONTOUR MIX LEVEL CHANNELSELECT Low High Mid Female XLR Combo Connector Phone 2 Tip 3 Ring Line 1 Sleeve Mic 12VDC Mic Phantom Pwr Input 1 Level Select Line Mic Mic Phantom Pwr 10dBu 10dBu Input 2 Level Select 10dBu 10dBu Phone Input Level POT Front Panel 400Hz TEST TONE OFF ON Red LED Test Tone Button Front Panel MIX OUTPUT Input 1 VU Meter Input 2 VU...

Page 6: ... Settings The power supply connects here Set RF Power level here and Full See page 7 for guide lines on setting power levels Input 2 Connect unbalanced audio to these phono connec tors input level 10dBu or 10dBu Input 2 Set switch to match the level of your Input 2 audio source Input 1 Used for balanced connection of a microphone or line level input This combination connector accepts either XLR or...

Page 7: ...r an XLR or phono connector Input 2 has two unbalanced mixing phono connectors Use Input 1 if you are using a microphone or if you have a balanced connection such as from a professional audio mixer you can also use Input 1 for unbalanced connections Use Input 2 to connect to an unbalanced audio source Input 1 Connect the audio source s to one or both audio input connections Input 1 offers a choice...

Page 8: ... 182 50 186 250 and then divide by 2 184 375MHz 2 Divide 7500 by the average frequency in MHz then subtract 5 from this result The solution to this equation is the length in centimeters to set your radials to Example 7500 184 375 40 68 40 68 5 35 68cm radial length 3 Extend the two adjustable length radials to the calculated length Example 40 68 centimeters Screw the two radials to the antenna mou...

Page 9: ...luminate often Adjust Contour Adjust the Contour knob counterclockwise if your audio source is mostly voice Adjust the knob clockwise if your audio source is mostly music The Contour knob adjusts the relative equalization of the unit This equalization boosts or cuts frequencies above 5 kHz Adjust Mix Level Adjust the mix level until the right VU meter occasionally illuminates the red LED This is t...

Page 10: ...tructions between the transmitter and receiver s 3 Minimize the distance between the transmitter and receiver s 4 Move the transmitting antenna away from metal or conductive objects 5 Place the transmitting antenna as high as possible 6 Orient the transmitting antenna vertically 7 Position the RF Power switch on the back of the TX 300V to full RF Power unless lower power is necessary see page 7 8 ...

Page 11: ...make sure you have the input level select switches in the proper position You may be providing too much audio level for the input stage to handle There is hum in the audio Make sure you have properly grounded the audio source to the TX 300V Check the connections from the audio source to the TX 300V If you can try to use a balanced audio source this will reduce the chance of creating hum Connect a ...

Page 12: ...ings and persons with hearing disabilities Two way voice communications and all other types of uses not mentioned above are expressly prohibited Caution Changes or modifications not expressly approved by the party responsible for compliance could void the user s authority to operate Phonak equipment Recycling The symbol with the crossed out disposal bin indicates that equipment shall not be treate...

Page 13: ...s immersion in water or undue stress Damage caused by third parties or non authorized service centers renders the Phonak warranty null and void This warranty does not include any service performed by a local distributor in their office Serial number _________________________________ Date of purchase _________________________________ Warranty Contacting Phonak Address Laenggasse 17 3280 Murten Swit...

Page 14: ...14 116 1940 Rack Mounting Kit Includes components for single and dual rack configuration and a security cover Rack Mount Kit Optional Accessory ...

Page 15: ......

Page 16: ...16 Phonak Communications AG Laenggasse 17 3280 Murten Switzerland T 41 0 26 672 96 72 F 41 0 26 672 96 77 info phonakcom ch www phonakcom ch 16 ...

Reviews: