background image

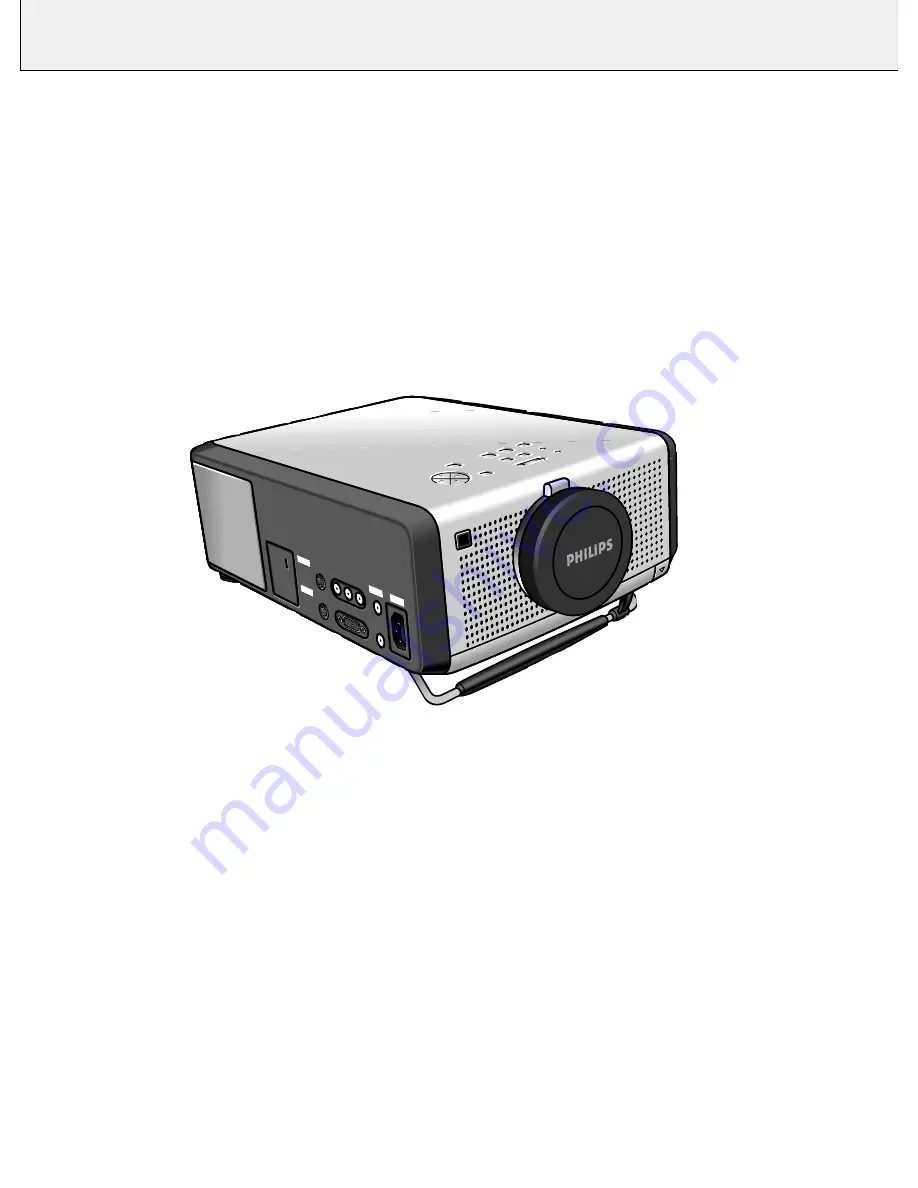
Philips Multimedia projector 

Hopper 10 series

English

Mouse

Data in

S-Video in

Video in

Audio

out

Audio

in

L

R

Mouse

Data in

S-Video in

Video in

Audio

out

Audio

in

L

R

Power

Data

Audio

Video

OK

Menu

Data

Lamp

Mute

AVMute

RC

Volume

Standb

y

Video

On/Off

OK

Menu

Data

Lamp

Mute

AVMute

RC

Volume

Standb

y

Video

On/Off

Summary of Contents for Hopper 10 series

Page 1: ...h Mouse Datain S Videoin Videoin Audio out Audio in L R Mouse Datain S Videoin Videoin Audio out Audio in L R Power Data Audio Video OK Menu Data Lamp Mute AVMute RC Volume Standby Video On Off OK Menu Data Lamp Mute AVMute RC Volume Standby Video On Off ...

Page 2: ...IMPORTANT NOTE FOR USERS IN THE U S A The responsible party of this multi media projector is the following Philips Consumer Electronics Company One Philips Drive Knoxville TN 37914 Telephone 1888 873 4672 ...

Page 3: ...eo On Off 0 Menu OK Video AV Mute Data Mute Volume Standby Lamp RC Menu OK Video AV Mute Data Mute Volume Standby Lamp RC 2 1 3 4 5 6 9 8 7 Mouse Data in S Video in Video in Audio out Audio in L R Mouse Data in S Video in Video in Audio out Audio in L R Power Data Audio Video d a b g e c f h Menu Volume Standby AV Mute Video Mute Data D c V Menu Volume Standby AV Mute Video Mute Data D c V 2 3 1 4...

Page 4: ...mply with the limits for a class B digital device in accordance with Part 15 of the FCC Rules as well as the European CE marking Operation is subject to the following two conditions 1 This device may not cause harmful interference and 2 This device must accept any interference received including interference that may cause undesired operation These limits are designed to provide reasonable protect...

Page 5: ...ounded type outlet Do not attempt to modify this AC plug 13 For added protection of the projector during a lightning storm or when it is left unattended or not in use for long periods of time unplug it from the wall outlet and disconnect any cable systems This will prevent damage to the projector due to lightning and power line surges 14 Do not overload wall outlets and extension cords with too ma...

Page 6: ...ed to manipulate the mouse cursor on the connected computer as long as the menu is not active When the menu is active the Cursor Control controls the menu cursor The remote and local keyboard provides direct access buttons for those functions that are most often used during presentations Source selection buttons With the VIDEO and DATA buttons you can directly select the required source S video vi...

Page 7: ...up red when the temperature measured in the set is too high or lamp start has failed Remote Control indicator Flashes green when the remote control is operated and the projector responds to this operation 0 ZOOM ring For adjusting the size of the projected image FOCUS ring For adjusting the focus of the projected image Horizontal adjusters For adjusting or correcting a possible oblique displayed p...

Page 8: ...cator lights up green The start up position of the projector depends on when the projector has been switched off before The factory default position is Power Standby 4 To switch off the mains supply completely pull the mains plug out of the wall socket Note Before disconnecting the mains lead make sure that the cooling fan has stopped about 3 minutes after the projector has been switched to Power ...

Page 9: ...ens is turned back in to prevent damage to the lens 4 Put the lens cap back in place to prevent dust dirt or other contamination from harming or damaging the front of the projector lens when moving the projector Note Never place the projector on the side where the connections are located INSERTING THE BATTERIES IN THE REMOTE CONTROL 1 Push and slide the lid in the direction of the arrow 2 Install ...

Page 10: ...ers S video cable Audio RCA cable Programmable VGA MAC adaptor No 1 2 LENGTH CONNECTIONS Computer AV products side Projector side VGA Cable CABLE ADAPTOR Mouse cable 8 mini Din to RS232 D Sub M 15P male RCA pin male x 3 Mini Din 8P male D Sub M 15P male D Sub M 9P female 2 0 m 2 0 m 2 0 m RCA pin male x 3 4 5 Video Audio Stereo RCA Cable 3 Scart RCA AV Adaptor Mouse cable 8 mini Din to ADB Mini Di...

Page 11: ...o the serial port of the computer as indicated above Install the proper remote control software on your computer as described in the chapter Additional information Sometimes your computer will require that the serial port is enabled separately Please check the documentation of your computer for details MACINTOSH Desk Top Power Book Power Mac 1 Connect the DATA OUT terminal of the computer to the D...

Page 12: ... white plug into the L socket and the red plug into the R socket In case your VCR Laser Disc player video camera or TV is equipped with a Scart connector 1 Connect the Scart RCA Audio Video adaptor 3 supplied to the Scart connector of the VCR Laser Disc player video camera or TV 2 Plug an optional audio connection cable or the video audio connection cable supplied into both the adaptor and the AUD...

Page 13: ...nd the start up screen appears for 5 seconds When operation time reaches 3901 hours the message WARNING Lamplife expires in 99 hours will be displayed on the screen when switching the projector on For this refer to the chapter Lamp under Additional information When the lamp is on the lamp indicator lights up green 2 Set the ON OFF switch of the remote control to ON in order to switch on the remote...

Page 14: ...be made shift adjusts the computer image in horizontal and vertical direction to centre it on the screen horizontal size adjusts the computer image in a horizontal direction to make the image completely fill the screen phase when connecting the projector to your PC for the first time be sure to adjust the phase control for optimal readability of the projected text brightness adjusts the black leve...

Page 15: ...tion window 6 Press OK to confirm and store the adjustment 7 If required select the next item to be adjusted or press MENU to exit Notes When you have selected the menu mode you cannot use the source selection buttons on the projector or on the remote control to select another input You can only change to another input via the SOURCE menu A audio V video mute can only be selected with the A V MUTE...

Page 16: ...sonal Preferences 1 Select the required input Video S Video or Data 2 Make the required adjustments as described under Picture Control and Audio Control 3 Press MENU The menu bar appears on the screen 4 Use Cursor Control to select P PREF Personal Preferences in the menu bar 5 Use Cursor Control to select STORE from the submenu 6 Press OK to activate the STORE item 7 Use Cursor Control to select P...

Page 17: ...ce when the projector is switched on Note The factory set default for Auto start is Data 1 Press MENU The menu bar appears on the screen 2 Use Cursor Control to select SOURCE in the menu bar 3 Use Cursor Control to select AUTO START from the sub menu 4 Press OK to activate the AUTO START item 5 Use Cursor Control to select the required default source in the action window Data Video or S Video 6 Pr...

Page 18: ...ctor and the ADB port 2 Switch on your computer you can immediately operate your mouse via the Remote Control For PC users 1 Turn off your PC and connect the supplied remote mouse cable RS232 between the computer and the projector 2 Switch on your PC you can now operate your mouse via the remote control if not please continue For Windows users 1 Double click on the remote control software file ex ...

Page 19: ...to dislodge dust and lint 4 Look or a built up of dirt on the rubber rollers inside the ball cage This build up usually appears as a stripe running around the middle of the roller 5 If dirty clean the rollers using a cotton swab moistened lightly with isopropyl rubbing alcohol After cleaning make sure the rollers are still centered in their channels 6 Make sure that fluff from the swab is not left...

Page 20: ...FE is highlighted 4 Press OK to activate the LAMP LIFE item 5 Use cursor control to select RESET in the action window Note If you select Quit you will exit the action window and the lamp life time will not be reset 6 Press OK to confirm A new action window will appear 7 Use cursor control to select YES or NO in the action window and press OK to confirm 8 If required select another item you wish to...

Page 21: ...em selection under Picture Control Adjust brightness contrast saturation or hue see Video adjustments under Picture Control Image is blurred Image is not focused Adjust focus ring Distance between projector and screen is not correct Adjust the distance between the projector and the screen Signal cable is not correctly connected Connect signal cable correctly Image does not match up with the projec...

Reviews: