Philips DCR 2020, User Manual
Introducing the Philips DCR 2020, a cutting-edge device that will revolutionize your entertainment experience. This versatile product offers seamless integration with your existing setup. To enhance your user experience, we provide a comprehensive and easy-to-follow User Manual. Download your free copy today from manualshive.com and unlock the full potential of your Philips DCR 2020.
Share
Download


Reviews:
No comments
Related manuals for DCR 2020

YP-60V - YEPP Sports 256 MB Digital Player
Brand: Samsung Pages: 36

CD-2000
Brand: Teac Pages: 64

AZ6828/17
Brand: Magnavox Pages: 2

SCR-68A
Brand: Jensen Pages: 1

AZ7461 - Portable Radio Cass Rec
Brand: Magnavox Pages: 26

PA7212
Brand: ABK Pages: 17

Black Sea MP001
Brand: SWEEX Pages: 6
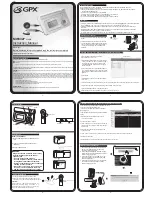
MW3327
Brand: GPX Pages: 4

SCM-8100
Brand: Samsung Pages: 47

BD-C7500W
Brand: Samsung Pages: 136

KDV-C810
Brand: Kenwood Pages: 40

LVD-700
Brand: Kenwood Pages: 38

KDC-C465FM
Brand: Kenwood Pages: 22

KDC-C465
Brand: Kenwood Pages: 33

KDC-9
Brand: Kenwood Pages: 17

KMD-C80
Brand: Kenwood Pages: 16

L-1000D
Brand: Kenwood Pages: 13

KDC-C462FM
Brand: Kenwood Pages: 22


