3121 233 42281
Quick Use and Setup Guide
B
ASIC
TV C
ONNECTIONS
Important Notice/Warning . . . . . . . . . . . . . . . . . . . .1
Making Basic TV Connections
Basic Cable TV Connection . . . . . . . . . . . . . . . . .1
Basic Cable Box Connection . . . . . . . . . . . . . . . .1
Basic Antenna TV Connection . . . . . . . . . . . . . . .1
Basic TV Operation . . . . . . . . . . . . . . . . . . . . . . . .2
Remote Battery Installation . . . . . . . . . . . . . . . . . . .2
Remote Control Button Descriptions . . . . . . . . . . . .2
How to Use the Installation Features . . . . . . . . . .3-4
Using the Language Control . . . . . . . . . . . . . . . . . .3
Setting the Tuner Mode A and B Controls . . . . . . .3
How to Automatically Program Channels . . . . . . . .3
How to Add and Delete Channels . . . . . . . . . . . . . .4
How to set the AutoChron™ Feature (Clock) . . . . .4
How to Name (Label) Channels . . . . . . . . . . . . . . .4
IMPORTANT
NOTE: This owner's manual is used with several
different television models. Not all features (and
drawings) discussed in this manual will necessar-
ily match those found with your television set.
This is normal and does not require that you con-
tact your dealer or request service.
WARNING: TO PREVENT FIRE OR SHOCK
HAZARD DO NOT EXPOSE THIS UNIT TO
RAIN OR EXCESSIVE MOISTURE.
Color TV
Color TV
C
ONTENTS
75
ANT "A"
Monitor out
AV1 in AV2 in
VIDEO
L/Mono
AUDIO
R
Y
Pb
Pr
S-VIDEO
8
8
SURROUND SOUND
+ R -
+ L -
1
2
Y
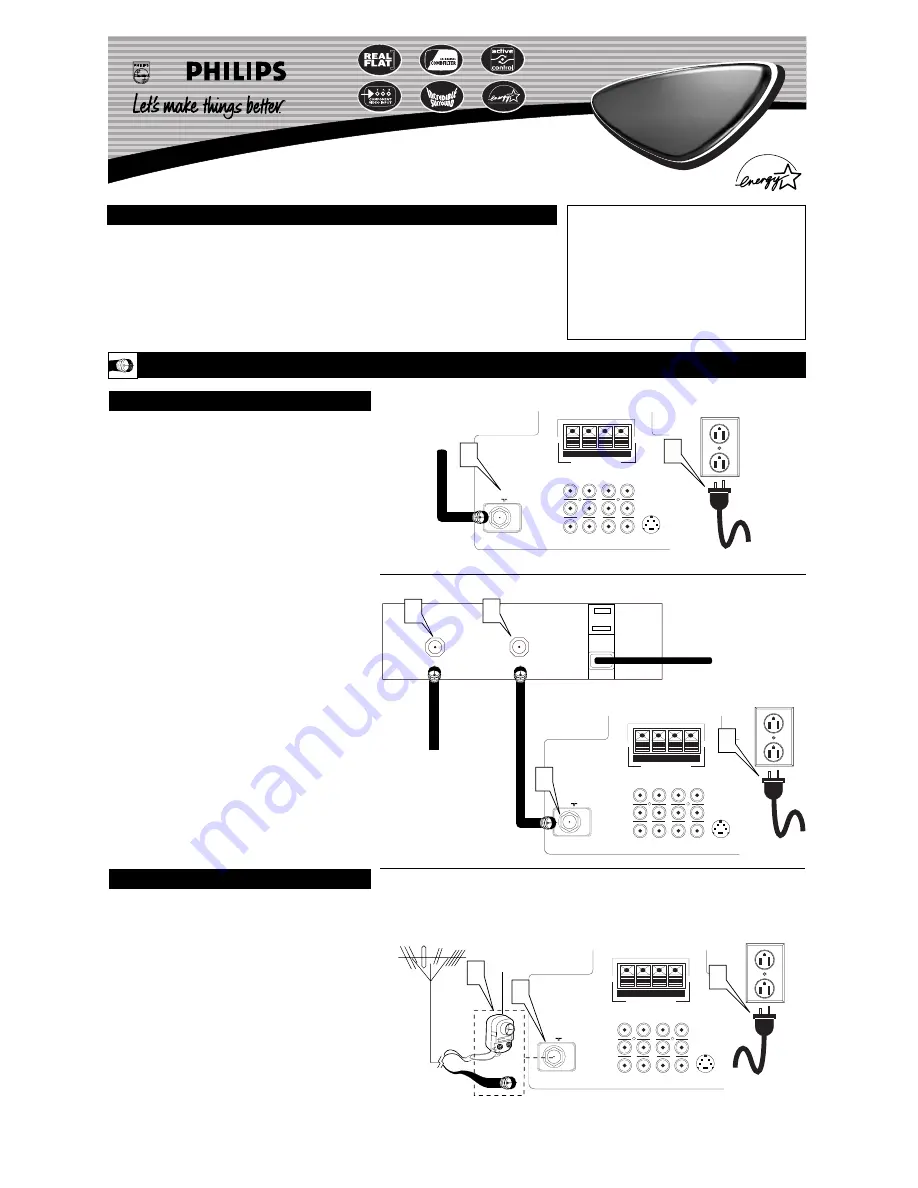
our Cable TV input into your home may be a single (75 ohm)
cable or a converter box installation. In either case, the con-
nection to the TV is very easy. Follow the steps below to connect
your cable signal to your new television.
If your cable signal comes directly from a round 75
Ω
coaxial
cable use the following steps:
1
Connect the open end of the round Cable Company sup-
plied cable to the 75
Ω
input on the TV. Screw it down finger
tight.
2
Plug the television in to the wall outlet and turn the TV on.
Refer to the AUTOPROGRAM feature to program all the
available channels on your cable signal.
If your cable signal comes from a cable box, use the following
steps:
3
Connect the open end of the round Cable Company sup-
plied cable to the cable signal IN(put) plug on the back of
the Cable Box.
4
Using a separate round coaxial cable, connect one end to the
OUT(put) plug on the back of the Cable Box.
5
Connect the other end of the round coaxial cable to the
75
Ω
input on the back of the television. Screw it down finger
tight.
6
Plug the television in to the wall outlet and turn the TV on.
Refer to the TUNER and AUTOPROGRAM features on page
3 of this Quick Use Guide. TUNER should be set to the
CABLE option. AUTOPROGRAM can be set to program all
the available channels on your cable signal into the televi-
sion’s memory.
C
ABLE
TV
75
ANT "A"
Monitor out
AV1 in AV2 in
VIDEO
L/Mono
AUDIO
R
Y
Pb
Pr
S-VIDEO
8
8
SURROUND SOUND
+ R -
+ L -
OUTPUT
INPUT
5
6
3
4
Direct Cable Connection:
Cable Box Connection:
Cable signal coming from
Cable Company (Round
75
Ω
coaxial cable)
Jack Panel Back of TV
AC Power
Wall Outlet
Power Plug
from back of TV
Jack Panel Back
of Cable Box
Cable Signal IN from
the Cable Company
Round 75
Ω
Coaxial Cable
Jack Panel
Back of TV
AC Power
Wall Outlet
Power Plug
from back of TV
A
combination antenna receives normal broadcast chan-
nels (VHF 2–13 and UHF 14–69). Your connection is
easy because there is only one 75
Ω
(ohm) antenna plug on
the back of your TV, and that’s where the antenna goes.
1
If your antenna has a round cable (75 ohm) on the end,
then you're ready to connect it to the TV.
If your antenna has flat, twin-lead wire (300 ohm), you
first need to attach the antenna wires to the screws on a
300- to 75-ohm adapter.
2
Push the round end of the adapter (or antenna) onto the
75
Ω
(ohm) plug on the back of the TV. If the round end of
the antenna wire is threaded, screw it down finger tight.
3
Plug the television in to the wall outlet and turn the TV
on. Refer to the TUNER and AUTOPROGRAM features on
page 3 of this Quick Use Guide. TUNER should be set to the
ANTENNA option. AUTOPROGRAM can be set to program
all the available channels on your cable signal into the televi-
sion’s memory.
A
NTENNA
TV
75
ANT "A"
Monitor out
AV1 in AV2 in
VIDEO
L/Mono
AUDIO
R
Y
Pb
Pr
S-VIDEO
8
8
SURROUND SOUND
+ R -
+ L -
1
3
2
Antenna Connection:
Jack Panel
Back of TV
Power Plug
from back of TV
AC Power
Wall Outlet
Round 75
Ω
Coaxial Cable
from Antenna
Twin
Lead Wire
300 to 75-ohm
Adapter
Outdoor or Indoor Antenna
(Combination VHF/UHF)
The combination antenna receives normal
broadcast channels 2-13 (VHF) and 14-69 (UHF).