background image

Summary of Contents for IR0280

Page 1: ......

Page 2: ...6 2 Power Off 6 3 Display Off Sleep Mode 6 4 Menu Screen 7 5 Measurement Screen 8 9 6 Display Brightness 10 7 Date and Time 10 8 Auto off Timer 10 9 Hi Low Temperature Alarm 10 11 10 Auto monitor Alarm 11 11 Temperature Unit 11 12 Image Format 12 13 Factory Reset 12 14 Min Max Crosshair 12 15 Color Palette 13 16 Color Palette Guide 13 17 View Images Videos 13 14 18 Delete Images Videos 15 19 Emmis...

Page 3: ...ng The traditional infrared thermometer needs to measure every component one by one this is not necessary for the IR0280 3 Easy to use Turn on the device and start measuring temperature right away 4 Image Video The IR0280 has the capabilities to take both images and videos making it easier for users to analyze the situation 5 Adjustable 9 types of color palettes and wide range of emissivity values...

Page 4: ...for electrician maintenance personnel technicians and even the emergency personnel Safety Considerations Please read the instructions carefully so as to ensure accurate measurement results and safety 1 Do not use device in explosive flammable or corrosive environment 2 Since the product is a precision electronic and sensitive optical device Do not drop it or allow impacts to occur to prevent damag...

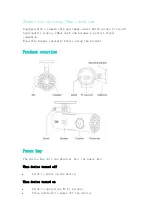
Page 5: ...4 Product Features ...

Page 6: ...ions 215 x 55 x 62 mm 14 Weight 230g 15 Warranty 2 years Thermal Image Specification 1 Resolution of infrared image 32 32 1024 pixel 2 Resolution of visible image 0 2 megapixels 3 Field angle shortest focal distance 33 x33 0 1m 4 Thermal sensitivity 0 15 C 5 Range of temperature measurement 30 C 1000 C 22 F 1832 F 6 Measure accuracy 30 300 C 1 or 1 C 300 1000 C 2 or 2 C 7 Emissivity 0 01 1 0 8 Ima...

Page 7: ...ss Hold Power button for 2sec A pop up menu appears for Power Off or Reboot selection Use Up down button to select and press Measure button to confirm 3 Display OFF Sleep Mode Press Power button once to turn off display Press Power button again to turn on it Remark a The Measurement screen is the default screen when turn on the display ...

Page 8: ...Temperature Alarm To set the high or low temperature alarm Auto monitor Alarm To capture the thermal image when over the Temperature Alarm over a period of time Temperature Unit To set temperature unit degree C degree F Emissivity To adjust the emissivity from 0 01 to 1 0 View Image To view the captured thermal image video Image format To set the image output format Bitmap or JPEG Factory Reset To...

Page 9: ...Image Thermal Image Visual Image Overlay Image Press Left button to select filter mode Temporal filter Wide Gaussian filter No filter Temporal filter Wide Gaussian No filter Press Right button to select zoom in or zoom out Image View Area Object Temperature mark Palette guide bar included min max object temperature Time Emissivity ...

Page 10: ...l SD card is present the image will be saved to the SD card The recording icon appear to indicate the video recording The video is saved in mp4 format When the Measure button release the recording will be stopped and will be saved in the memory Touchable object temperature mark Touch the screen to move the object temperature mark and show the temperature of that location ...

Page 11: ...ious screen 8 Auto off timer Press Left Right to increase decrease the selected item Press Up Down to select the Minute or Second Press Measure to confirm Press Menu to return to the previous screen Remark a The minimum Auto off timer is 0min 30sec b The maximum Auto off timer is 30min 0sec c The timer is for Display OFF only 9 Hi Low Temperature Alarm Press Left Right button to increase decrease ...

Page 12: ... decrease the selected item Press Up Down button to select the Temperature or Duration Press Measure to confirm Press Menu to return to the previous screen Remark a Duration is from 15min 30min 45min 60min 90min and 120min b The Auto monitor Alarm Duration is OFF by default c Press and Hold Measure button to turn ON or OFF the Auto Monitor Alarm 11 Temperature Unit Press Left Right button to selec...

Page 13: ...o confirm Press Menu to return to the previous screen 14 Min Max Crosshairs Min Max ON Min Max OFF Press Left Right to select ON or OFF Press Measure to confirm Press Menu to return to previous screen Remarks a When ON exact maximum and minimum points and temperatures will both show on the measurement screen b When OFF default maximum and minimum temperatures will only show at the bottom of the me...

Page 14: ...eft Right button to select ON or OFF Press Measure to confirm and back to the previous screen Press Menu to back to the previous screen Palette guide ON Palette guide OFF 17 View Images Videos Press Up Down Left Right button to select Image Icon Press Measure to open image video Press and Hold Measure to delete selected item Press Menu to return to the previous screen ...

Page 15: ... Image Video b View Image with touchable object temperature mark Original Image New movable temperature mark Touch the screen to show the temperature of that location c Delete Image or Video Hold the measure button until the pop up menu appears Press Left Right button to select BACK or Trash icon Press Measure to confirm Remark The deleted items is not deleted It will move to the Trash ...

Page 16: ...anent delete menu Press Menu to return to the previous screen a Recover Image Press and Hold Measure to pop up the recover or permanent delete menu Select the Recover button and press Measure to confirm The selected item will be recovered b Permanently delete image Select the Permanent Delete button and press Measure to confirm The selected item will be deleted permanently ...

Page 17: ...vity Table Substance Thermal Radiation Substance Thermal Radiation Bitumen 0 90 0 98 Black cloth 0 98 Concrete 0 90 Human skin 0 98 Cement 0 96 Foam 0 75 0 80 Sand 0 90 Charcoal dust 0 96 Earth 0 92 0 96 Paint 0 80 0 95 Water 0 92 0 96 Matte paint 0 97 Ice 0 96 0 98 Black rubber 0 9 Snow 0 83 Plastic 0 85 0 95 Glass 0 90 0 95 Timber 0 90 Ceramics 0 90 0 94 Paper 0 70 0 94 Marble 0 94 Chromium Hemi...

Page 18: ...om For B2B or project based application please send an email sales perfectprime com FOR MORE INFORMATION ABOUT PERFECT PRIME PLEASE VISIT OUR ABOUT US PAGE AND FEEL FREE TO BROWSE 製品マニュアルページの QR コードをスキャンする 特定の製品で利用可能な多言語 Scan QR Code for Product Registration Multi Language available for certain products Scan QR Code to check out our Youtube Channel for video manuals Retailer HORMES LIMITED Email c...

Reviews: