Pentair Pool Products Mako Shark, Owner'S Manual
The Pentair Pool Products Mako Shark offers powerful and efficient cleaning for your pool. Make maintenance a breeze with our comprehensive Owner's Manual, available for free download at manualshive.com. Get all the details you need to keep your pool sparkling clean with this handy manual.
Share
Download


Reviews:
No comments
Related manuals for Mako Shark
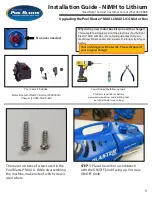
Pool Blaster
Brand: Water Tech Pages: 6

3000 wd
Brand: Zodiac Pages: 48

titan 2 Eco 3
Brand: baracuda Pages: 18
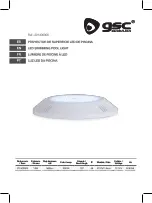
201400008
Brand: GSC Pages: 24

QC Series
Brand: Aqua Quip Pages: 4

WIDE
Brand: Pahlen Pages: 18

100
Brand: Marineland Pages: 2

LG125
Brand: Jandy Pages: 40

ROUND POOL 1" RIMS
Brand: Zodiac Pages: 21

WR000411
Brand: Zodiac Pages: 29

QUICK SET OVAL POOL
Brand: SUMMER WAVES Pages: 60

AquaTech
Brand: AQUATECH Pages: 4

RO-PS-1000Int
Brand: GroTech Pages: 2

AF-D01
Brand: AIREFINA Pages: 65

PWU 2/3
Brand: Smith's Heating First Pages: 2

PPT8
Brand: Calorex Pages: 151

Deluxe Thru-Wall Skimmer 1-4113-006
Brand: Lomart Pages: 8

Verro 100
Brand: iRobot Pages: 28


