

Play back recorded images.
Control the playback of recorded images from the [HDD] tab.
Search for and play back recorded events (REC event search).
Play back Recorded Images
Search for and Playback Images
Select the camera channel you want to
playback and click the [PLAY] button.
Plays back recorded images. [
] is
displayed in the status display area.
• Playback resumes from the date and
time when playback was stopped.
Click the [STOP] button to stop
playback.
[
] disappears from the Status
display area and a live image from the
camera is displayed in the Image
display.
Click the [Go to date] button in the
Playback point operation area.
This displays the [Go to date] window.
Select the date and time of the image to
play back and then click the [PLAY]
button.
[
] is displayed in the status display
area and images at the specified date
and time are played back.
(1)
(3)
(2)
(4)
Playback point
operation area
(1)
[FF]/
[REW]
: Plays recorded images forward or in reverse at
high speed.
The playback speed changes each time the
button is clicked.
(Approximately 4x
J
8x
J
16x
J
32x
J
48x
J
96x)
(2)
[NEXT
RECORD]/
[PREV
RECORD]
: Skips forward or backward to play the recorded
image of the next event.
(3)
[NEXT
IMAGE]/[PREV
IMAGE]
: Click during playback or when paused to play
one frame at a time forward or backward, or to
pause.
(1)
(2)
(3)
[HDD] Tab
Click the [Control] button and then click [Search] button in the
[Search] box.
• This will display the [Select search method] screen.
Click the [Rec event search] button.
• This displays the [Rec event search] window.
Narrow the conditions.
Select the "Time & date", "Rec event", and "Camera" for the
images you want to playback and then click the [OK] button.
• [FILTERING] is displayed on the status display area and the
filtered results are displayed on the recorded event list
window.
• Click the [All List] button to eliminate all the search conditions.
Click the recorded event time you want to play back. The
selected images are played back.
Click the [STOP] button to stop playback.
(1)
(2)
(3)
(4)
Network Disk Recorder
WJ-ND400
Quick Reference Guide
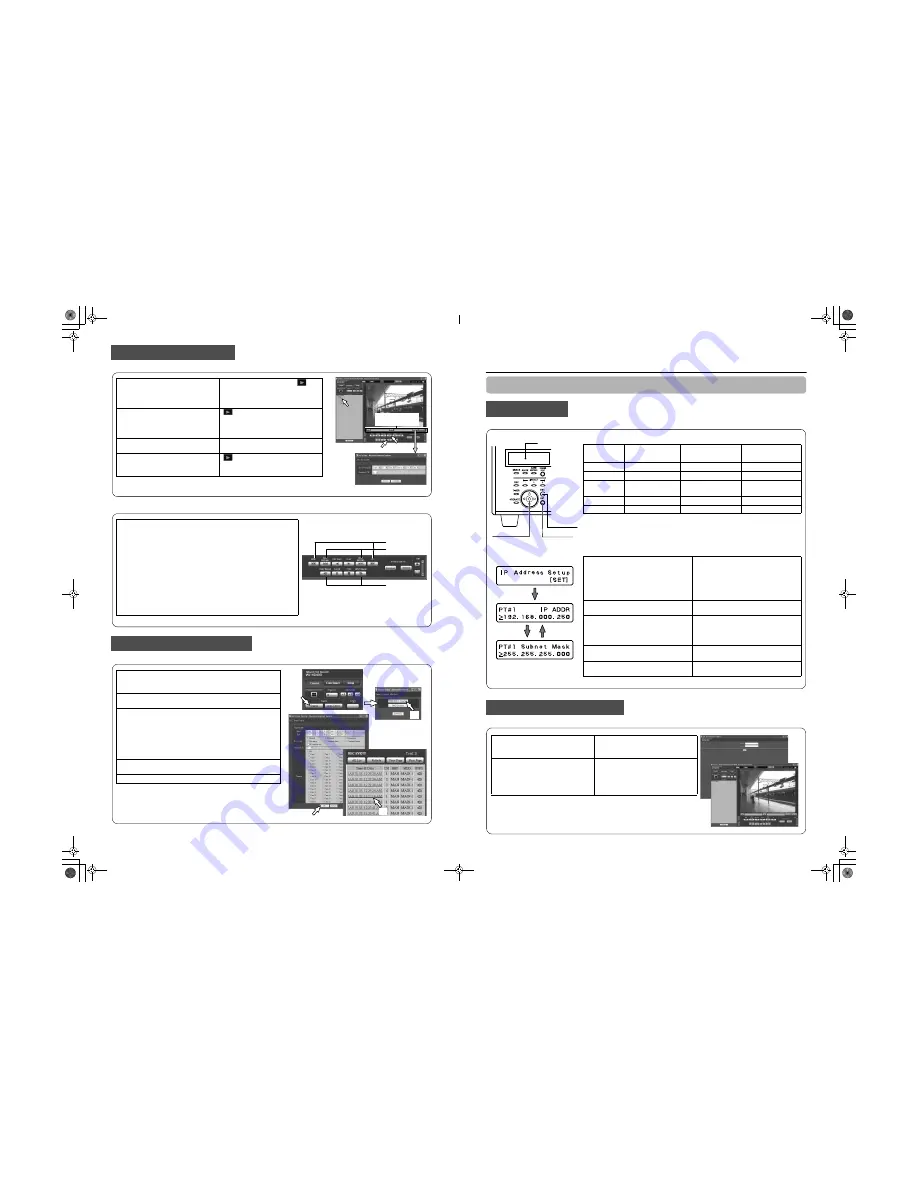
Set the IP address, subnet mask, and other network settings for each port.
Display the operating window from a web browser on a PC.
Network Settings
Display the Operating Window
The Quick Reference Guide provides simple explanations for operating the product.
z
Factory default network settings
Item
PT#1
Camera port
PT#2
Client PC port
PT#3
Maintenance port
DHCP
-
OFF
-
IP address
192.168.0.250
192.168.1.250
192.168.2.250
Subnet
mask
255.255.255.0
255.255.255.0
255.255.255.0
Gateway
-
192.168.1.1
-
HTTP
-
80
-
z
How to configure network settings
Use the arrow buttons (up or down) on the
date display screen to display the [IP
Address Setup] and then press the [SET]
button.
• The cursor is shown as an under bar
(_).
Switch to the settings screen.
• When the cursor changes to ">":
Arrow buttons (left or right): Select port
Arrow buttons (up or down): Select item
Click the [SET] button when the cursor is
[>].
The cursor moves to the number area.
Move the cursor with the arrow buttons
(left or right) to configure the settings.
• Arrow buttons (left or right): Move the
cursor
• Arrow buttons (up or down): Input a
value
Press the [ESC] button to move the cursor
to ">" and check the settings.
Press the [ESC] button again to return to
the date display screen.
z
IP Address Settings
Screen
[SET]
LCD
ESC button
SET button
Arrow buttons
Launch the web browser, input the main
unit's IP address, and press the [Enter]
key.
The authentication screen opens.
Enter your user name and password to
login.
• Initial default
User name:
ADMIN
Password:
12345
This will display the top page.
• The wizard for installing ActiveX
control, which is required to display
images from cameras, opens. Follow
the instructions of the wizard.
3TU001890AAA
AM0408-0
ND400_A3_E.fm 1 ページ 2008年4月8日 火曜日 午後2時59分


