background image

GH

GC

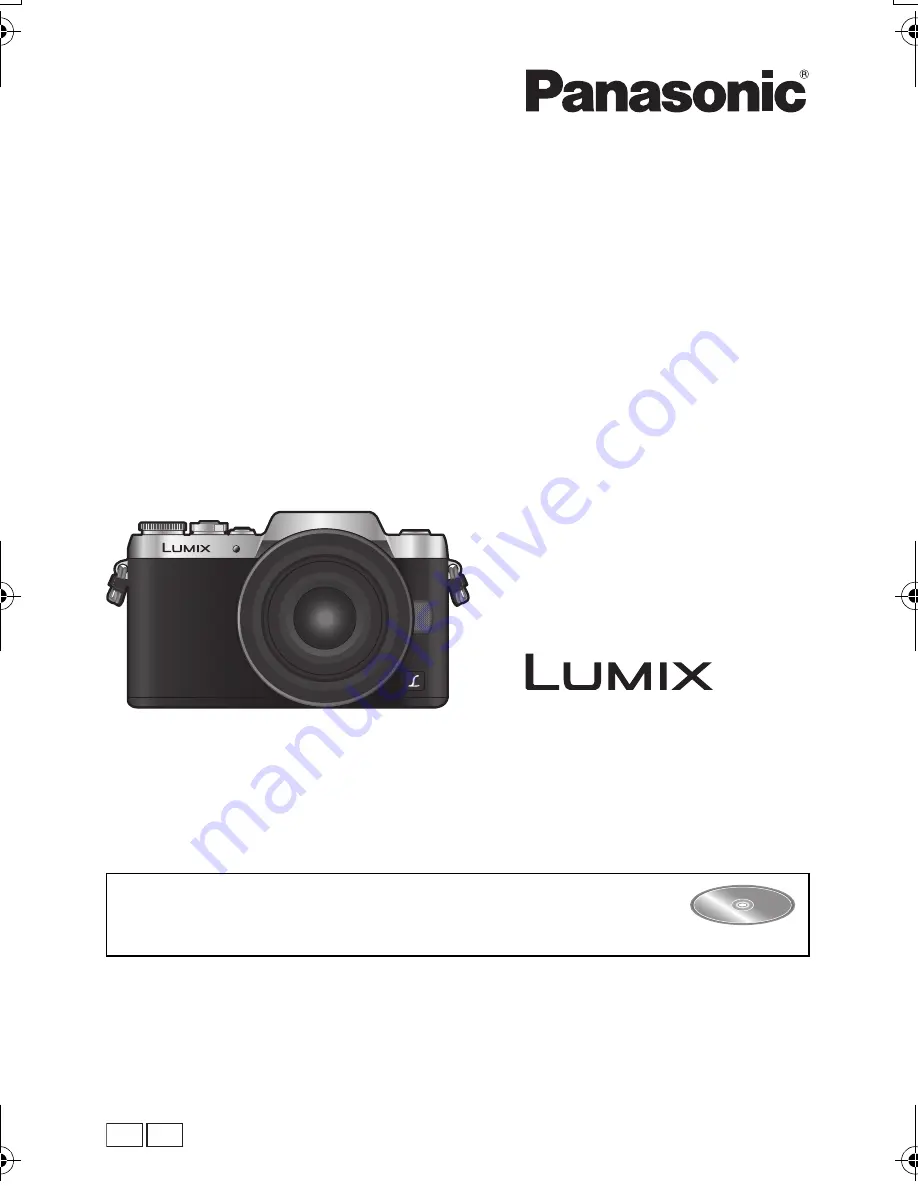
Basic Operating Instructions

Digital Camera/

Lens Kit/Double Zoom Lens Kit

Model No. 

DMC-GF7K/DMC-GF7X

DMC-GF7W

Please read these instructions carefully before using this product, and 
save this manual for future use.

More detailed instructions on the operation of this camera are 
contained in “Operating Instructions for advanced features (PDF 
format)” in the supplied DVD.

SQT0544

F0115YD0

until 

2015/3/23

DMC-GF7K&GF7X&GF7W-SQT0544_eng.book  1 ページ  2015年1月6日 火曜日 午前11時25分

Summary of Contents for Lumix DMC-GF7K

Page 1: ...F7K DMC GF7X DMC GF7W Please read these instructions carefully before using this product and save this manual for future use More detailed instructions on the operation of this camera are contained in...

Page 2: ...cast material for purposes other than your own private use may infringe copyright laws Even for the purpose of private use recording of certain material may be restricted Information for Your Safety P...

Page 3: ...ase contact your local authorities or dealer and ask for the correct method of disposal Warning Risk of fire explosion and burns Do not disassemble heat above 60 xC or incinerate CAUTION To reduce the...

Page 4: ...wave radiation Do not use this unit near cell phones because doing so may result in noise adversely affecting the pictures and or sound Recorded data may be damaged or pictures may be distorted by st...

Page 5: ...tatic electricity The data on the card may be damaged or lost due to electromagnetic waves static electricity or breakdown of the camera or the card We recommend storing important data on a PC etc Do...

Page 6: ...ouch screen Touch operations 19 REC SETTING RESET button Resetting the recording settings 19 Calling frequently used menus instantly Quick Menu 20 Setting the Menu 20 Recording Taking Pictures using t...

Page 7: ...the mount of the digital camera body Since the sensor unit is a precision apparatus it may cause a malfunction or damage About Condensation When the lens or monitor is fogged up Condensation occurs wh...

Page 8: ...y before use 6 Battery Charger Indicated as battery charger or charger in the text 7 AC Cable In Saudi Arabia always use A 8 USB Connection Cable 9 DVD Software Use it to install the software to your...

Page 9: ...sed on the interchangeable lens H FS12032 Some digital camera kits may not be commercially available in some regions Consult the dealer or Panasonic if you lose the supplied accessories You can purcha...

Page 10: ...our finger Doing so may make sound difficult to record 7 Flash 8 Focus distance reference mark 9 Wi Fi button P31 Fn1 button P18 10 Shoulder strap eyelet P12 11 Status indicator P16 Wi Fi connection l...

Page 11: ...e control dial is indicated as follows 27 MENU SET button P20 28 DISP button Each time this is pressed the display on the monitor is switched 29 Delete button P29 Quick Menu Return button P20 30 REC S...

Page 12: ...s 1 to 8 and then attach the other side of the shoulder strap Use the shoulder strap around your shoulder Do not wrap the strap around your neck It may result in injury or accident Do not leave the sh...

Page 13: ...attery has been discharged completely The charging time may vary depending on how the battery has been used The charging time for the battery in hot cold environments or a battery that has not been us...

Page 14: ...writing on a card label etc when you record a motion picture Use a card with SD Speed Class with Class 4 or more for AVCHD MP4 motion picture recording Please confirm the latest information on the fo...

Page 15: ...anging the Lens How to Extend the Lens Rotate the zoom ring in the direction of arrow 1 from position A the lens is retracted to position B 12 mm to 32 mm H FS12032 35 mm to 100 mm H FS35100 to extend...

Page 16: ...ress 3 4 to select the language and press MENU SET 4 Press MENU SET 5 Press 2 1 to select the items year month day hour minute and press 3 4 to set 6 Press MENU SET to set Confirmation screen is displ...

Page 17: ...ture value and shutter speed are displayed It will flash in red if the correct exposure is not achieved except when set to flash Once the subject is in focus the focus indication is displayed When the...

Page 18: ...AE Mode The shutter speed is automatically determined by the aperture value you set Shutter Priority AE Mode The aperture value is automatically determined by the shutter speed you set Manual Exposur...

Page 19: ...apart enlarge or together reduce with two fingers You can restore the default recording settings by pressing this button Try pressing this button when the function in use stops working or is not worki...

Page 20: ...e the setting is complete You can close the menu by pressing the shutter button halfway Setting the Menu 1 Press MENU SET 2 Press 3 4 of the cursor button to select the menu item and press MENU SET 3...

Page 21: ...d with the mode dial 2 Align the screen with the subject When the camera identifies the optimum scene the icon of the scene concerned is displayed in blue for 2 seconds after which its colour changes...

Page 22: ...nd normal operation 2 Rotate the control dial to set the blurriness Recording Mode This mode enables you to change the brightness and colour tone to your preferred settings from the ones set by the ca...

Page 23: ...hen recording Be careful not to look at the light from the flash and the AF Assist Lamp directly Soft Skin Makes people s faces look brighter and their skin tones look softer Off Low Medium High Defoc...

Page 24: ...position and press MENU SET The assist screen is displayed enlarging the area MF Assist Pressing DISP resets the focus position back to the centre When using an interchangeable lens H FS12032 with no...

Page 25: ...ations after pressing 4 to display the screen that lets you set the area to be enlarged 5 Press the shutter button halfway The assist screen will close The recording screen will be displayed You can a...

Page 26: ...ly pressing the shutter button When a high ambient temperature continuous recording or other conditions cause the camera to overheat the following restrictions will occur to protect the camera Wait un...

Page 27: ...MENU SET 6 Select ON with 3 4 and then press MENU SET Press the shutter button halfway to exit the menu If Pull Focus is set to ON set its focus 7 Start recording by pressing the motion picture butto...

Page 28: ...web service If you press 4 when displaying images one by one you can easily send an image to a web service For details refer to the Operating Instructions for advanced features PDF format Button oper...

Page 29: ...1 In Playback Mode press 2 Press 3 4 to select Delete Multi or Delete All and then press MENU SET Delete All Confirmation screen is displayed Pictures are deleted by selecting Yes It is possible to de...

Page 30: ...vanced features PDF format Installing the smartphone tablet app Image App OS App for AndroidTM Android 2 3 3 or higher Search the Google PlayTM Store for Panasonic Image App or LUMIX and install the a...

Page 31: ...and collect the content of communications Set Wi Fi Password to ON to enable the password For details refer to the Operating Instructions for advanced features PDF format After use terminate the conn...

Page 32: ...cture while jumping Operate the smartphone Live Control Settings Jump Snap Select the sensitivity We recommend that you take test pictures to determine the camera s angle and how hard you jump and to...

Page 33: ...res a smartphone that supports Android OS 4 3 or higher The iPhone 4 and iPod touch 4th generation do not support Snap Movie of the Image App Adding location information to images stored in the camera...

Page 34: ...ndows 8 1 you can display the menu by clicking a message that is displayed after inserting the DVD and then selecting and executing Launcher exe You can also display the menu by double clicking SFMXXX...

Page 35: ...o Extra Tele Conversion when taking still pictures Image effect filter adjustment display Image effect filter setting Card displayed only during recording Elapsed recording time 1 P26 Simultaneous rec...

Page 36: ...te and time Travel destination setting 4 Exposure meter Focal distance display Step zoom 4 AF area Spot metering target Self timer 5 Mic level display Silent Mode AE Lock Metering Mode Programme Shift...

Page 37: ...ng Photo Style i Resolution ISO Increments Filter Settings iHandheld Night Shot Extended ISO Aspect Ratio iHDR Long Shtr NR Picture Size HDR Shading Comp Quality Multi Exp Ex Tele Conv Sensitivity Tim...

Page 38: ...m the clock settings select the operating beep tone settings and set other settings which make it easier for you to operate the camera You can also configure the settings of Wi Fi related functions Cl...

Page 39: ...tomatically The subject is beyond the focus range of the camera There is camera shake jitter or the subject is moving slightly Is Focus Release Priority in the Custom menu set to RELEASE The shutter s...

Page 40: ...is used the flash is not activated Set Shutter Type to AUTO or EFC When Silent Mode is set to ON the flash is not activated Set Silent Mode to OFF Is the card inserted Is there a picture on the card...

Page 41: ...wireless access point Remove the obstacles between this unit and the wireless access point Change the direction of this unit Change the location and orientation of the wireless access point Perform th...

Page 42: ...destination on the web service link settings If the camera is shaken it may cause the shutter to close This is not a malfunction Do not put your finger in the mount Turning on the camera will re open...

Page 43: ...000 pixels Image sensor 4 3q Live MOS sensor total pixel number 16 840 000 pixels Primary colour filter Digital Zoom Max 4k Extra Tele Conversion When taking still pictures Max 2k When a picture size...

Page 44: ...35100 is used Approx 9 lx when i Low light is used the shutter speed is 1 25th of a second When the Interchangeable lens H PS14042 is used Shutter speed Still picture T Time Max approx 60 seconds 60 s...

Page 45: ...HS I compatible Picture size Still picture When the aspect ratio setting is 4 3 4592k3448 pixels 3232k2424 pixels 2272k1704 pixels When the aspect ratio setting is 3 2 4592k3064 pixels 3232k2160 pixel...

Page 46: ...ck 8 pin HDMI microHDMI Type D Dimensions Approx 106 5 mm W k64 6 mm H k33 3 mm D excluding the projecting parts Mass Approx 266 g with the card and battery Approx 236 g camera body Approx 336 g with...

Page 47: ...eference line focal length 12 mm to 20 mm 0 3 m to from the focus distance reference line focal length 21 mm to 32 mm 0 9 m to from the focus distance reference line Maximum image magnification 0 13k...

Page 48: ...g Yes In focus distance 0 2 m to from the focus distance reference line focal length 14 mm to 20 mm 0 3 m to from the focus distance reference line focal length 21 mm to 42 mm Maximum image magnificat...

Page 49: ...may be subject to change Some optional accessories may not be available in some countries NOTE Accessories and or model numbers may vary between countries Consult your local dealer For lens related op...

Page 50: ...s PDF format will be displayed 3 Click the language of the Operating Instructions you want to open The Operating Instructions for advanced features PDF format will open You can save the Operating Inst...

Page 51: ...pus Imaging Corporation in Japan the United States the European Union and other countries SDXC Logo is a trademark of SD 3C LLC AVCHD AVCHD Progressive and the AVCHD Progressive logo are trademarks of...

Page 52: ...is a registered trademark of DynaComware Taiwan Inc QR Code is a registered trademark of DENSO WAVE INCORPORATED Other names of systems and products mentioned in these instructions are usually the re...

Reviews: