background image

7

1

0

3

6

2

4

8

9

5

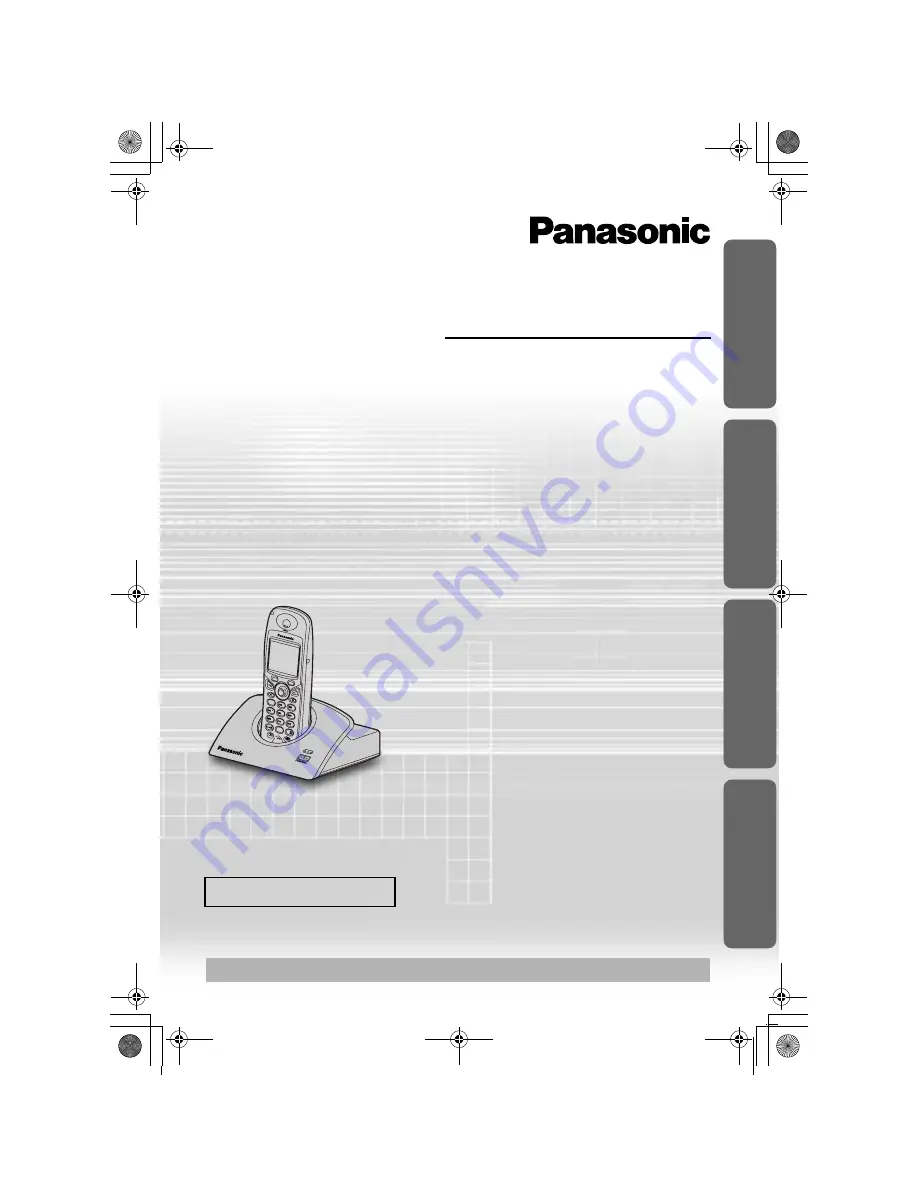
Digital Cordless Answering System

Operating Instructions

Model No. 

KX-TCD510BX

Contents

Preparation

Before Initial Use..........................2
Important Information...................5
Location of Controls .....................6
Meanings of Icons above
SOFT KEYS.................................7
Meanings of Symbols 
and Operations of Keys ...............8
Display .........................................9
Setting up...................................10

Cordless Telephone

Using the Telephone..................14
Caller ID .....................................19
List Menu ...................................20
Using the Phonebook.................23
Settings Menu Chart ..................32
Handset Settings........................34
Base Unit Settings .....................44
Multi-Unit User Operations.........49
Walkie-Talkie .............................56

Answering System

Answering System .....................59

Useful Information

Using the Belt Clip .....................71
Optional Headset .......................71
Wall Mounting ............................71
Before Requesting Help.............72
Character Table .........................75
Index ..........................................76
Technical Information.................77

Please read these Operating Instructions before using the unit 

and save for future reference.

Charge the batteries for about 7 hours before initial use.

Caller ID Compatible

Prepa

rat

ion

Cordl

ess Tel

e

phone

Usefu

l Inf
o

rmati

o

n

Answeri

ng System

510BX_e.book  Page 1  Thursday, June 5, 2003  9:43 PM

Summary of Contents for KX-TCD510BXM

Page 1: ...ngs Menu Chart 32 Handset Settings 34 Base Unit Settings 44 Multi Unit User Operations 49 Walkie Talkie 56 Answering System Answering System 59 Useful Information Using the Belt Clip 71 Optional Headset 71 Wall Mounting 71 Before Requesting Help 72 Character Table 75 Index 76 Technical Information 77 Please read these Operating Instructions before using the unit and save for future reference Charg...

Page 2: ...ee facility provides total ease and freedom of use Illuminated Keypad Lights up when there is an incoming call or you touch any key for easier operation even in the dark 200 20 Station Phonebook Stores 200 station names and numbers with the built in telephone directory of the handset to be recalled easily and stores 20 station names and numbers in the base unit for Audible Caller ID feature Multip...

Page 3: ...transmission This telephone was designed for a wide range of applications For example this telephone can be used within a network of base units and handsets constituting a telephone system which operates up to 6 handsets at one base unit allows an intercom between 2 handsets allows the operation of a handset at up to 4 base units expanding the communication radio area Caller ID Service where avail...

Page 4: ...rd Rechargeable Batteries AAA size HHR 4EPT BA2 P03P one one two Belt Clip Battery Cover Operating Instructions one Quick Guide one one one Additional accessories are available for purchase Contact your Panasonic Service Centre for further details 510BX_e book Page 4 Thursday June 5 2003 9 43 PM ...

Page 5: ...less than 5 C or greater than 40 C The AC adaptor is used as the main disconnect device Ensure that the AC outlet is located installed near the unit and is accessible Battery Caution 1 Use only the specified batteries 2 Only use rechargeable batteries 3 Do not mix old and new batteries 4 Do not dispose of batteries in a fire as they may explode Check local waste management codes for special dispos...

Page 6: ...dby mode display and are displayed above the soft keys Example Standby Mode Display To operate Phonebook press LEFT SOFT KEY To operate Menu press JOYSTICK directly as the middle soft key To operate Redial press RIGHT SOFT KEY When is displayed above a soft key the soft key will not work To select only Menu you can also select it moving the JOYSTICK up down left or right 7 1 0 3 6 2 4 8 9 5 Receiv...

Page 7: ...EYS Icon Function Icon Function Go Back Alphabet Menu Numeric Sub Menu Extended 1 OK Extended 2 Redial Greek Phonebook Russian New Phonebook Select Search Pause Key Lock Mute 12 24 Hour Clock Delete No Function LINE PAGE Button 510BX_e book Page 7 Thursday June 5 2003 9 43 PM ...

Page 8: ...e Display Press RIGHT SOFT KEY In this example the telephone number last dialled is displayed e g Go Back e g Display of menu items Press LEFT SOFT KEY In this example the display returns to the previous menu has the same function Press POWER TALK OFF Button Press this button for one or two times then the display returns to the standby mode any time To go to the next step The words in indicate the...

Page 9: ...aging Intercom While connecting with base unit Making or answering calls Call Bar ON Phonebook Mode Answering System ON Battery strength Direct Call ON Ringer Volume OFF Handset Name e g Handset 1 New call Caller ID only The line is being used by another handset for additional handset users Example Caller ID is selected Caller ID TAM Operation Handset Ringer Option Setting Handset Setting Base Uni...

Page 10: ...t the batteries are not charged To charge place the handset on the base unit Please charge the batteries for about 7 hours before initial use During charging the charge LED will light as shown below During charging Fully charged The handset which power is off will be turned on automatically when it is placed on the base unit The handset will not operate while it is on the base unit If you do not r...

Page 11: ...fully charged both batteries must be replaced Charge new batteries for approximately 7 hours before initial use The telephone line cord must not be connected to the telephone socket at this time When replacing the batteries be sure to set up the battery type even if you install the same type of batteries to initialise battery remaining memory of your handset See Setting the Battery Type on page 42...

Page 12: ...e Press Move Press Enter 4 digit Handset PIN Factory Preset 0000 Move Press All handset settings will be reset to their initial settings p 43 however the phonebook data will be saved Press and hold POWER When POWER is released the display changes to the standby mode Press and hold POWER The display goes blank 1 Press JOYSTICK or move 2 Select Setting Handset 3 Select Display Option 4 Select Select...

Page 13: ...ample To set 16 February 2003 7 15 pm To Select 12 24 Hour Clock 1 Press JOYSTICK or move 2 Select Setting Handset 3 Select Set Date Time 4 Enter the date see below 5 Enter the time see below 6 Press JOYSTICK Date Time Day Month Year Hour Minute 12 24 hour clock Press RIGHT SOFT KEY repeatedly 24 hour clock 12 hour clock AM 12 hour clock PM 510BX_e book Page 13 Thursday June 5 2003 9 43 PM ...

Page 14: ... you press and hold You can also press to make a call Answering a Call Terminating a Call You can also answer a call by pressing to or Any Key Talk Auto Talk If you set Auto Talk to ON you can answer a call by lifting the handset off the base unit See Setting Auto Talk ON OFF on page 42 1 Enter Phone Number 2 Press TALK 1 Press TALK 2 Enter Phone Number Press TALK During a call Press TALK OFF 510B...

Page 15: ...ternately with the caller in a quiet environment If either party has difficulty hearing move the JOYSTICK up or down to change the volume accordingly The choices for the speakerphone volume are 6 levels Muting Your Conversation During a call you can mute your phone so the other party cannot listen to you When muting your conversation you can hear the other party To Mute To Return to the Conversati...

Page 16: ... You can locate a misplaced handset by paging it Paging To Stop Paging You can also stop paging by pressing to or When the ringer volume is off p 37 44 the unit will ring at the lowest level Standby Mode Display Press and hold JOYSTICK directly for more than 2 seconds Press and hold JOYSTICK directly for more than 2 seconds once more Base Unit Press PAGE All Handsets All registered handsets ring f...

Page 17: ...ill automatically call back every 40 seconds up to 12 times When using Auto Redial press again after pressing if the mute has not been cancelled Recall Feature RECALL is used to access special telephone services Contact your Telephone company for details If your unit is connected to a PBX pressing allows you to access some features of your host PBX such as transferring an extension call Temporary ...

Page 18: ... Waiting Call Waiting is a service of your Telephone company and will only operate if you have subscribed to this service You can answer the second call keeping the first call on hold To Return to the First Caller If you subscribed to Caller ID and Call Waiting services your handset displays a second caller s phone number while talking If the phone number is stored in the phonebook with its name t...

Page 19: ...er s name will also be displayed To exit the operation press at any time You can also press to make a call indicates you have already viewed this caller information or answered the call If the caller has requested not to display his her information the display shows Private Caller If the caller dialled from an area which does not provide Caller ID service the display shows Out of Area If the items...

Page 20: ... phone number press to or at the desired item on step 3 or to delete a digit at the beginning of a phone number press at the desired item on step 3 Then go to step 6 Storing the Number in the Handset Phonebook 1 Press JOYSTICK or move 2 Select Caller ID 3 Select the desired item Go to step 4 Follow steps 1 to 3 shown above then 4 Select Edit for Call 5 Edit Phone Number max 24 digits 6 Press TALK ...

Page 21: ...ressing the display shows Memory Empty Storing the Number in the Handset Phonebook Follow steps 1 to 3 on the previous page then 4 Select Delete or Delete All 5 Select Yes then Deleted is displayed 1 Press RIGHT SOFT KEY 2 Select the desired item Go to step 3 Follow steps 1 and 2 shown above then 3 Select Save Phonebook 4 Enter Name p 26 max 16 characters 5 Press JOYSTICK twice twice 6 Select the ...

Page 22: ...m s Follow steps 1 and 2 on the previous page then 3 Select Edit for Call 4 Edit Phone Number max 24 digits 5 Press TALK or press JOYSTICK to call OR Follow steps 1 and 2 on the previous page then 3 Select Delete or Delete All 4 Select Yes then Deleted is displayed 510BX_e book Page 22 Thursday June 5 2003 9 43 PM ...

Page 23: ...e The factory preset LED colour is green The unit will indicate an incoming call using the factory preset LED colour green and the ringer pattern assigned to external calls p 37 momentarily until Caller ID information is received from the network provider Audible Caller ID Feature To use this feature you need to subscribe to Caller ID service For further information please contact your Telephone c...

Page 24: ...ook To continue storing other caller information repeat from step 4 1 Press LEFT SOFT KEY 2 Press JOYSTICK 3 Select H set Phonebook then the display shows the number of empty phonebook entries 4 Enter Name p 26 max 16 characters 5 Press JOYSTICK 6 Enter Phone Number max 24 digits 7 Press JOYSTICK 8 Select desired category or Off 9 Select Save then Saved is displayed 510BX_e book Page 24 Thursday J...

Page 25: ...g time is 0 To store delete unnecessary incoming memo messages p 64 To continue storing other caller information repeat from step 4 Follow steps 1 and 2 on the previous page then 3 Select Base Phonebook then the display shows the number of empty phonebook entries 4 Enter Name p 26 max 16 characters 5 Press JOYSTICK 6 Enter Phone Number max 24 digits 7 Press JOYSTICK 8 Select Start Recording 9 Reco...

Page 26: ...ght to move the cursor a flashing digit to Press to enter letters numbers Items are added to the left of the cursor If the cursor is at the beginning of a line the item is added at the beginning Press to delete characters Character on the cursor is deleted To delete all characters press and hold Press to change between upper and lower case Press to insert a blank space except when in Numeric input...

Page 27: ...Phonebook only 1 Press LEFT SOFT KEY To select the base unit phonebook press LEFT SOFT KEY again 2 Move the JOYSTICK up or down to search for the desired item 1 Press LEFT SOFT KEY To select the base unit phonebook press LEFT SOFT KEY again 2 Press 3 repeatedly until the first item under F is displayed 3 Move the JOYSTICK down until Felix is displayed 1 Press LEFT SOFT KEY 2 Press RIGHT SOFT KEY 3...

Page 28: ... base unit phonebook go to step 4 3 Select Index Search 4 Press RIGHT SOFT KEY repeatedly until the desired input mode Greek appears 5 Select the desired initial character Σ 6 Move the JOYSTICK down until ΣΟΦΙΑ is displayed 1 Press LEFT SOFT KEY To select the base unit phonebook press LEFT SOFT KEY again 2 Select the desired item see above and previous page 3 Press TALK or SPEAKERPHONE OR 510BX_e ...

Page 29: ...e editing other caller information repeat from step 2 1 Press LEFT SOFT KEY 2 Select the desired item 3 Select Edit 4 Edit Name max 16 characters 5 Press JOYSTICK 6 Edit Phone Number max 24 digits 7 Press JOYSTICK 8 Select the desired category or Off 9 Select Save then Saved is displayed 510BX_e book Page 29 Thursday June 5 2003 9 43 PM ...

Page 30: ...LEFT SOFT KEY twice twice 2 Select the desired item 3 Select Edit 4 Edit Name max 16 characters 5 Press JOYSTICK 6 Edit Phone Number max 24 digits 7 Press JOYSTICK 8 Select Start Recording If you do not change the recorded name select Skip Recording then go to step 11 If you delete the recorded name select Delete then go to step 11 9 Record the name within 1 minute 10 Press JOYSTICK 11 Select Save...

Page 31: ...h is selected press to select Overwrite Dialling with a Hot Key Deleting the Hot Key Registration Phonebook registration will not be erased when hot key registration is deleted 1 Press LEFT SOFT KEY 2 Select the desired item 3 Select Reg to Hot Key 4 Select the desired dialling button number 5 Select Save then Saved is displayed 1 Press and hold the dialling button registered as a hot key until a ...

Page 32: ...ing Tone Private Ring Tone Option Key Tone Display Option Standby Display Talk Display Select Language Private Colour Category Name Call Option Call Bar Direct Call No Direct On Off Registration Register H set Cancel Base Select Base Auto Base 1 Base 4 Other Option Change H S PIN Change H S Name Auto Talk Battery Type Reset Handset 510BX_e book Page 32 Thursday June 5 2003 9 43 PM ...

Page 33: ...ngs Menu Chart 1st Menu 2nd Menu 3rd Menu Setting Base Ringer Option Ringer Volume Call Option Dial Mode Recall Pause Time Emergency Call Call Restricted Cancel Handset Other Option Change Base PIN Reset Base 510BX_e book Page 33 Thursday June 5 2003 9 43 PM ...

Page 34: ...e date and time before setting the memo alarm p 13 1 Press JOYSTICK or move 2 Select Setting Handset 3 Select Memo Alarm 4 Select the desired alarm number 1 3 Go to step 5 Follow steps 1 to 4 shown above then 5 Select Once or Daily 6 Once Enter the date and time Daily Enter the time 7 Press JOYSTICK 8 Enter a memo message max 32 characters p 26 then press JOYSTICK 9 Select the desired ringer patte...

Page 35: ...e To Stop the Alarm You can also stop the alarm by pressing to or If Once is selected the setting is turned off When in talk or intercom mode the alarm will not sound until the call is ended Follow steps 1 to 4 on the previous page then 5 Select Off 6 Select Save then Saved is displayed The Alarm sounds Max 3 minutes Press 510BX_e book Page 35 Thursday June 5 2003 9 43 PM ...

Page 36: ...he melody ringer patterns the phone will ring for 10 seconds even if a caller has hung up Therefore you may hear a dial tone or no one on the line after you answer a call Ringer No Ringer Pattern or Name 1 6 Bell Patterns Ringer Pattern 7 to 15 Preset Melody Patterns 7 Symphony No 5 in C minor 8 Air on G String 9 Wholetemperiere Clavier 1 Teil No 1 Fuga Das 10 Fantaisie Impromptu 11 Allegro Spring...

Page 37: ...attern for Private Ring The factory preset of each ringer pattern is 1 1 Press JOYSTICK or move 2 Select Ringer Option 3 Select Ringer Volume 4 To increase volume move the JOYSTICK up To decrease volume move the JOYSTICK down 5 Press JOYSTICK Follow steps 1 to 2 shown above then 3 Select EXT Ringer Type INT Ringer Type or Paging Tone 4 Select the desired ringer pattern Follow steps 1 to 2 shown ab...

Page 38: ... Mode Display The factory preset is Handset Name 1 Press JOYSTICK or move 2 Select Setting Handset 3 Select Tone Option 4 Press JOYSTICK to select Key Tone 5 Select On or Off 1 Press JOYSTICK or move 2 Select Setting Handset 3 Select Display Option Go to step 4 Follow steps 1 to 3 of Display Options shown above then 4 Select Standby Display 5 Select Base Number Handset Name or Off 510BX_e book Pag...

Page 39: ...nging the Private Category Name Follow steps 1 to 3 of Display Options on the previous page then 4 Select Talk Display 5 Select Talk Time or Phone Number Follow steps 1 to 3 of Display Options on the previous page then 4 Select Private Colour 5 Select the desired category 6 Select Private Colour Green Red or Orange for each category Follow steps 1 to 3 of Display Options on the previous page then ...

Page 40: ...en turned on you can dial only the direct call number by pressing or When this feature is ON emergency calls cannot be made However incoming calls can be answered While the direct call mode is turned on is displayed 1 Press JOYSTICK or move 2 Select Setting Handset 3 Select Call Option Go to step 4 Follow steps 1 to 3 shown above then 4 Select Call Bar 5 Enter 4 digit Handset PIN Factory Preset 00...

Page 41: ... is 0000 Follow steps 1 to 3 on the previous page then 4 Select Direct On Off 5 Select On or Off 1 Press JOYSTICK or move 2 Select Setting Handset 3 Select Other Option Go to step 4 Once you have programmed the handset PIN you cannot confirm it We recommend you write down the handset PIN If you forget it please consult your nearest Panasonic Service Centre Follow steps 1 to 3 shown above then 4 Se...

Page 42: ...6 Press JOYSTICK Follow steps 1 to 3 on the previous page then 4 Select Auto Talk 5 Select On or Off Follow steps 1 to 3 on the previous page then 4 Select Battery Type 5 Select Ni Cd or Ni MH You can reset all of the handset settings to their initial settings 1 Press JOYSTICK or move 2 Select Setting Handset 3 Select Other Option 4 Select Reset Handset 5 Enter 4 digit Handset PIN Factory Preset 0...

Page 43: ...Handset Alarm Tone Pattern 1 Key Tone ON Standby Mode Display Handset Name Talk Mode Display Talk Time Display Language English Call Bar Mode OFF Direct Call Mode OFF Direct Call Number Delete 4 Digit Handset PIN 0000 Auto Talk OFF Select Base Automatic Base Unit Selection Redial Memory Delete All Handset Receiver Volume Medium Walkie Talkie Setting Group Phonebook List Remain LED Colour of Privat...

Page 44: ... Base 3 Enter 4 digit Base Unit PIN Factory Preset 0000 4 Select Ringer Option 5 Select Ringer Volume 6 To increase volume move the JOYSTICK up To decrease volume or set to OFF move the JOYSTICK down 3 levels 7 Press JOYSTICK 1 Press JOYSTICK or move 2 Select Setting Base 3 Enter 4 digit Base Unit PIN Factory Preset 0000 4 Select Call Option Go to step 5 on the next page 510BX_e book Page 44 Thurs...

Page 45: ...h mode to suit your PBX or Telephone company The factory preset is Flash Type 1 100 ms Type 2 600 ms Type 3 300 ms The factory preset is Type 2 Selecting the Pause Time You can select the pause time to 3 or 5 seconds depending on your PBX requirements The factory preset is Short Follow steps 1 to 4 of Call Options on the previous page then 5 Select Dial Mode 6 Select Tone or Pulse Follow steps 1 t...

Page 46: ...write the current displayed numbers We recommend you to write down the restricted phone number you entered Follow steps 1 to 4 of Call Options on page 44 then 5 Select Emergency Call 6 Select Emergency Call1 to Emergency Call5 7 Enter Emergency Call Number 8 Press JOYSTICK Follow steps 1 to 4 of Call Options on page 44 then 5 Select Call Restricted 6 Search and press RIGHT SOFT KEY to attach or ca...

Page 47: ... to step 5 Once you have programmed the base unit PIN you cannot confirm it We recommend you write down the base unit PIN If you forget it please consult your nearest Panasonic Service Centre Follow steps 1 to 4 shown above then 5 Select Change Base PIN 6 Enter new 4 digit Base Unit PIN 7 Enter new PIN again to verify You can reset all of the base unit settings to their initial settings Follow ste...

Page 48: ...andset s Delete All Call Restriction Number s Delete All 4 Digit Base Unit PIN 0000 Base Unit Ringer Volume Medium Caller ID List Delete All Date Time 31 12 03 00 00 Answering System ON Your Own Greeting Message Remain Caller s Recording Time No Limit Number of Rings 4 Rings Greeting Monitor ON Remote Code Delete OFF Incoming Memo Message s Remain 510BX_e book Page 48 Thursday June 5 2003 9 43 PM ...

Page 49: ... the individual bases are linked to the same telephone line then you can extend the operating range of the system by positioning the bases so that the two radio cells overlap If the handset is set to auto base selection then in standby mode the handset will automatically swap to the second base if the range on the first base is exceeded It is not possible to transfer calls between bases only betwe...

Page 50: ...ct Base Unit PIN the error tone sounds and repeat from step 1 The handset main menu may change corresponding to the base unit registered to 1 Press JOYSTICK or move 2 Select Setting Handset 3 Select Registration 4 Select Register H set 5 Press and hold on the Base Unit for about 3 seconds until the tone sounds If all registered handset s start ringing paging press to stop paging then start over ag...

Page 51: ...led handset Therefore you need to cancel the base unit registered in the cancelled handset To exit the operation press at any time 1 Press JOYSTICK or move 2 Select Setting Base 3 Enter 4 digit Base Unit PIN Factory Preset 0000 4 Select Cancel Handset 5 Search and press RIGHT SOFT KEY to attach to the handset s to cancel 6 Press JOYSTICK Follow steps 1 to 3 on the previous page then 4 Select Cance...

Page 52: ...ation press at any time Intercom Between Handsets You can use your handsets as a 2 way intercom Intercom calls can be conducted within the radio cell of the current base unit but not with units in neighbouring radio cells To exit the operation press at any time For example when Handset 1 calls Handset 2 You can also answer a call by pressing to or instead of pressing Any Key Talk Terminating a Cal...

Page 53: ... If you press after pressing the desired handset number a call can be transferred to another handset without speaking to another handset If the transferred call is not answered within 60 seconds Handset 1 will ring again When Handset 2 answers a call transferred press to complete a call transfer or press to establish a conference call Handset 1 Handset 2 During a call 1 Press INTERCOM then press t...

Page 54: ...m Between Handsets on page 52 To exit the operation press at any time Copying an Item Handset 1 Receiver Handset 2 Sender During an intercom call During an intercom call 1 Press JOYSTICK 2 Select Recv Phonebook Start Copying is displayed 3 Press JOYSTICK 4 Select Send Phonebook 5 Select the desired item to copy 6 Select Copy One Item then Start Copying is displayed 510BX_e book Page 54 Thursday Ju...

Page 55: ...iver handset memory is full If Copy Failure is displayed on the sender handset the receiver and or sender did not prepare for copying within 60 seconds If you move the JOYSTICK up or down before pressing JOYSTICK at step 5 all items will not be copied The items from the item indicated now to the last item are copied Follow steps 1 to 4 on the previous page then Handset 1 Receiver Handset 2 Sender ...

Page 56: ... while in Walkie Talkie mode is up to 300 metres outdoors Setting the Walkie Talkie Mode You can set the Walkie Talkie mode There are two types Common Base Station mode and Group mode The factory preset is Group mode In Common Base Station mode communication is possible between handsets registered to a common base unit If the handsets are registered to more than one base unit the same base unit mu...

Page 57: ...he factory preset of Handset Number is 1 1 Press JOYSTICK or move 2 Select Walkie Talkie 3 Select Setting 4 Select Common or Group When Group was selected 5 Enter 3 digit Group Code Factory Preset 000 6 Press JOYSTICK 7 Enter Handset Number 1 9 Factory Preset is 1 8 Press JOYSTICK twice twice IMPORTANT Each handset should have its own unique number 510BX_e book Page 57 Thursday June 5 2003 9 43 PM...

Page 58: ...off if you turn power off then on Talking in Walkie Talkie Mode Before proceeding with this function please ensure Walkie Talkie mode is turned on and the appropriate Walkie Talkie mode has been selected For example Handset 1 is calling Handset 2 To exit the operation press at any time You can also answer a call by pressing to or instead of pressing Any Key Talk 1 Press JOYSTICK or move 2 Select W...

Page 59: ...mmend you to record a brief greeting message in order to leave more time for recording new incoming memo messages All messages greeting incoming and memo are stored indefinitely on a Flash memory IC chip even if a power failure occurs All of the messages are saved until you erase them Flash Memory Message Backup Answering System ON OFF When you set the answering system ON a caller can leave his he...

Page 60: ...Select Record 4 Select Record OGM 5 Record Greeting Message 20 cm away from the Mic 6 Press JOYSTICK to finish recording then the recorded message is played back Follow steps 1 to 2 shown above then 3 Select Setting TAM 4 Select Msg Rec Time 5 Select 1 Minute or No Limit up to 30 minutes or Greeting Only no incoming messages will be recorded 510BX_e book Page 60 Thursday June 5 2003 9 43 PM ...

Page 61: ... after the beep We will return your call When the recording time is set to Greeting Only Hello we are not available now Please call again Thank you for your call Deleting Your Own Greeting Message You can also delete your own greeting message by pressing then selecting Yes during playback see Playing back Pre Recorded Your Own Greeting Message on this page 1 Press JOYSTICK or move 2 Select TAM Ope...

Page 62: ...telephone If the unit answers on the 2nd ring there is at least one new message If the unit answers on the 5th ring there are no new messages Hang up when you hear the 4th ring This will save you the toll charge for the call The factory preset is 4 Rings 1 Press JOYSTICK or move 2 Select TAM Operation 3 Select Setting TAM 4 Select Number of Rings 5 Select Auto or 2 Rings to 7 Rings to select the n...

Page 63: ...k to the speaker press Playing All Incoming Memo Messages Repeating a Message During Playback Skipping a Message During Playback Stopping a Message During Playback If new mesage s is are recorded icon and the number of messages will be displayed 1 Press JOYSTICK or move 2 Select TAM Operation 3 Select Play New Msg 1 Press JOYSTICK or move 2 Select TAM Operation 3 Select Play All Msg During a messa...

Page 64: ...es Calling back to the Caller During a message playback 1 Move the JOYSTICK up or down During a message playback 1 Press JOYSTICK 2 Select Delete 3 Select Yes then Deleted is displayed 1 Press JOYSTICK 2 Select TAM Operation 3 Select Delete Message 4 Select Delete All 5 Select Yes then Deleted is displayed During a message playback 1 Press JOYSTICK 2 Select Call Back 510BX_e book Page 64 Thursday ...

Page 65: ...g recorded you can listen to it through the handset The factory preset is On During a message playback 1 Press JOYSTICK 2 Select Edit for Call 3 Edit Phone Number max 24 digits 4 Press JOYSTICK TALK or SPEAKERPHONE 1 Press JOYSTICK or move 2 Select TAM Operation 3 Select Setting TAM 4 Select Greet Monitor 5 Select On or Off OR OR 510BX_e book Page 65 Thursday June 5 2003 9 43 PM ...

Page 66: ...message playback Press To delete one incoming memo message 1 Press To delete all incoming memo messages Follow steps 1 to 2 shown above then Press To enter the answering system setting menu Press To playback new incoming memo message s Press To playback all incoming memo messages Press To playback a greeting message Press To record a memo message Press To record your own greeting message Press To ...

Page 67: ...rn on the answering system from any touch tone phone If your remote code is not stored you cannot turn on the answering system remotely 1 Press JOYSTICK or move 2 Select TAM Operation 3 Select Setting TAM 4 Select Remote Code 5 Enter 3 digit Remote Code 6 Press JOYSTICK Follow steps 1 to 5 shown above then 6 Press x 7 Press JOYSTICK 1 Call from a touch tone phone then wait for 10 rings 2 Enter Rem...

Page 68: ...eting message playback 3 Enter Remote Code 4 The number of new message s is played 5 Voice menu starts after 3 seconds Follow the guidance see next page OR Enter your desired direct remote command see below Command Function Repeat message during playback Skip message during playback New message playback All message playback Check greeting message Record Greeting message recording Stop operating An...

Page 69: ... minutes the remaining recording time is announced Press 1 to playback new messages Press 2 for other functions New message playback Press 1 to record your message Press 2 for other functions Please leave your message Talk after you hear this message Hang up to finish recording Press 1 to erase all messages Press 2 for other functions No message Press 1 to record your greeting Press 2 for other fu...

Page 70: ...party that the conversation is being recorded 1 Press JOYSTICK or move 2 Select TAM Operation 3 Select Record 4 Select Record Memo 5 Record Memo Message 20 cm away from the Mic 6 Press JOYSTICK During a call 1 Press JOYSTICK twice to start recording then Recording is displayed 2 Press JOYSTICK to stop recording 510BX_e book Page 70 Thursday June 5 2003 9 43 PM ...

Page 71: ...e Optional Headset to the Handset Open the headset jack cover and connect the optional headset to the headset jack as shown This unit can be mounted on a wall Insert screws into the wall The centre of the screw holes should be 8 cm horizontally apart Connect the AC adaptor and the telephone line cord Arrange the wires as shown then mount the unit Make sure the screws are securely fastened to the w...

Page 72: ... blank Handset not turned on Turn on power p 12 Display is blank even if the unit is charged Battery low Recharge batteries more than about 15 minutes p 10 Handset will not turn on Batteries not inserted Batteries not charged Insert the 2 rechargeable batteries supplied Place handset on base and connect AC adaptor to base and AC outlet full charge period 7 hrs p 10 Battery charge icon not counting...

Page 73: ...l manually p 17 No Caller ID number displayed Service not supplied Caller has withheld info Caller ID service must be arranged with Telephone company p 19 icon flashes Battery low Recharge batteries p 10 Cannot register handset to base Max number of bases already registered to handset Max number of handsets already registered to base unit Wrong PIN number entered Default 0000 Electrical noise in l...

Page 74: ...er the correct remote code Press each button firmly Turn on the answering system p 68 p 59 67 Cannot operate the answering system with the handset Someone is operating the answering system You are too far from the base unit Retry when other user has finished operation Move closer to the base unit While recording a greeting message the unit starts to ring and stops recording A call is being receive...

Page 75: ...75 Useful Information Character Table Phonebook Character Table x x 1 2 3 4 5 6 7 8 9 0 510BX_e book Page 75 Thursday June 5 2003 9 43 PM ...

Page 76: ...ling Pause 18 Direct Call Number 40 Display Language 12 Standby Mode 38 Talk Mode 39 Emergency Calls 46 Flash Earth Mode 45 Handset Display 9 Initial Settings 43 Locator Paging 16 PIN 41 Registration 50 Reset 42 Ringer Pattern 37 Ringer Volume 37 Hands Free Phone 15 Headset optional 71 Intercom 52 Key Lock 16 Tone 38 Making a Call 14 Memo Alarm 34 Mute 15 Pause Time 45 Phonebook Copy 54 Dialling 2...

Page 77: ...Profile Number of channels 120 Duplex Channels Frequency range 1 88 GHz to 1 9 GHz Duplex procedure TDMA Time Division Multiple Access Channel spacing 1728 kHz Bit rate 1152 kbit s Modulation GFSK RF Transmission power Approx 250 mW Voice coding ADPCM 32 kbit s Power source AC Adaptor 220 240 V 50 Hz Power consumption base unit Standby Approx 3 5 W Maximum Approx 9 2 W Operating conditions 5 40 C ...

Page 78: ...510BX_e book Page 78 Thursday June 5 2003 9 43 PM ...

Page 79: ...510BX_e book Page 79 Thursday June 5 2003 9 43 PM ...

Page 80: ...ssential requirements of the R TTE Directive is available at the following web address http doc panasonic tc de For your future reference Serial No Date of purchase found on the bottom of the base unit Name and address of dealer 1999 5 EC Technical specifications are subject to change Panasonic Communications Co Ltd 1 62 4 chome Minoshima Hakata ku Fukuoka 812 8531 Japan 0436 PQQX13707ZA D0603 0 5...

Reviews: