background image

Operating Instructions

DECT Portable Station

Model No.    

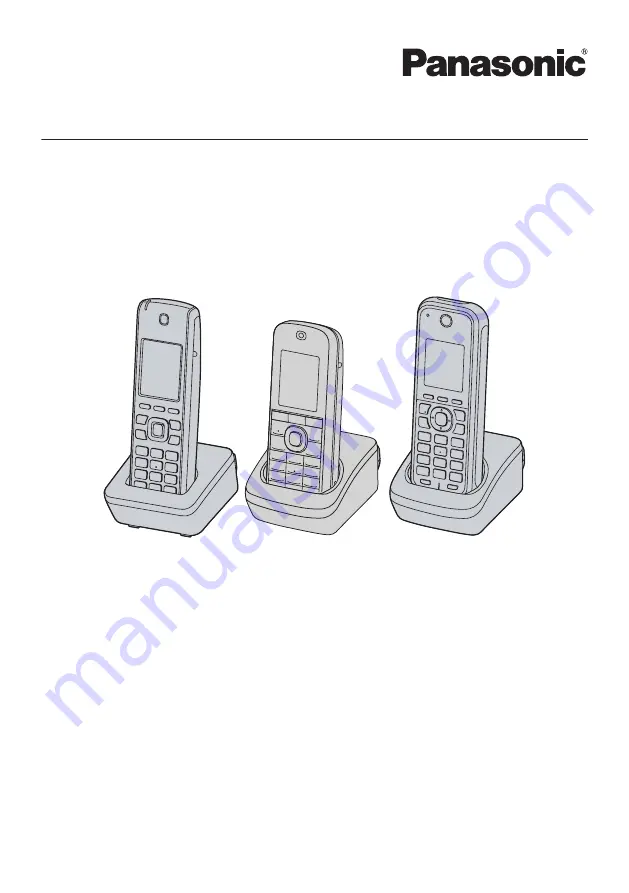
KX-TCA185/KX-TCA285/KX-TCA385

KX-TCA185

KX-TCA385

KX-TCA285

Thank you for purchasing this Panasonic product.
Please read this manual carefully before using this product and save this manual for future
use.
KX-TCA385’s handset meets IP65 classification.

For KX-TCA185:
Please use only the batteries provided and charge the batteries for about 7 hours before using
the handset for the first time. For details, see "Charging the Battery/Batteries" on Page 74
in this manual.

For KX-TCA285/KX-TCA385:
Please use only the battery provided and charge the battery for about 3 hours before using
the handset for the first time. For details, see "Charging the Battery/Batteries" on Page 74
in this manual.

Document Version: 2013-10

Summary of Contents for KX-TCA185

Page 1: ...ets IP65 classification For KX TCA185 Please use only the batteries provided and charge the batteries for about 7 hours before using the handset for the first time For details see Charging the Battery...

Page 2: ...ures described in this document may not be available in your country or area Consult a certified Panasonic dealer for more information Related Documentation Quick Guide Briefly describes basic informa...

Page 3: ...chase to aid in identification in the event of theft MODEL NO SERIAL NO DATE OF PURCHASE NAME OF DEALER DEALER S ADDRESS DEALER S TEL NO Trademarks R The Bluetooth word mark and logos are registered t...

Page 4: ...book and vCard Transfer by Bluetooth 53 Deleting Stored Items in Handset Phonebook Hot Key Dial Outgoing Call Log Incoming Call Log 55 Assigning Hot Keys 57 Entering Characters 58 Locking the Handset...

Page 5: ...and describe the type of instructions to be observed This symbol is used to alert users to a specific operating procedure that must not be performed This symbol is used to alert users to a specific op...

Page 6: ...tely shielded from external RF radio frequency energy The product operates in the frequency range of 1880 MHz to 1900 MHz and the output peak power level is less than 0 25 W When using Bluetooth devic...

Page 7: ...te For KX TCA285 KX TCA385 only Do not touch released electrolyte if the battery leaks It may cause burns or injury to the eyes or skin The electrolyte is toxic and may be harmful if swallowed If you...

Page 8: ...basement or near a swimming pool R Do not use the telephone in the vicinity of a gas leak to report the leak R Do not mix old and new batteries For KX TCA185 only SAVE THESE INSTRUCTIONS Information...

Page 9: ...be set to make automatic calls to the Telecom 111 Emergency Service PTC General Warning R The grant of a Telepermit for any item of terminal equipment indicates only that Telecom has accepted that th...

Page 10: ...swimming pools R 999 and 112 can be dialled on the product after accessing the outside line for the purpose of making outgoing calls to the BT emergency 999 and 112 services For users in Singapore on...

Page 11: ...ght Bluetooth KX TCA285 KX TCA385 only R A Bluetooth headset can communicate with the handset within a range of approximately 10 m The connection may be subject to interference from obstructions such...

Page 12: ...urs The battery strength icon will then display the correct reading R Please use only Panasonic batteries For details consult your administrator or dealer R There is a danger of explosion if the batte...

Page 13: ...of the Ni MH batteries by charging and discharging several times one after another Ni MH batteries can also self discharge This self discharge depends on the ambient temperature At temperatures under...

Page 14: ...A185CE KX TCA185RU PNLV226CE KX TCA185UK PNLV226E KX TCA185AL PNLV226AL KX TCA185X PNLV226 Charger 1 Battery 1 2 Battery Cover 2 1 Belt Clip 1 Belt Clip Holder 1 1 Rechargeable AAA Ni MH 1 2 V 700 mAh...

Page 15: ...CE KX TCA285UK PNLV226E KX TCA285AL PNLV226AL KX TCA285X PNLV226 Charger 1 Battery 1 1 Battery Cover 2 1 Belt Clip 1 Belt Clip Holder 1 1 For details consult your administrator or dealer 2 The battery...

Page 16: ...RU PNLV226CE KX TCA385UK PNLV226E KX TCA385AL PNLV226AL Charger 1 Battery 1 1 Battery Cover 2 1 Belt Clip Replacement Cover 1 1 For details consult your administrator or dealer 2 The battery cover com...

Page 17: ...Location of Controls KX TCA185 The headset is an optional accessory Open the cover INT INT FLEX Back View 17 Before Operating the Telephone...

Page 18: ...KX TCA285 The headset is an optional accessory Open the cover INT Back View KX TCA385 INT Back View 18 Before Operating the Telephone...

Page 19: ...standby mode pressing the keys perform the following functions LEFT Used to perform various common functions quickly UP Used to display the Incoming call log RIGHT Used to display the Flexible Key lis...

Page 20: ...O Charge Contacts P Strap Holes Used to attach phone straps and similar items Q Speaker 20 Before Operating the Telephone...

Page 21: ...ys other than the Navigator Key while the handset is in standby mode One of 4 key lock types can be selected For details see Key Option on Page 66 To lock Press and hold or the CENTRE navigation key f...

Page 22: ...so increased according to the level of environmental noise It is useful in noisy environments such as warehouses manufacturing plants restaurants and garages Noise Reduction can be toggled on off duri...

Page 23: ...splay Name You can edit the name displayed when the handset is in standby mode 1 Press or the CENTRE navigation key 2 Select Setting Handset by pressing the arrow keys and then press 3 Select Display...

Page 24: ...luetooth headset connection KX TCA285 KX TCA385 only Bluetooth on Bluetooth headset connected KX TCA285 KX TCA385 only Incoming Call Log Outgoing Call Log Navigation Key Guidance Handset Status Inform...

Page 25: ...number and Name Soft Keys For more information see Page 26 Note R Example images of the display in this manual are samples only and the actual screen on your phone may vary in colour and or appearanc...

Page 26: ...ok while receiving a call Returns to the previous display Displays the caller information stored in the system while receiving a call Opens the list menu edit delete in the Phonebook etc Establishes a...

Page 27: ...splayed on the handset in one of the two following ways If the caller s information is stored in the PBX that information can be displayed If the caller s information is stored in the handset that inf...

Page 28: ...splay menu and selected with the Navigator Key and soft keys Handset Phonebook Incoming Call Log 1 Outgoing Call Log PBX System Phonebook PBX Extension Phonebook Group Log Function Keys In standby mod...

Page 29: ...item in the Phonebook Setting Handset Accesses the Setting Handset setting PBX Program Enters PBX Personal Programming mode For PBX Personal Programming refer to the user documentation for your PBX P...

Page 30: ...cts the current call and allows you to make another call without hanging up 6 Pause Inserts a dialling pause 7 H S Phonebook Makes a call using the Handset Phonebook 8 PBX Phonebook Makes a call using...

Page 31: ...urrently using this line flashing rapidly You have an incoming call on this line An outside call is coming in on a single extension flashing slowly You have a call on hold on this line Red On This lin...

Page 32: ...ect Display Option by pressing the arrow keys and then press 4 Select Standby Display by pressing the arrow keys and then press 5 Press or to select the desired item and then press Note R By default H...

Page 33: ...set the Ringer Type to 1 2 9 30 or 32 and the Vibrate setting to Vib Ring R For details about setting the ringer pattern see Incoming Option on Page 64 Adjusting the Ringer Volume or Turning the Ring...

Page 34: ...nsion number 3 Talk To an outside party Using the Line Access Numbers 1 Press 2 Enter 0 or 9 Or enter 8 and then dial an outside line group number 3 Dial an outside party s phone number 4 Talk Using F...

Page 35: ...ge 51 2 This step can be omitted Using the PBX System Phonebook 1 2 1 Press 2 Press 3 Enter a name 3 4 Press 5 Select an item stored in the phonebook and then press 6 Talk 1 When a call is made using...

Page 36: ...ou press and then enter 0 you can skip Step 2 To dial 1 Press 2 Press 3 Select a One touch Dialling key by pressing the arrow keys and then press 4 Talk Hot Key Dialling 1 1 Press the dialling key ass...

Page 37: ...information may be transmitted to unauthorised parties R You can also answer a call using the following features Any Key Answer See Answer Option on Page 66 Quick Answer See Answer Option on Page 66...

Page 38: ...stination answers press Holding a Call To hold Regular Hold 1 Press 2 Press To hold Exclusive Call Hold 1 Press 2 Press 3 Press To retrieve a call An Intercom Call 1 Press INT 2 Talk An Outside Call 1...

Page 39: ...Three party Conference To add another party during a conversation 1 Press during a conversation 2 Enter 3 3 Dial the party you want to add to the conversation 4 After the called party answers press 5...

Page 40: ...side line access number an outside phone number and then enter 6 Press 1 If you enter 7 or 8 in Step 4 enter your extension number and then you can skip Step 5 2 If you enter 0 in Step 4 you can skip...

Page 41: ...e Key to the clear message waiting indications feature for One touch operation To register 1 Press or the CENTRE navigation key 2 Select PBX Program by pressing the arrow keys and then press 3 Press 4...

Page 42: ...Bluetooth to connect to a cell phone you must set the Bluetooth PIN number in the handset settings 1 Press or the CENTRE navigation key 2 Select Setting Handset by pressing the arrow keys and then pr...

Page 43: ...ne Bluetooth headset can be registered to the handset Registering a new Bluetooth headset overwrites the current registration R Up to 4 digits can be entered for the Bluetooth headset s PIN number Der...

Page 44: ...he handset or the TALK key on the Bluetooth headset 3 To end a call press on the handset or the TALK key on the Bluetooth headset Answering a Call Using a Bluetooth Headset 1 Press on the handset or t...

Page 45: ...o select Cell Phone and then press 5 Press or to select Registration and then press 6 If the Register Deregister menu is displayed press or to select Register and then press Otherwise proceed to step...

Page 46: ...ok see Searching for an item stored in the Phonebook on Page 51 Note We recommend that you keep a copy of your Handset Phonebook in case data becomes unrecoverable due to product malfunction Private R...

Page 47: ...nt to assign a default number The first number entered for an entry will automatically be assigned as the default number R The valid digits are 0 through 9 P R If an item with the same name and number...

Page 48: ...you do not want to assign a default number The first number entered for an entry will automatically be assigned as the default number R To enter characters see Page 58 Storing an Item Using the Outgoi...

Page 49: ...ntry name max 24 characters phone number max 32 digits R To search for an item in the Phonebook see Page 51 Storing an Item Using the PBX Extension Phonebook 1 Press 2 Press 3 Press 4 Enter a name 1 5...

Page 50: ...5 Select the desired category number 1 9 by pressing the arrow keys and then press 6 Enter a name max 13 characters 7 Press 50 Using the Handset Phonebook...

Page 51: ...an enter up to 5 characters Corresponding names appear as the characters are entered Searching by category 1 Press 2 Press 3 Select the desired category number by pressing the arrow keys and then pres...

Page 52: ...ected the next entry will be displayed PBX Extension Phonebook Scrolling through all items 1 Press 2 Press 3 Press 4 Press 5 Press or repeatedly Searching by name or first character s of name 1 Press...

Page 53: ...ofile to use this function To transfer the phonebook data of an unregistered cell phone to the handset 1 Press or the CENTRE navigation key 2 Select Setting Handset by pressing the arrow keys and then...

Page 54: ...ed corresponds with existing data in the handset the phonebook item will not be transferred Also phonebook entries without any phone numbers entered will not be transferred to the handset R If multipl...

Page 55: ...All if you want to delete all items R To search for an item in the Phonebook see Page 51 Hot Key Dial 1 Press the dialling key for more than 1 second 2 Press or to select the desired item 3 Press 4 P...

Page 56: ...3 Press or to select the desired item 4 Press 5 Press or to select Delete 6 Press 7 Select Yes 8 Press 56 Using the Handset Phonebook...

Page 57: ...umber and then press 8 Press 1 This step can be omitted R To search for an item in the Phonebook see Page 51 Selecting the Type of Hot Key Dialling You can select one of 2 types of Hot Key Dialling fo...

Page 58: ...A a B b C c Alphabetic Numeric Greek Extended 2 Extended 1 Example To enter Anne in Alphabet Mode R To switch between uppercase and lowercase press R To enter a character located on the same dialling...

Page 59: ...j k l 5 j k l 5 M N O 6 6 m n o 6 P Q R S 7 7 p q r s 7 T U V 8 8 t u v 8 8 W X Y Z 9 9 w x y z 9 0 R Press before or after entering a character to change between uppercase and lowercase R Pressing a...

Page 60: ...for more than 2 seconds will be displayed Unlocking the Handset Phonebook 1 Press for more than 2 seconds 2 Enter your password 1 3 You can view the Phonebook and use it to make calls 4 Press 1 To cha...

Page 61: ...d Memo Alarm is available only when the handset is within range of a CS Select the alarm mode Once Daily 1 Press or the CENTRE navigation key 2 Select Memo Alarm by pressing the arrow keys and then pr...

Page 62: ...You can select the ringer LED vibrate pattern for each Memo Alarm See Incoming Option on Page 64 R If you are on a call at the time that the alarm is set to sound it will sound after you have ended t...

Page 63: ...inger Talk Option Noise Reduction Speaker Volume Receiver Volume Headset Volume 1 Headset Mic Vol 1 Talk On Charger Answer Option Any Key Answer Quick Answer Auto Answer Auto Ans Delay Key Option Flex...

Page 64: ...Lock Change PIN H S Information Bluetooth Option On Off 2 Cell Phone 2 BT Headset 2 Other Option Change Password Line Access CD Reset Handset 1 KX TCA185 KX TCA285 only 2 KX TCA285 KX TCA385 only Inco...

Page 65: ...ing Off Ring On Charger Selects the ringing mode On or Off while a handset is set on the charger 2 On On Off Memo Alarm Ringer Pattern Selects the ringer pattern for each Memo Alarm Ringtone 1 19 25 3...

Page 66: ...her or not to continue the conversation when the handset is put on the charger during a conversation On Off Off 1 KX TCA185 KX TCA285 only Answer Option Sub Item Description Setting Default Any Key An...

Page 67: ...on Key Hot Key Dial 2 Soft Key Name Softkey A Softkey B Softkey C Edits the names of the soft keys Standby Talking Max 5 characters Not stored Key Lock Type Selects the type of key lock Manual Manual...

Page 68: ...lects what is shown on the display while in standby mode 1 Handset Number Handset Number Base H S No Edit Off Edits the name displayed on the LCD while in standby mode Max 16 characters Not stored Cat...

Page 69: ...e Alarm Selects whether the range alarm tone rings or not On On Off System Option Sub Item Description Setting Default Register H S Registers a handset to a base Base 1 4 Not stored Cancel Base 1 Canc...

Page 70: ...th headset Level 1 6 Level 3 1 If you set an International code Country code and or National Access code phone numbers that include will be converted to include in the international or national call p...

Page 71: ...sily guessed Change the password regularly 2 Make a note of the password so that you will not forget it 3 If a password has not already been set you can skip the first step 4 The default setting for K...

Page 72: ...the battery cover insert the battery and close the cover as indicated below KX TCA185 KX TCA285 KX TCA385 R Confirm that the slide switch has been returned to its original position when the cover is...

Page 73: ...aptor For details see Included Accessory on Page 14 or later WARNING R To reduce the risk of fire or electric shock do not overload AC outlets and extension cords R Do not bundle the charger s AC adap...

Page 74: ...tery for about 3 hours before using the handset for the first time R The charge indicator will turn off when batteries are fully charged For more information about charging batteries see Battery Infor...

Page 75: ...ated here use the measurement indicated here R When mounting the charger ensure that the correct screws are used for the type of wall R Make sure that the wall that the charger will be attached to is...

Page 76: ...strap hole and then loop it around the hook Attaching the Belt Clip KX TCA185 KX TCA285 only You can attach the handset to your belt by following the steps below 1 Insert the clip into the designated...

Page 77: ...belt clip KX TCA385 The belt clip is attached to the handset before shipment You can remove the attached belt clip by following the steps below 1 Remove the screw with a screwdriver 2 Remove the belt...

Page 78: ...hours Dimensions Width Depth Height Handset only 48 2 mm 25 4 mm 146 3 mm Handset on charger 71 9 mm 71 3 mm 159 7 mm Handset only 48 5 mm 17 9 mm 127 5 mm Handset on charger 63 0 mm 78 0 mm x 140 0...

Page 79: ...equency Band 1880 MHz to 1900 MHz Number of Carriers 10 Transmission Output Average 10 mW Peak 250 mW RF Specifications Bluetooth 1 Item Specifications Frequency Band 2 4000 GHz to 2 4835 GHz Class Cl...

Page 80: ...00 or later KX TDA600 PLMPR Software File Version 5 0000 or later KX TDE100 KX TDE200 PMMPR Software File Version 1 0000 or later KX TDE600 PGMPR Software File Version 2 0000 or later KX TDA0158CE sof...

Page 81: ...rophone is facing the wrong direction or is obstructed during the conversation The front of the handset should face you and the microphone should not be covered For details see Location of Controls on...

Page 82: ...properly R Make sure the battery is inserted properly R Set the handset in the charger properly R Consult your dealer You charged the KX TCA285 KX TCA385 battery for 3 hours or the KX TCA185 batterie...

Page 83: ...and then turn it on and try again I cannot have a conversation using a Bluetooth headset For KX TCA285 KX TCA385 The Bluetooth headset is not registered to the handset Register the Bluetooth headset t...

Page 84: ...tails see Registering a Bluetooth Headset on Page 42 Some Bluetooth headset features are not functioning For KX TCA285 KX TCA385 The handset does not support enhanced features such as last number redi...

Page 85: ...Outgoing Call Log No logs have been stored Memory Full The Phonebook is full and cannot store the new item Remove unnecessary data in the Phonebook and try again Incorrect Entry The numbers you enter...

Page 86: ...X TCA385 16 Wall mounting 75 Conference 39 Controls locations of 17 KX TCA185 17 KX TCA285 18 KX TCA385 18 D Deregistering a Cell Phone 45 Display language 31 Do Not Disturb DND 40 E Error messages 85...

Page 87: ...n 70 System Option 69 Talk Option 66 Tone Option 69 Shortcut Combinations 30 Silent Mode 21 Soft Keys 26 Speaker volume 33 Specifications 78 Standby display number 32 System Requirements 80 T Text ent...

Page 88: ...1 62 4 chome Minoshima Hakata ku Fukuoka 812 8531 Japan Panasonic System Networks Co Ltd 2013 PNQX6173YA PP0613TM1103...

Reviews: